'%3e%3cpath%20d='M150.127%20195.325C233.04%20195.325%20300.255%20168.696%20300.255%20135.848C300.255%20103%20233.04%2076.3709%20150.127%2076.3709C67.2143%2076.3709%200%20103%200%20135.848C0%20168.696%2067.2143%20195.325%20150.127%20195.325Z'%20fill='white'/%3e%3cpath%20d='M231.093%20118.256L150.117%20-0.000183105L69.1527%20118.256C68.1365%20119.748%2067.5967%20121.294%2067.5967%20122.871C67.5967%20136.017%20104.538%20146.666%20150.117%20146.666C195.697%20146.666%20232.638%20136.007%20232.638%20122.871C232.638%20121.294%20232.098%20119.748%20231.082%20118.256H231.093Z'%20fill='%2301A9F2'/%3e%3cpath%20d='M150.106%20356.844L98.7265%20281.5L62.3035%20311.117L25.4253%20257.017L50.787%20239.721L68.8556%20266.226L105.279%20236.62L150.106%20302.363L194.934%20236.62L231.357%20266.226L270.045%20209.48L295.407%20226.776L237.898%20311.117L201.475%20281.5L150.106%20356.844Z'%20fill='white'/%3e%3cpath%20d='M592.168%20165.22V237.908H561.482V171.825C561.482%20153.884%20551.807%20143.034%20535.051%20143.034C516.644%20143.034%20505.318%20156.011%20505.318%20175.604V237.908H474.875V171.349C474.875%20153.407%20464.968%20142.791%20448.445%20142.791C429.804%20142.791%20418.711%20156.011%20418.711%20176.07V237.908H388.025V118.964H418.711V134.301C426.502%20122.033%20440.421%20115.418%20458.13%20115.418C477.014%20115.418%20490.7%20122.975%20498.247%20135.953C506.747%20123.208%20521.608%20115.418%20540.725%20115.418C572.819%20115.418%20592.179%20135.476%20592.179%20165.22H592.168Z'%20fill='white'/%3e%3cpath%20d='M899.48%2080.2534C899.48%2068.2182%20909.388%2059.4856%20920.248%2059.4856C931.574%2059.4856%20941.248%2068.9274%20941.248%2080.2534C941.248%2091.3465%20931.574%20100.788%20920.248%20100.788C909.155%20100.788%20899.48%2092.0557%20899.48%2080.2534Z'%20fill='white'/%3e%3cpath%20d='M935.832%20118.955H905.146V237.899H935.832V118.955Z'%20fill='white'/%3e%3cpath%20d='M1140.2%20118.955H1173L1099.84%20288.644H1067.5L1090.6%20237.666L1043.42%20118.955H1076.45L1107.37%20204.81L1140.18%20118.955H1140.2Z'%20fill='white'/%3e%3cpath%20d='M883.182%20115.418H815.904C781.45%20115.418%20755.008%20137.837%20755.008%20171.825C755.008%20206.756%20778.846%20228.466%20815.904%20228.466C831.951%20228.699%20847.288%20231.059%20847.288%20246.64C847.288%20259.617%20835.962%20267.175%20817.555%20267.175C799.148%20267.175%20784.985%20254.664%20781.915%20239.326L756.66%20246.873C763.741%20274.722%20787.346%20292.188%20817.312%20292.188C856.963%20292.188%20876.313%20272.838%20876.313%20249.233C876.313%20234.605%20869.231%20223.036%20855.545%20215.721C868.522%20206.047%20877.022%20190.709%20877.022%20171.825C877.022%20160.986%20871.412%20149.3%20863.145%20140.674H883.182V115.418ZM815.904%20203.919C797.264%20203.919%20782.392%20192.117%20782.392%20171.825C782.392%20151.534%20799.148%20139.964%20815.904%20139.964C832.66%20139.964%20849.416%20151.29%20849.416%20171.825C849.416%20188.814%20835.497%20203.919%20815.904%20203.919Z'%20fill='white'/%3e%3cpath%20d='M737.426%20237.906V118.962H708.158V136.088C698.685%20121.481%20682.796%20115.426%20668.983%20115.426C633.587%20115.426%20608.087%20143.509%20608.087%20179.148C608.087%20214.788%20633.1%20241.452%20668.03%20241.452C682.426%20241.452%20698.24%20235.08%20708.148%20220.917V237.906H737.415H737.426ZM673.471%20213.835C653.645%20213.835%20638.308%20199.207%20638.308%20178.429C638.308%20157.65%20653.889%20143.032%20673.704%20143.032C694.705%20143.032%20709.1%20160.021%20709.1%20178.429C709.1%20196.836%20694.472%20213.835%20673.46%20213.835H673.471Z'%20fill='white'/%3e%3cpath%20d='M1003.29%20111.085C1003.29%2098.5315%201011.17%2091.8842%201023.98%2091.8842C1028.9%2091.8842%201033.83%2092.6251%201037.77%2093.853L1042.2%2068.0043C1038.02%2066.7765%201027.43%2064.7971%201021.27%2064.7971C994.18%2064.7971%20972.607%2081.786%20972.607%20110.355V118.961H956.889V144.216H972.607V164.519V237.915H1003.29V144.216H1038.46V118.961H1003.29V111.096V111.085Z'%20fill='white'/%3e%3c/g%3e%3cdefs%3e%3cclipPath%20id='clip0_1_3'%3e%3crect%20width='1173'%20height='356.842'%20fill='white'/%3e%3c/clipPath%3e%3c/defs%3e%3c/svg%3e)

Google Ads3
This guide will help you connect a Google Ads data grabber to the Magify analytics system.The grabber collects data on ad assets, geo performance, and other account-level metrics, enabling automated data import into your analytics pipeline.
Getting Started
- Go to:
Configurations > Integration > UA Grabbersand select Google Ads from the list. - Click the Add Grabber button to create a new data source.
This will open a configuration form where you can enter the required connection parameters. Below is a description of each field, along with instructions on where to find the necessary values.
Name
The name of the grabber configuration in the Magify system. It helps you identify this data source among other integrations.
Recommended format: Use a clear and descriptive name, for example:
Google Ads – Your CompanyGoogle Ads – UA TrackerGoogle Ads – Promo App
Client ID and Client Secret
These are the two key parameters required for authorization via OAuth 2.0 — the protocol used by the grabber to access the Google Ads API on behalf of your project.
How to get them:
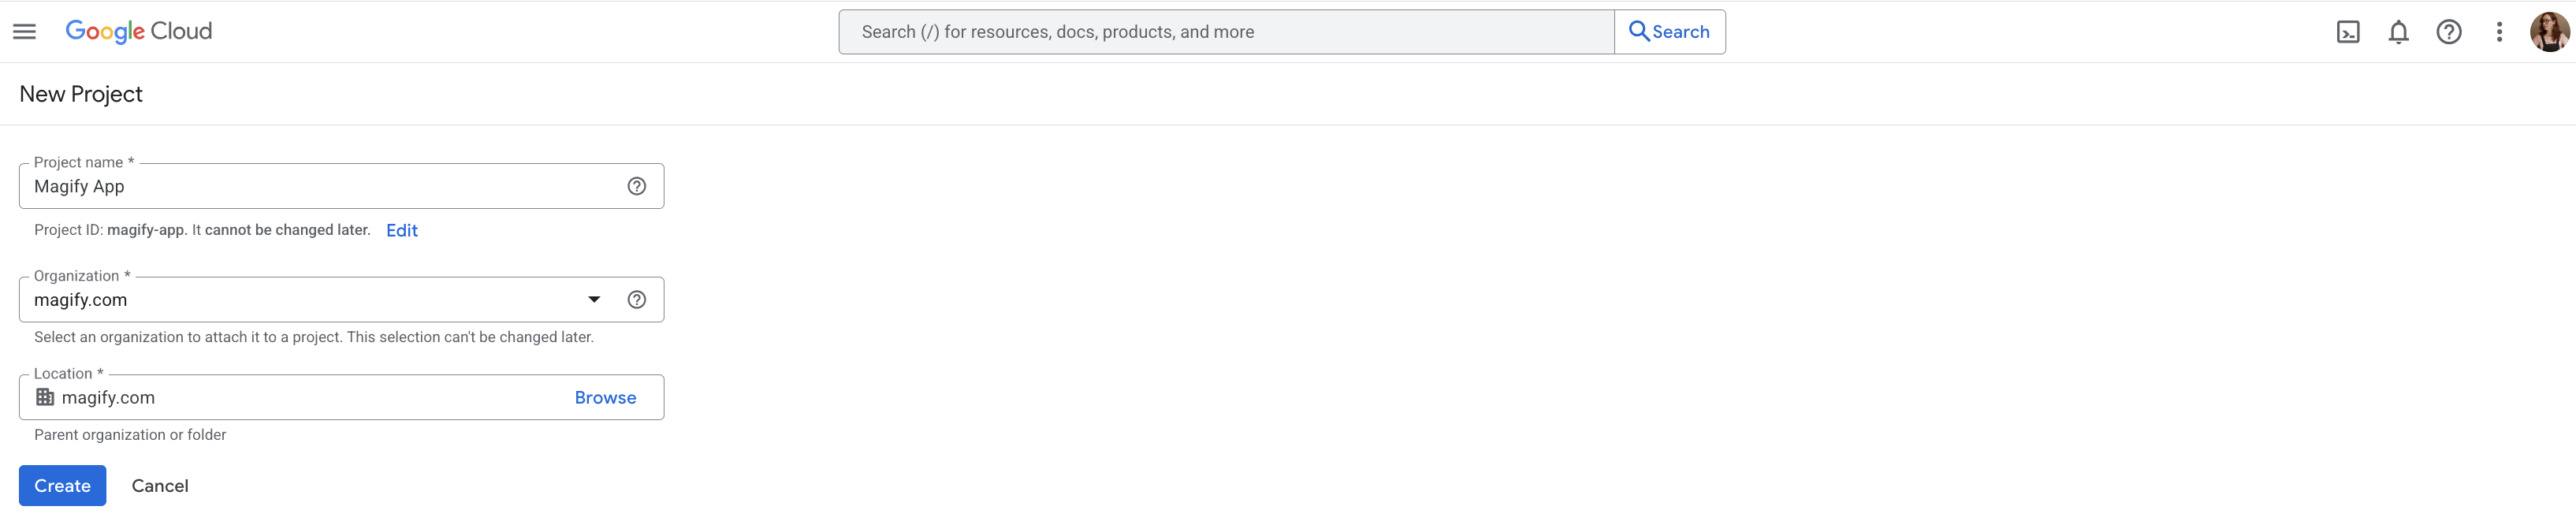
- Go to the Google Cloud Console.
- In the top menu, click Select a project, and either:
- choose an existing project, or
- click New project to create a new one.
If you don't have a project in Google Cloud Console yet, follow these steps:
- Click New project in the top right corner of the project selection window.
- In the popup window, provide the following:
- Project name — enter any descriptive name (e.g., Your Application Name).
- Optionally, select your organization and folder, if applicable.
- Click Create.

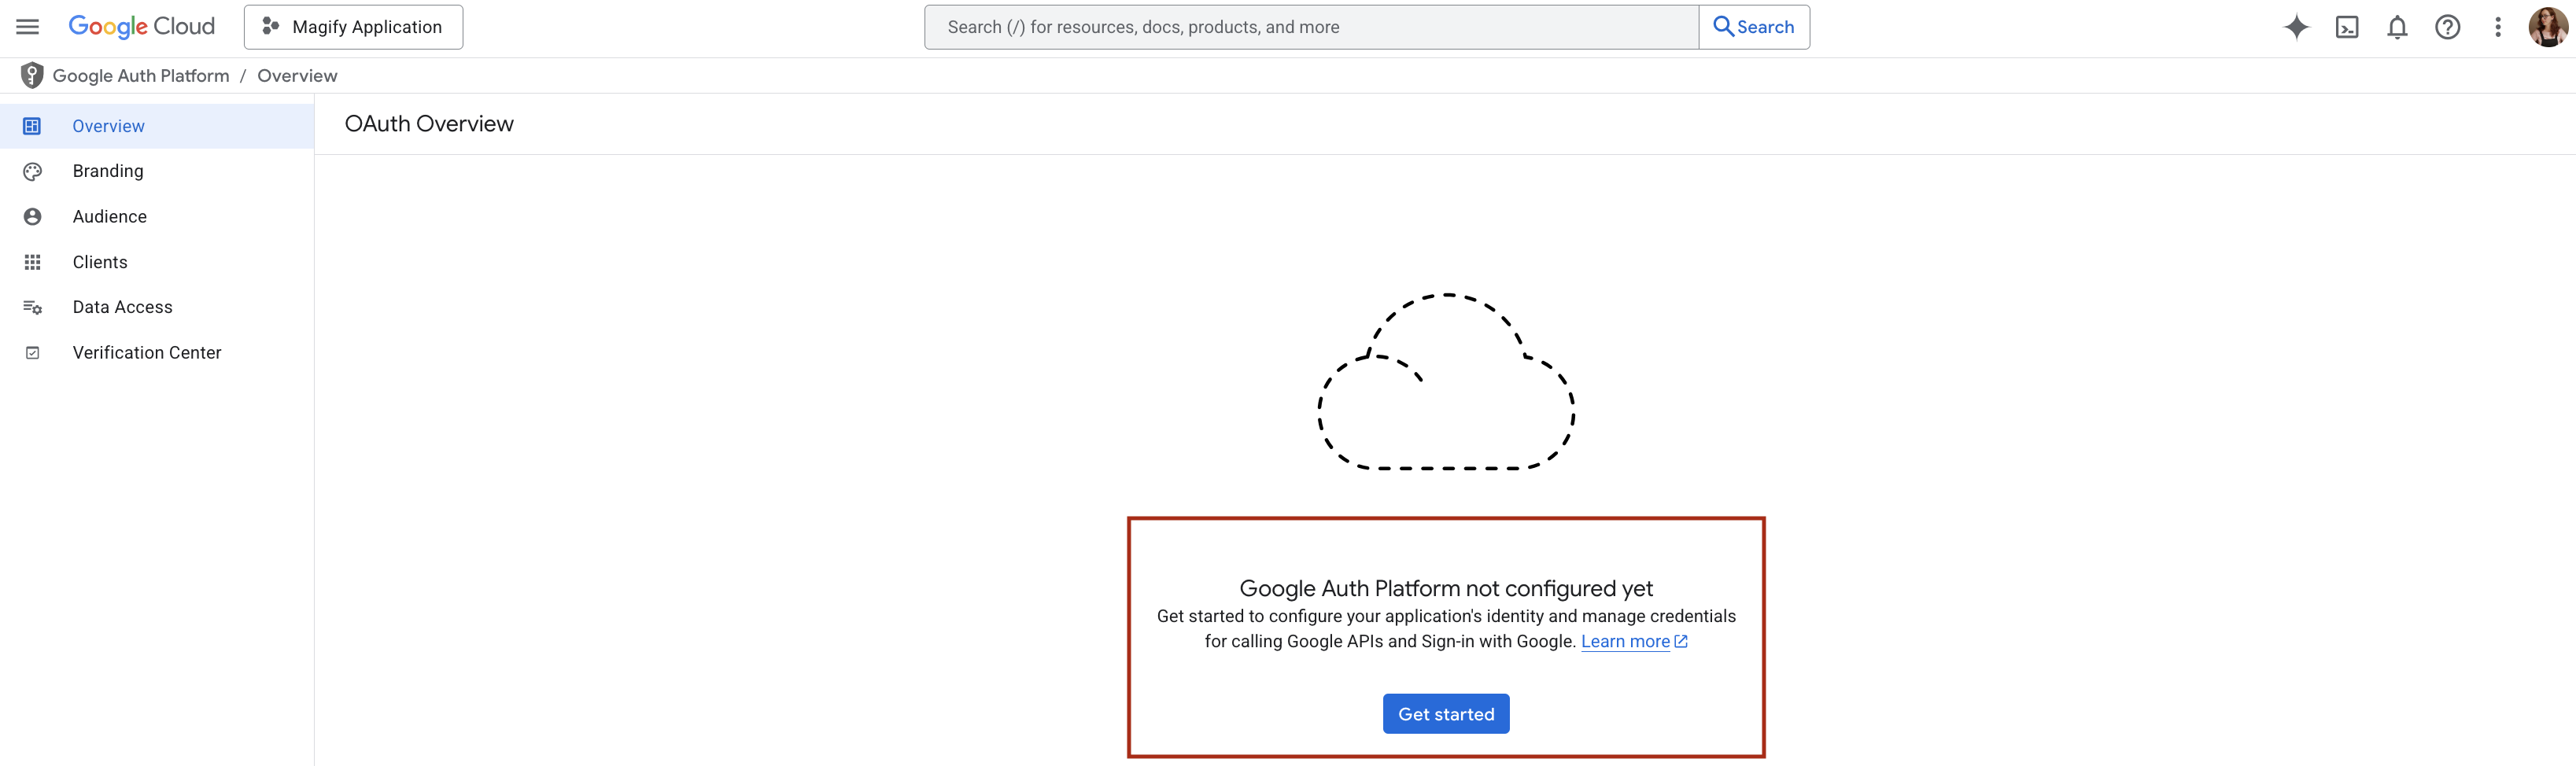
- Once you’ve selected or created a project, you need to configure the consent screen that will be linked to your OAuth client:
- In Google Cloud Console, go to APIs & Services → OAuth consent screen.
- On the page that opens, click Get Started.
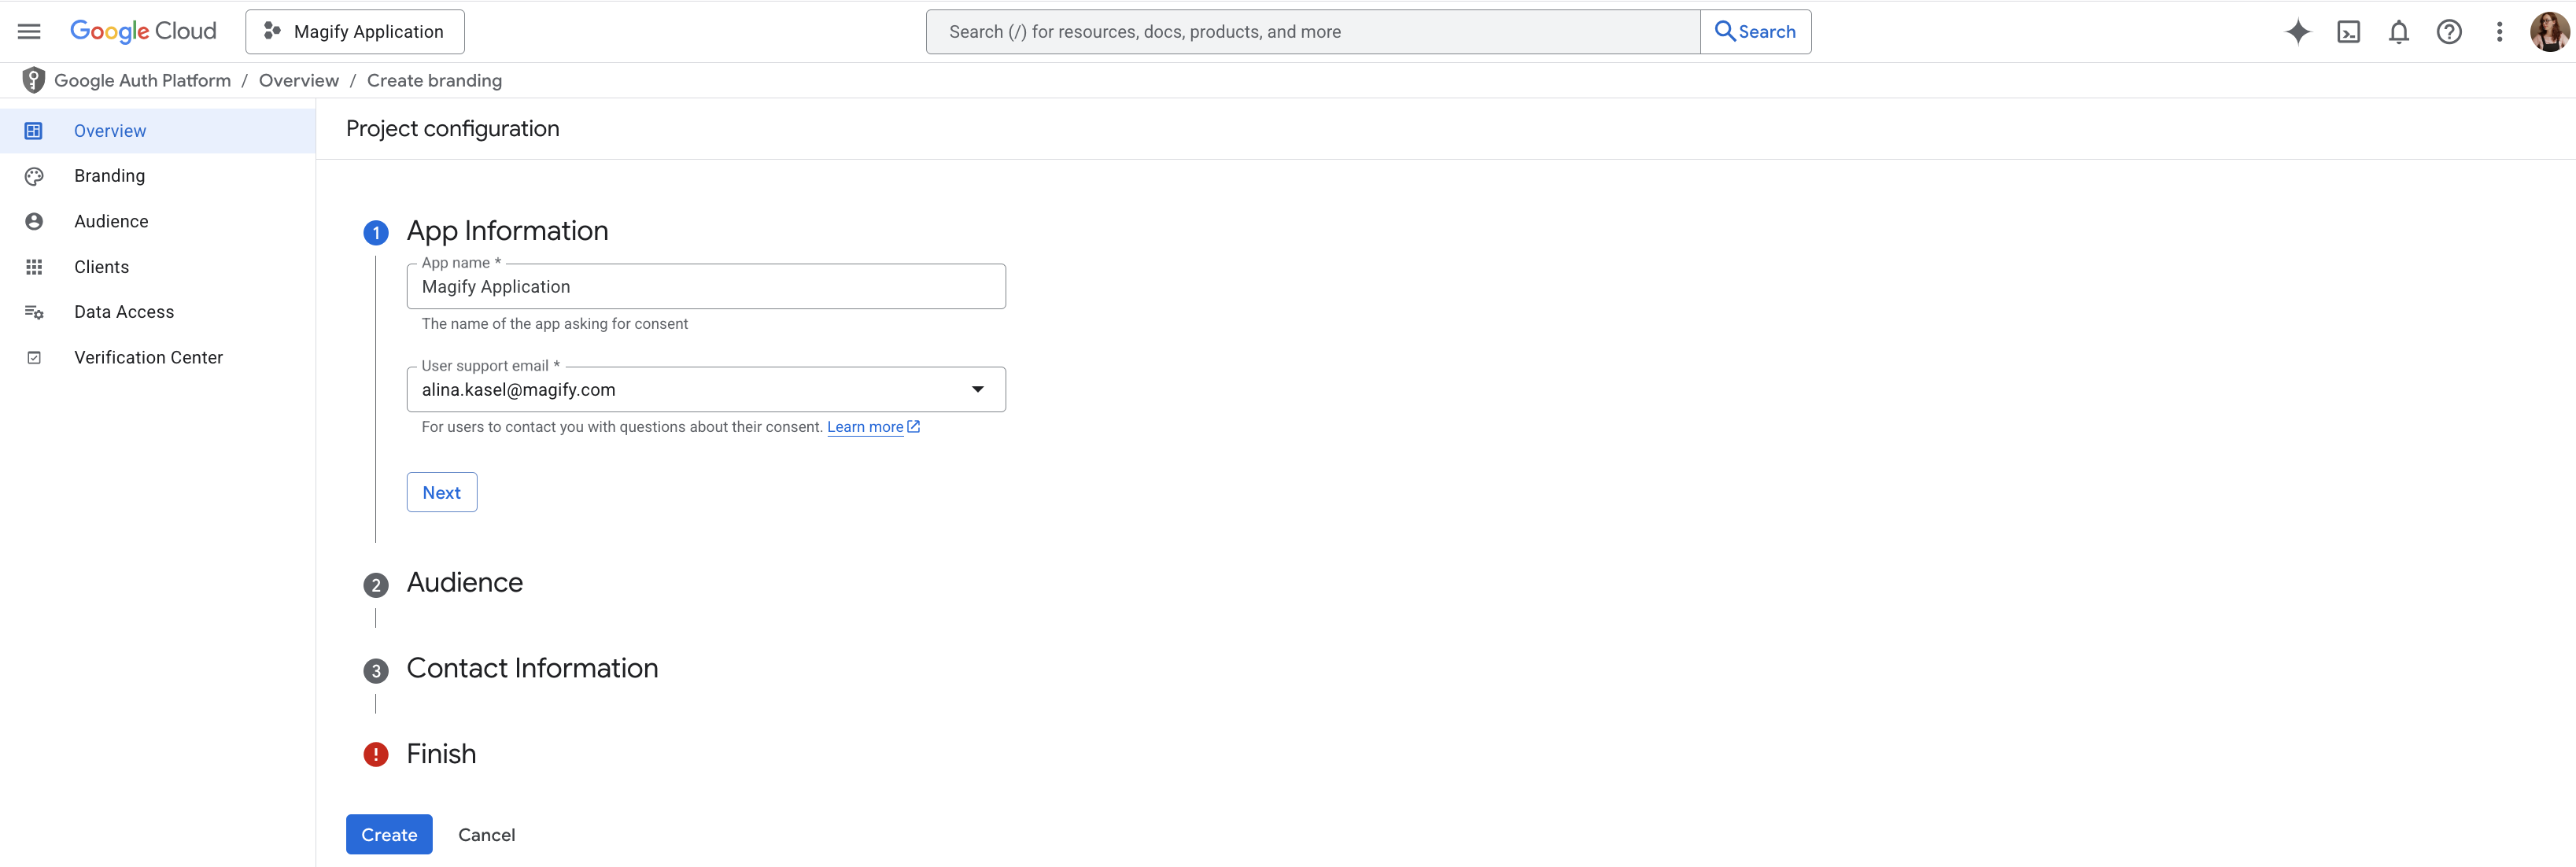
- A step-by-step configuration form will open:Fill out the App Information section:
- App name — the name that will be displayed to users. For example: Magify Application
- User support email — the support contact email (for user inquiries).
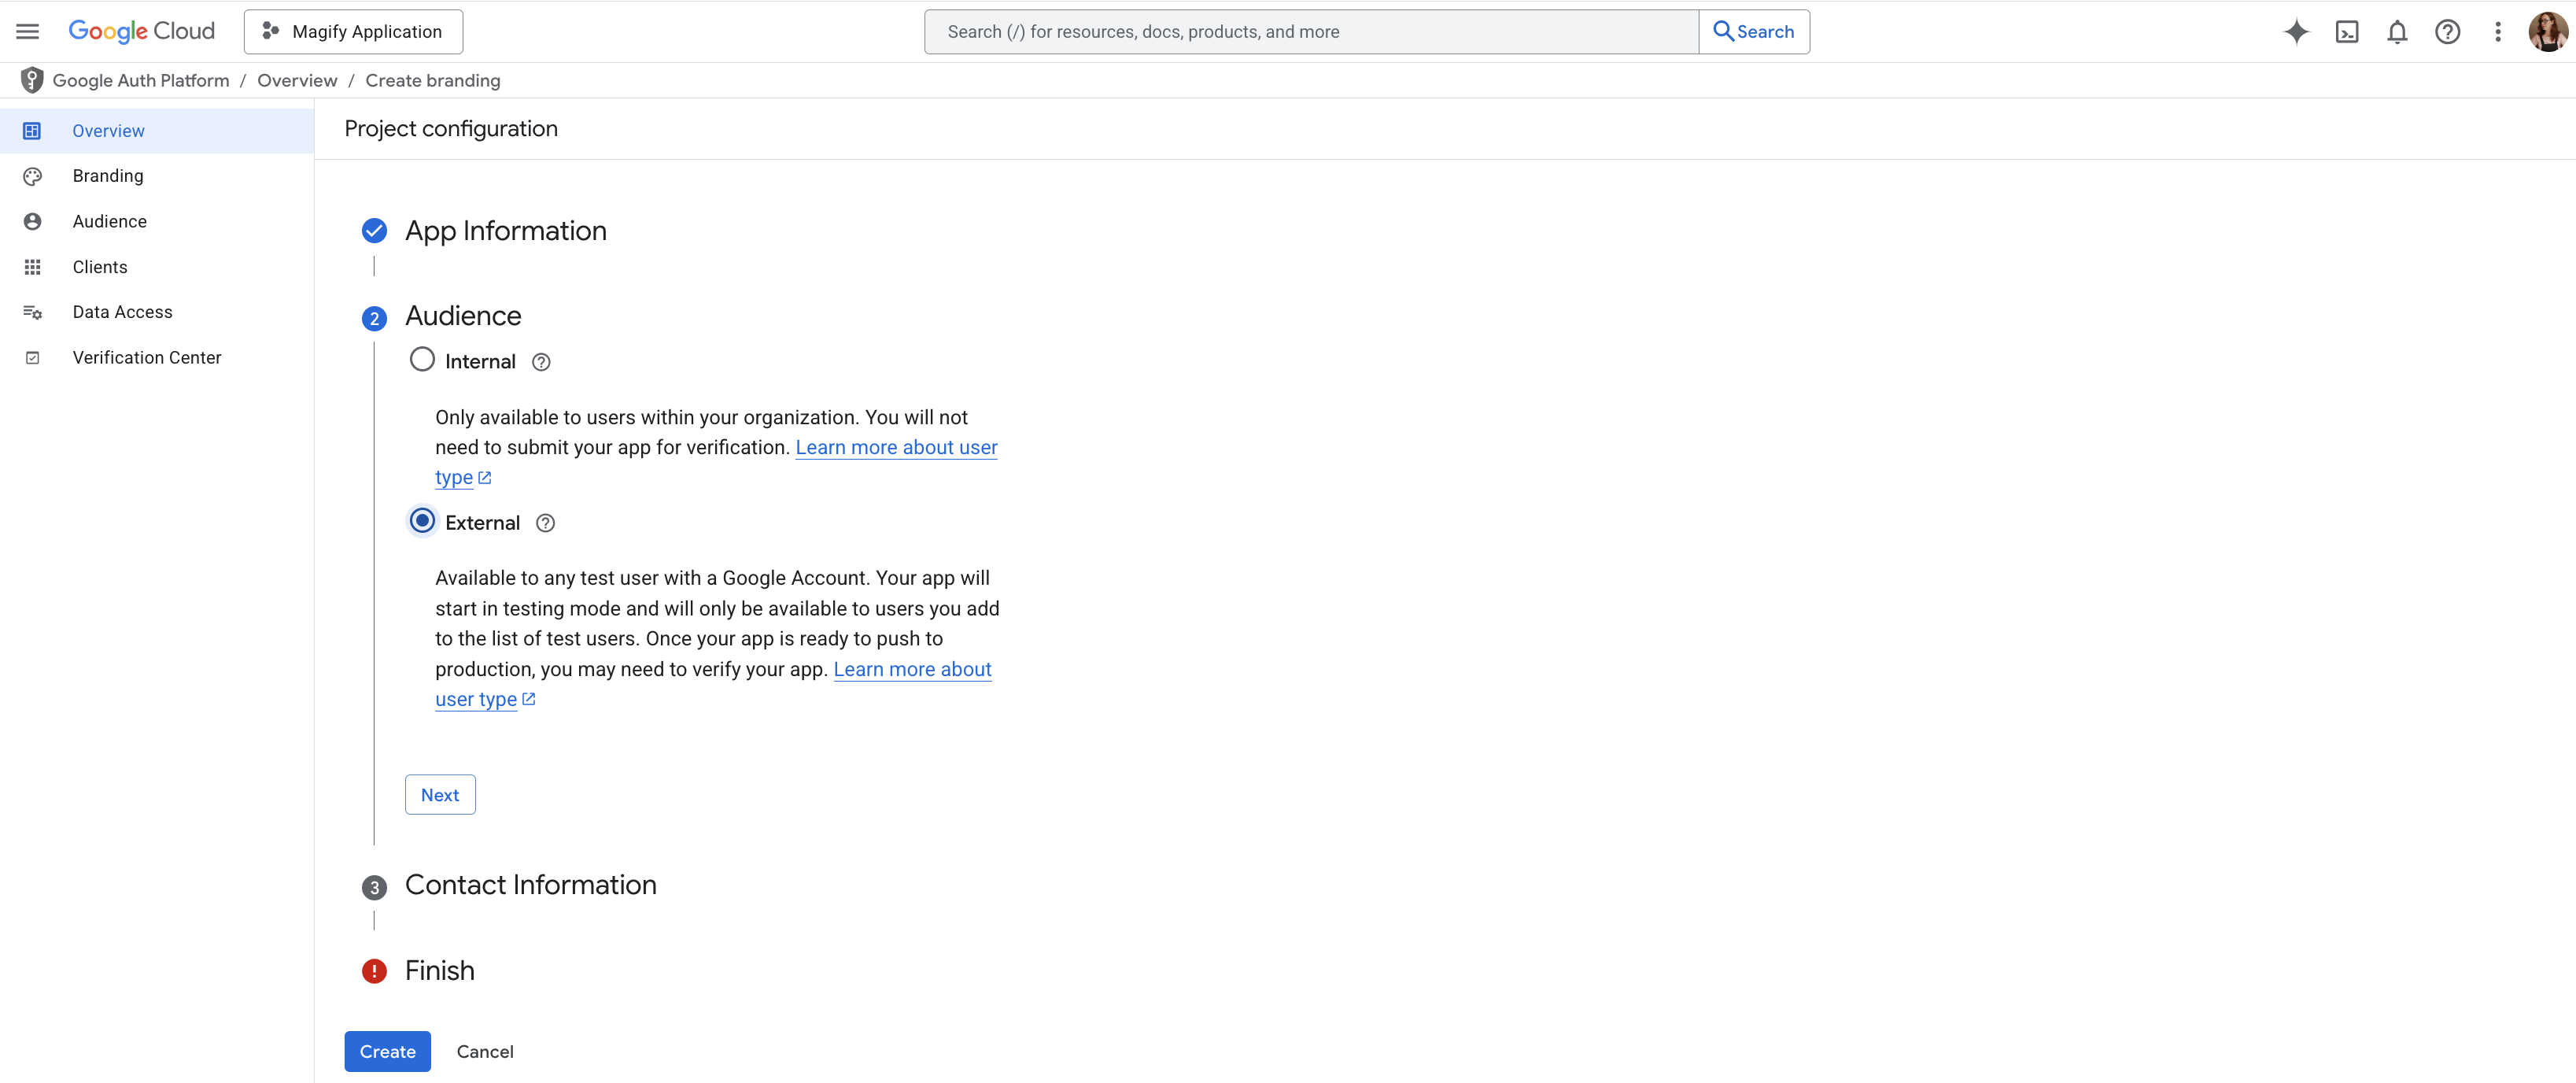
Choose the user type (Audience):
- External — select this if the integration will be used outside your organization. This is the default and most common option.
- Internal — only available for Google Workspace accounts within your organization.
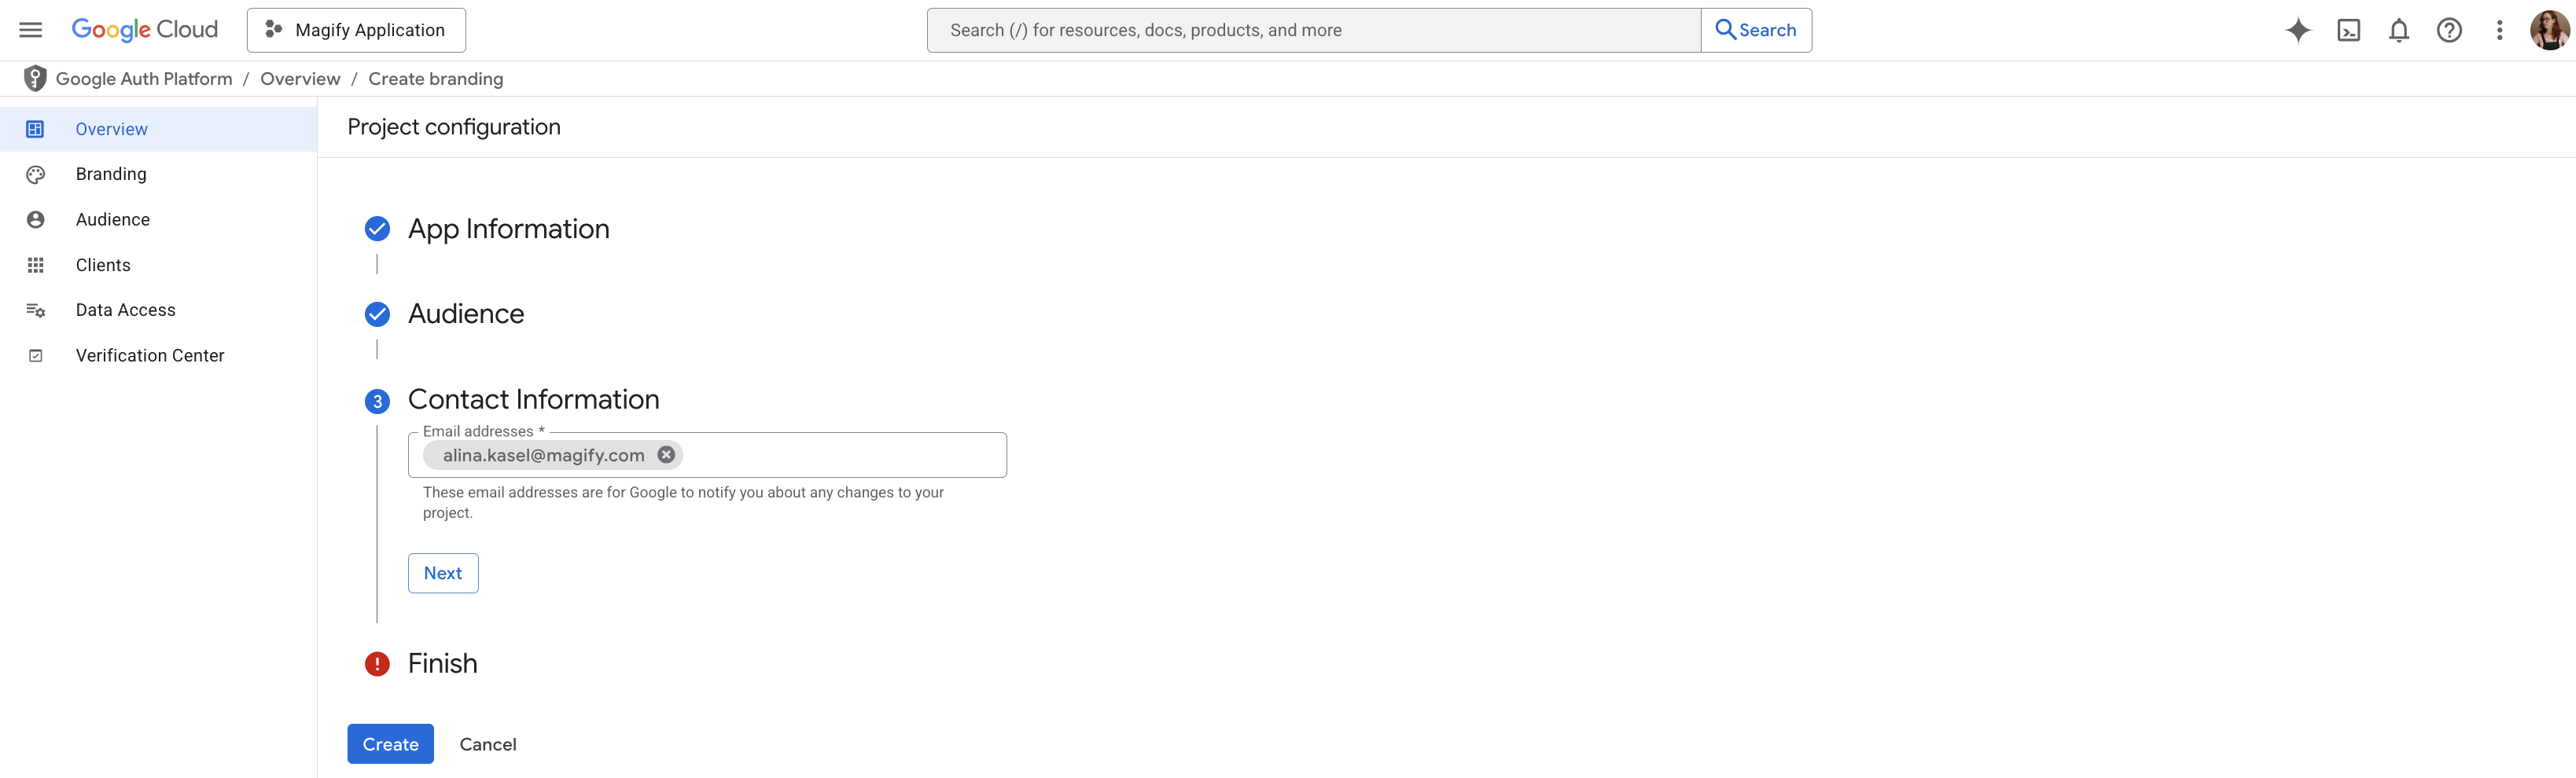
Enter the Developer contact information:
- This email will be used by Google to send important notifications related to your project.
- Enter a valid work email (e.g.,
magify.application@magify.com).
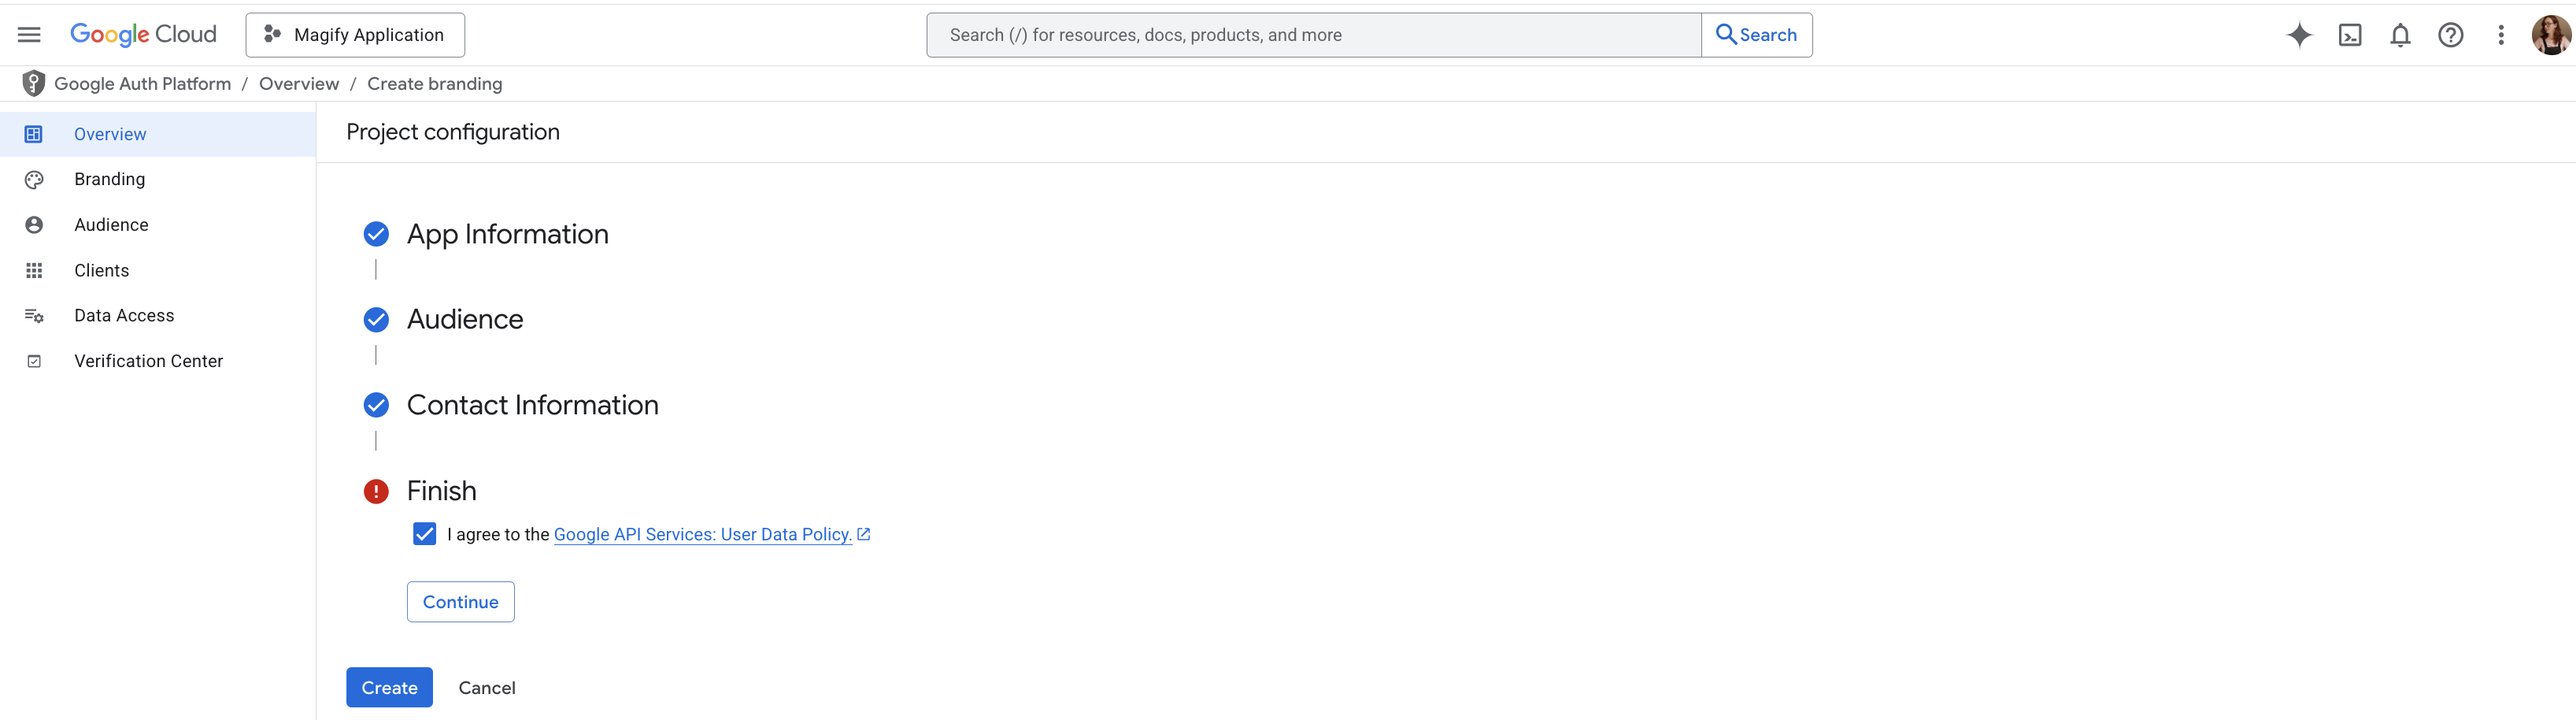
Finalize the consent screen setup:
- Accept the Google API Services: User Data Policy.
- Click Create to complete the OAuth consent screen setup.
- Now that the consent screen is set up, you can proceed to create your OAuth client. To create your OAuth 2.0 Client:
- Go to APIs & Services → Credentials, then click + Create Credentials → OAuth client ID, or, if you're still on the same page after completing the consent screen, simply click Create OAuth client.
- Configure the OAuth client:
- In the Application type field, select Web application. This is the appropriate option for manually retrieving a refresh token using tools like OAuth Playground.
- In the Name field, enter a name to help you identify this client in the console. (This name is internal only and won’t be visible to end users.) Example:
Magify Application UA GrabberGoogle Ads ConnectorMy OAuth Client
- Set up the redirect URI:
- In the Authorized redirect URIs section, click + Add URI and enter the following:
https://developers.google.com/oauthplayground. This is the URL used by Google's OAuth Playground — a tool for manually testing and retrieving tokens. Enter the URL exactly as shown — without extra characters, trailing slashes, or IP addresses.
- In the Authorized redirect URIs section, click + Add URI and enter the following:
- Finally, click Create.
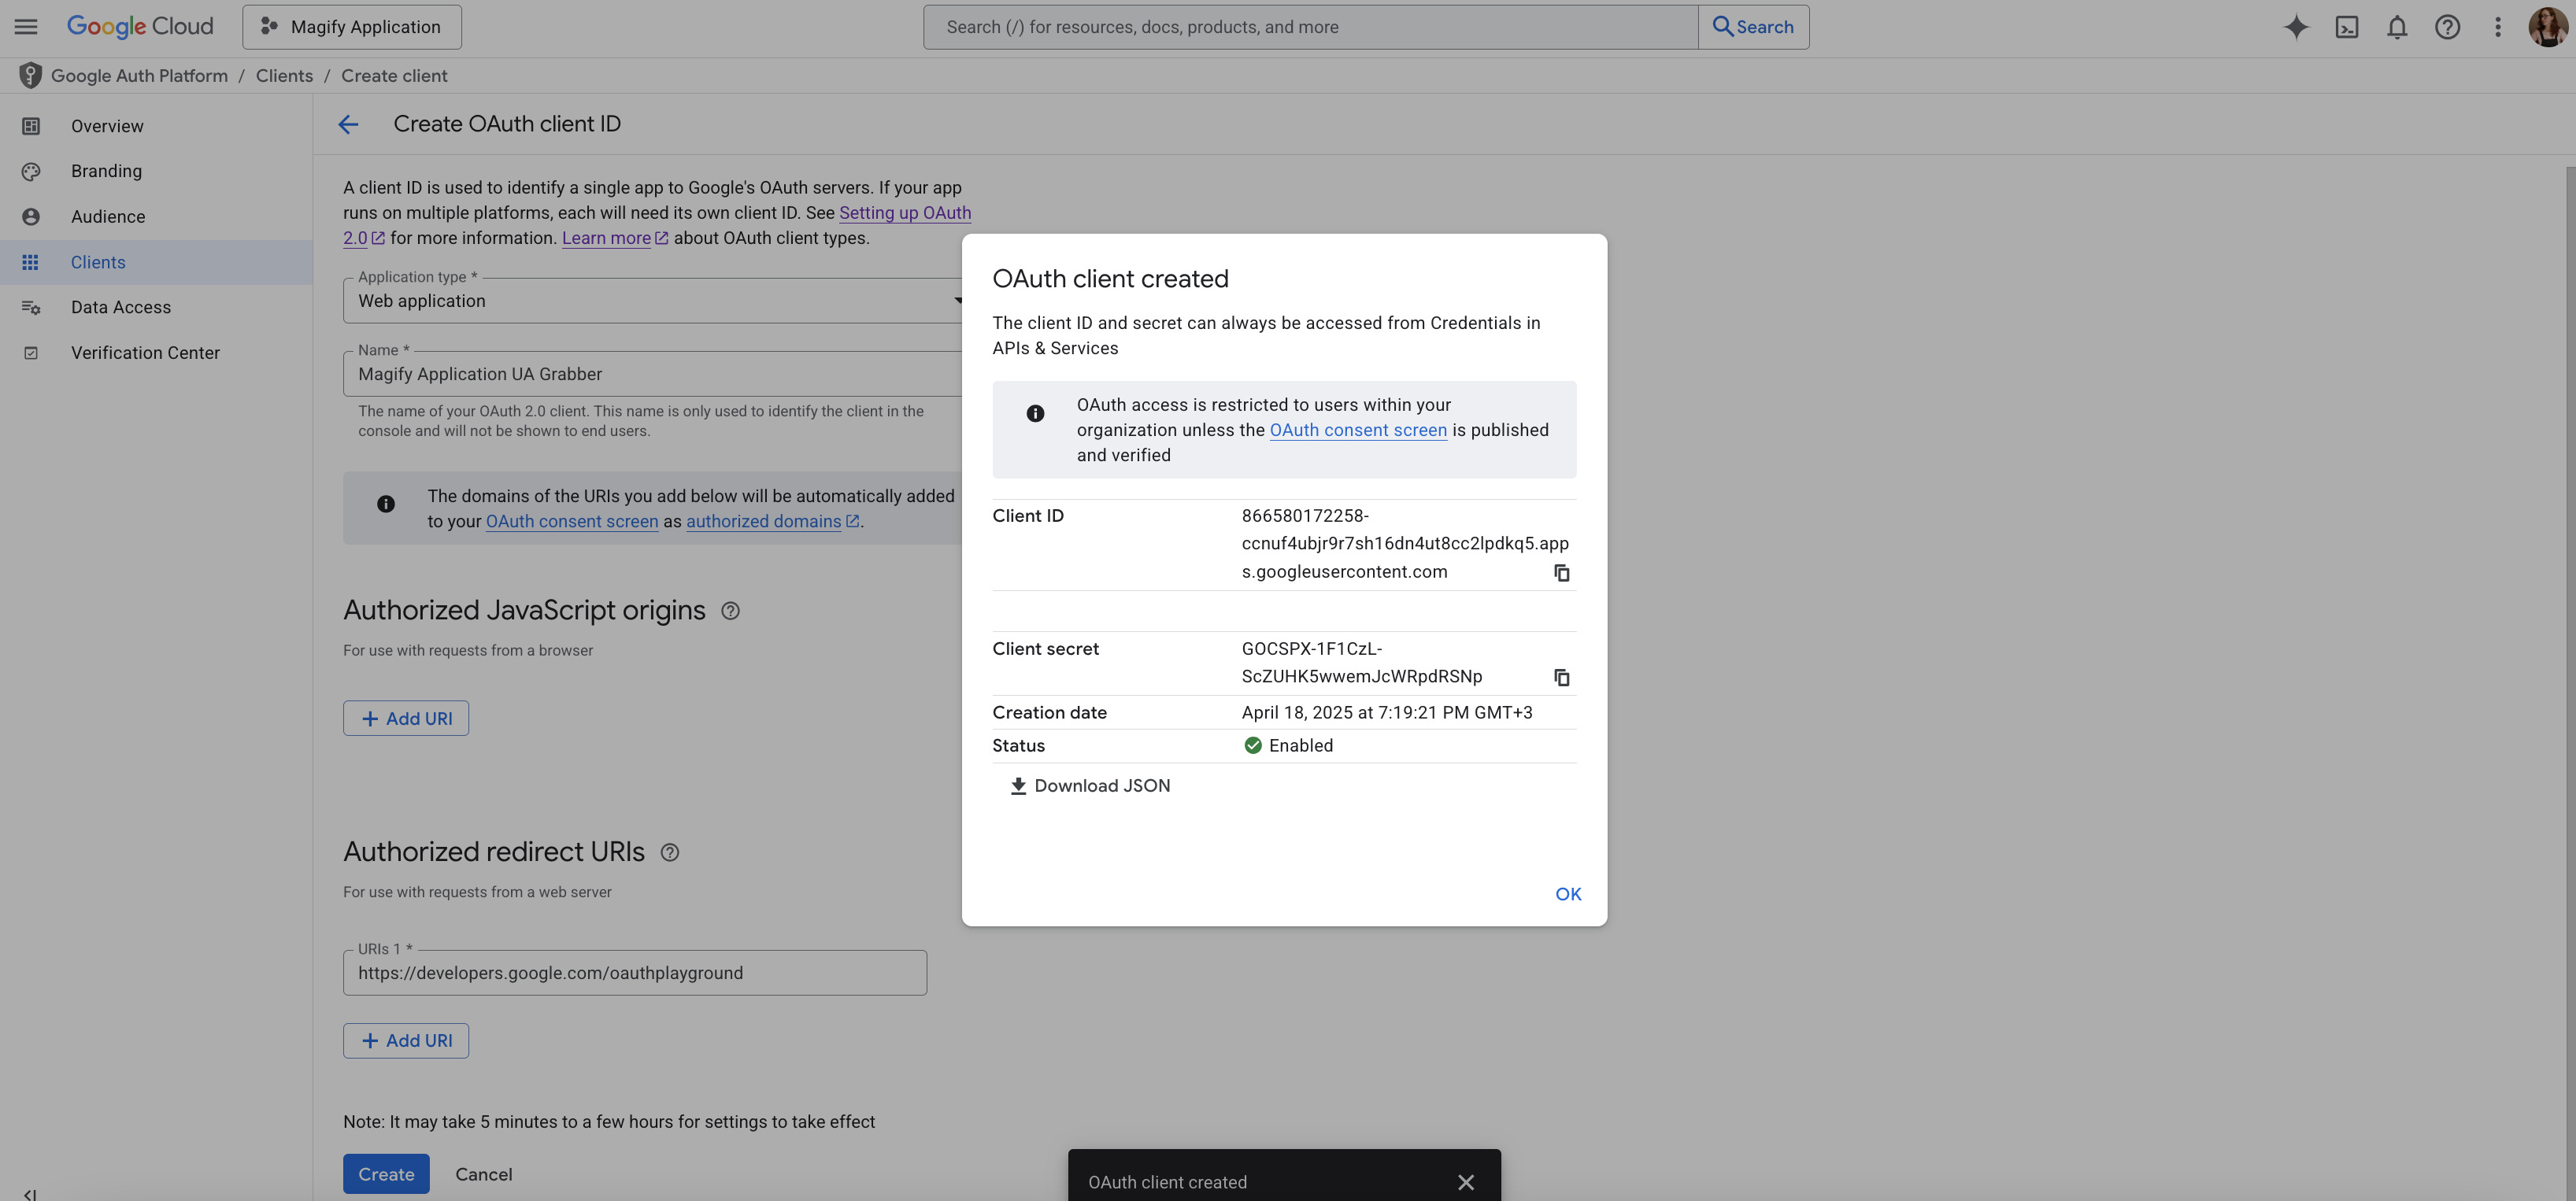
- After clicking Create, a dialog window will appear (see screenshot above). Once done, you will be presented with your OAuth 2.0 Client ID and Client Secret.You can download these credentials in JSON format and save them for later use.For more details, refer to the Google Ads API Authentication Guide (Step 2).
Refresh token
The refresh token is a key that allows the grabber to stay authorized in the Google Ads API without requiring repeated logins.It works together with your Client ID and Client Secret to automatically refresh the access token and maintain a persistent connection.
How to get a refresh token using OAuth Playground
- Open the OAuth 2.0 Playground
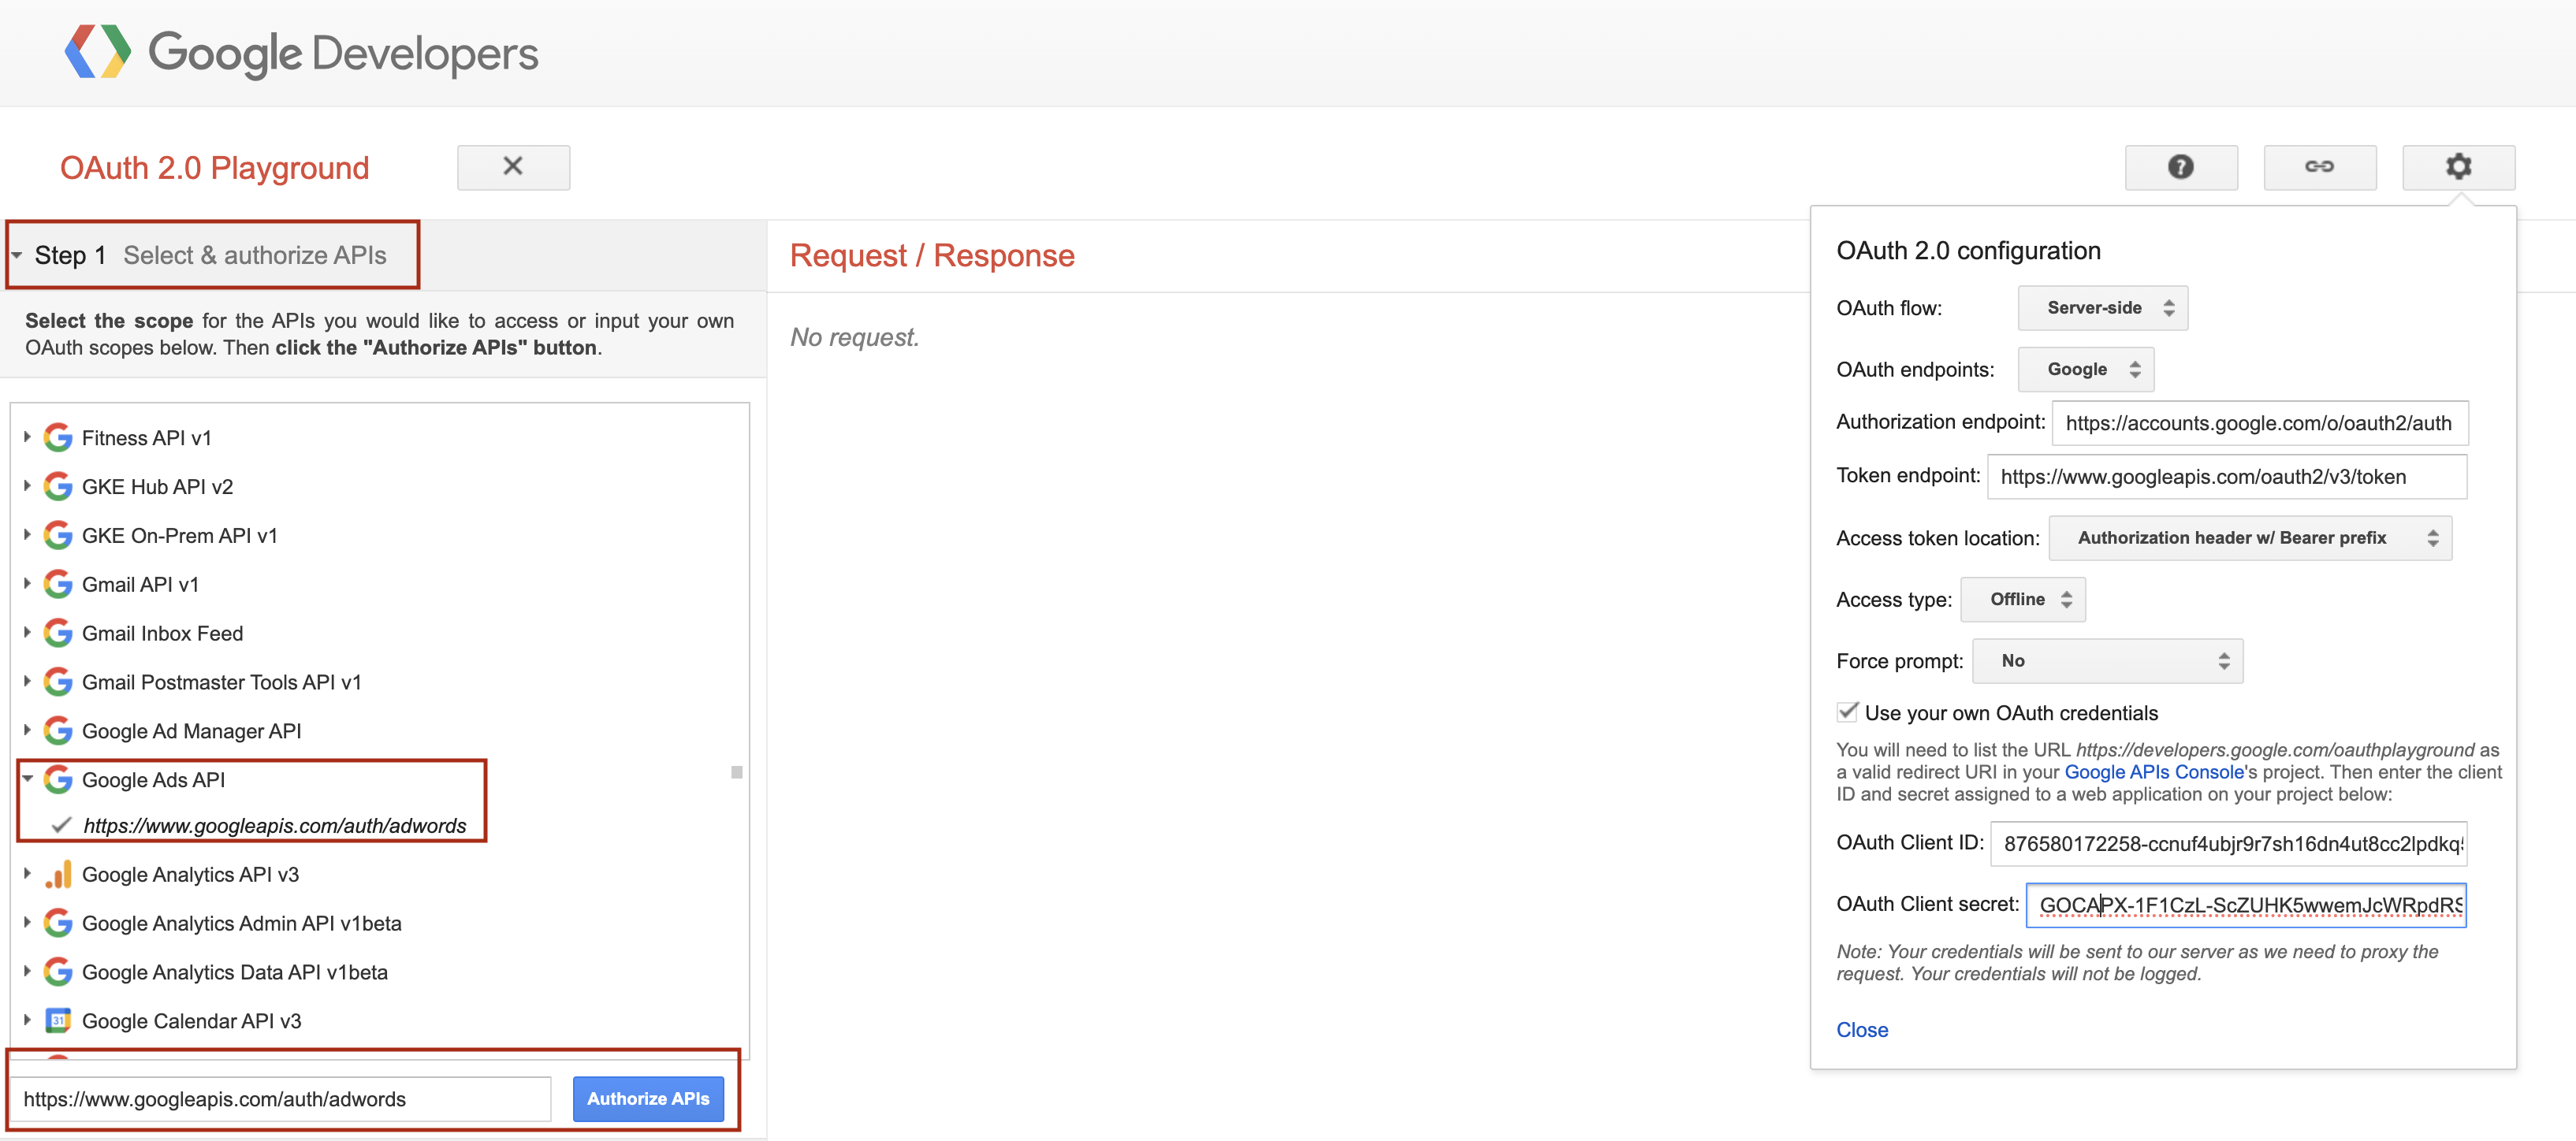
- Click the ⚙️ (gear icon) in the top-right corner and enable: ✔ Use your own OAuth credentials
- Set the following option: Force prompt → No. This disables extra authorization prompts during token refresh.
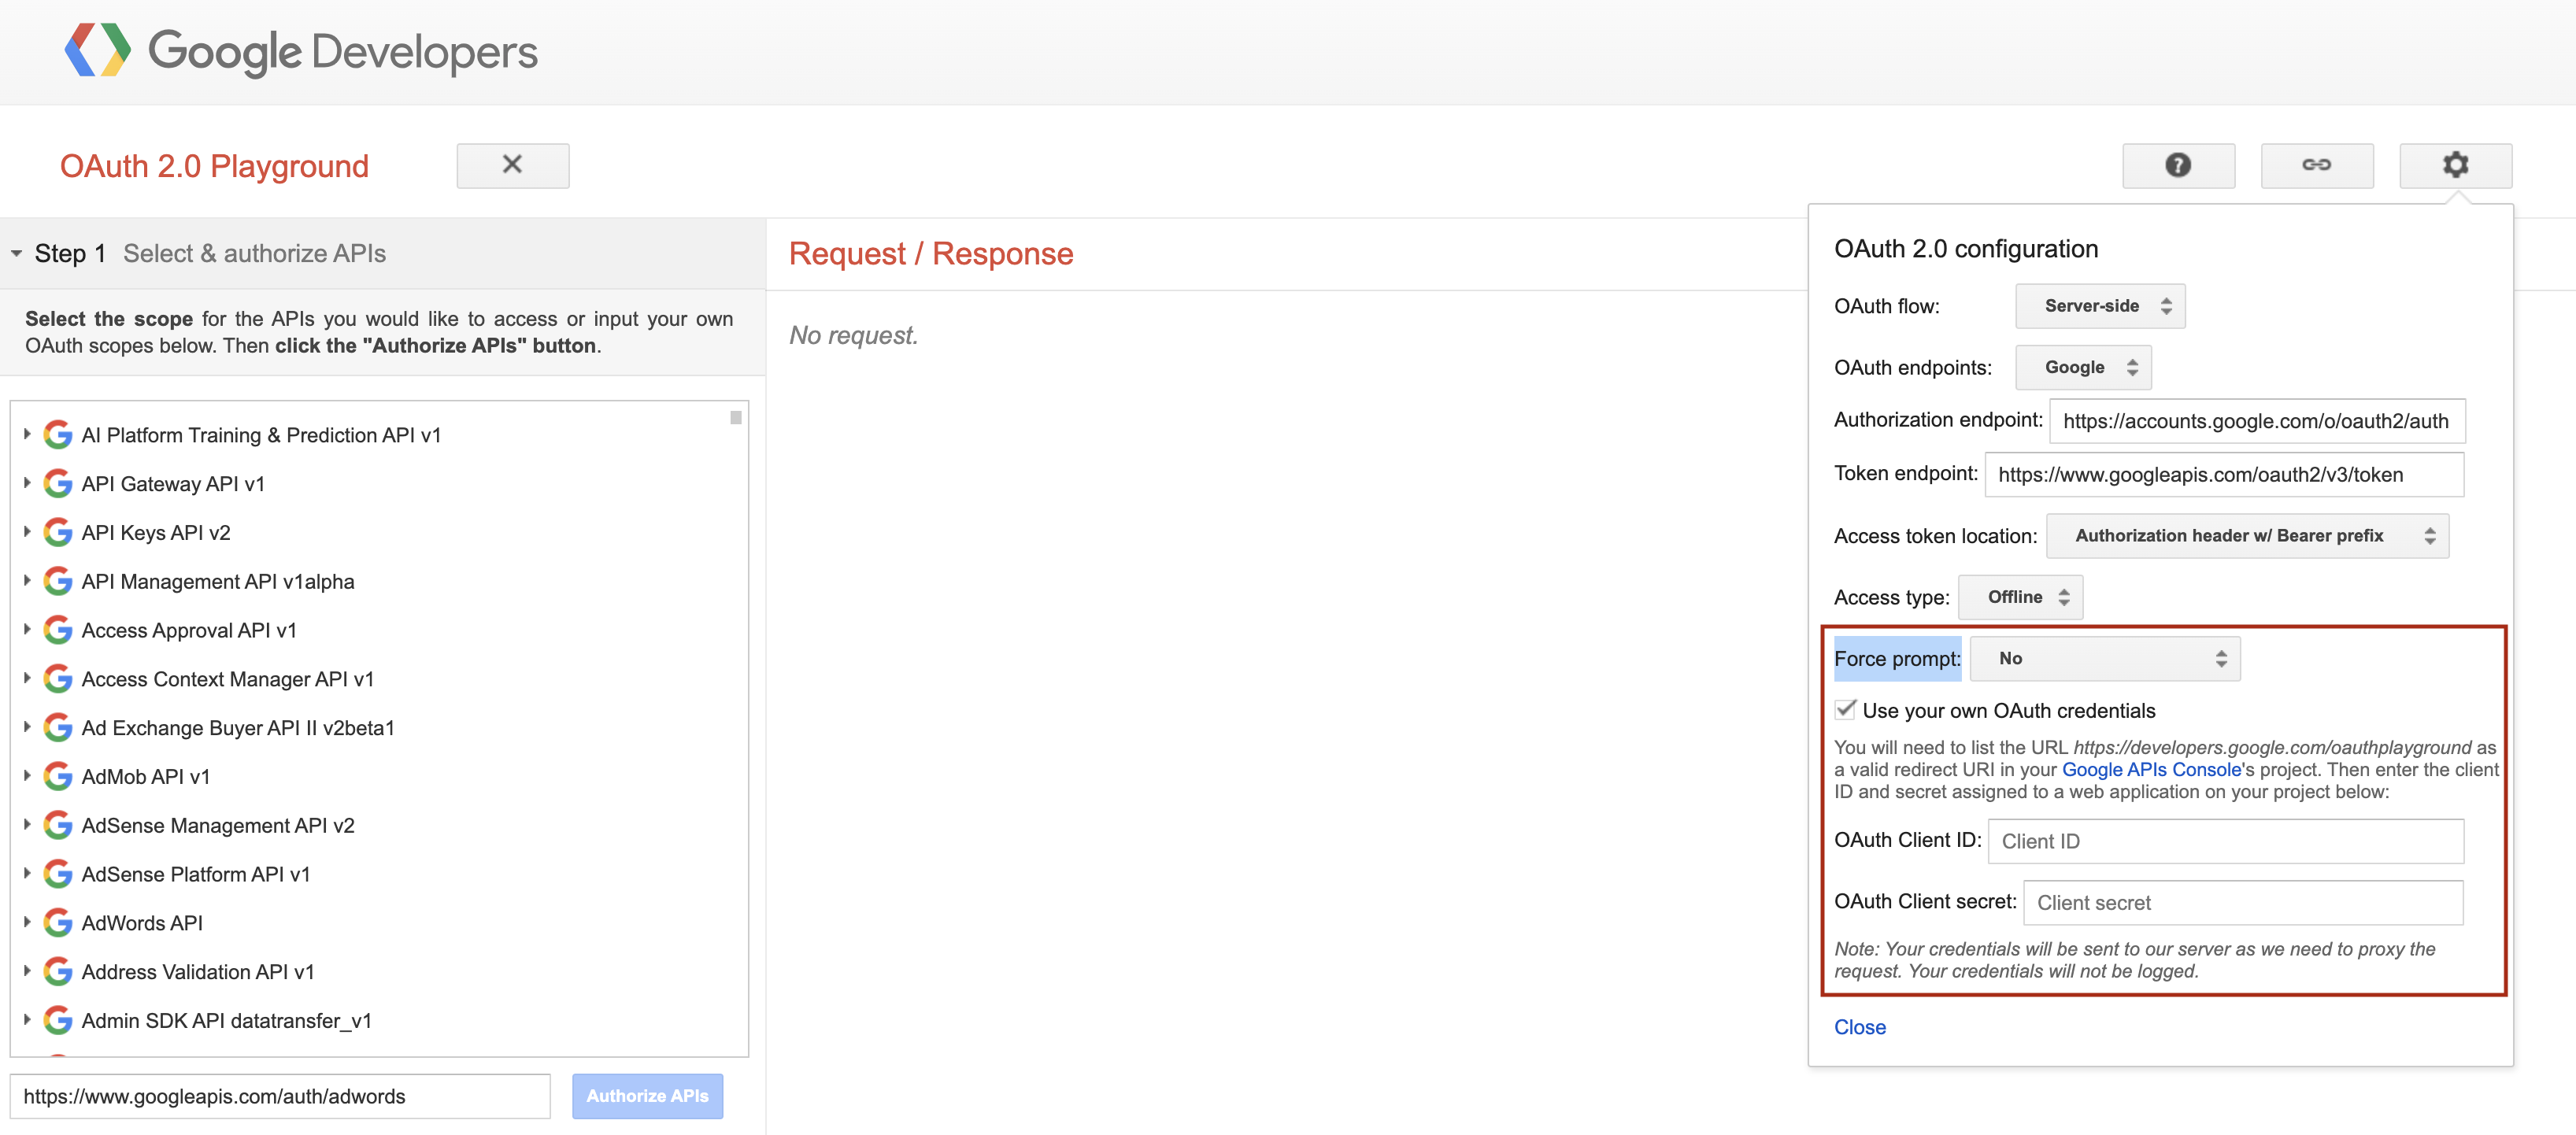
- At Step 1: Select & authorize APIs, locate and expand the Google Ads API category.
- Check the box next to:
https://www.googleapis.com/auth/adwords. This grants access to Google Ads data via the API. - Click the Authorize APIs button.Sign in with your Google Ads account and confirm access when prompted.
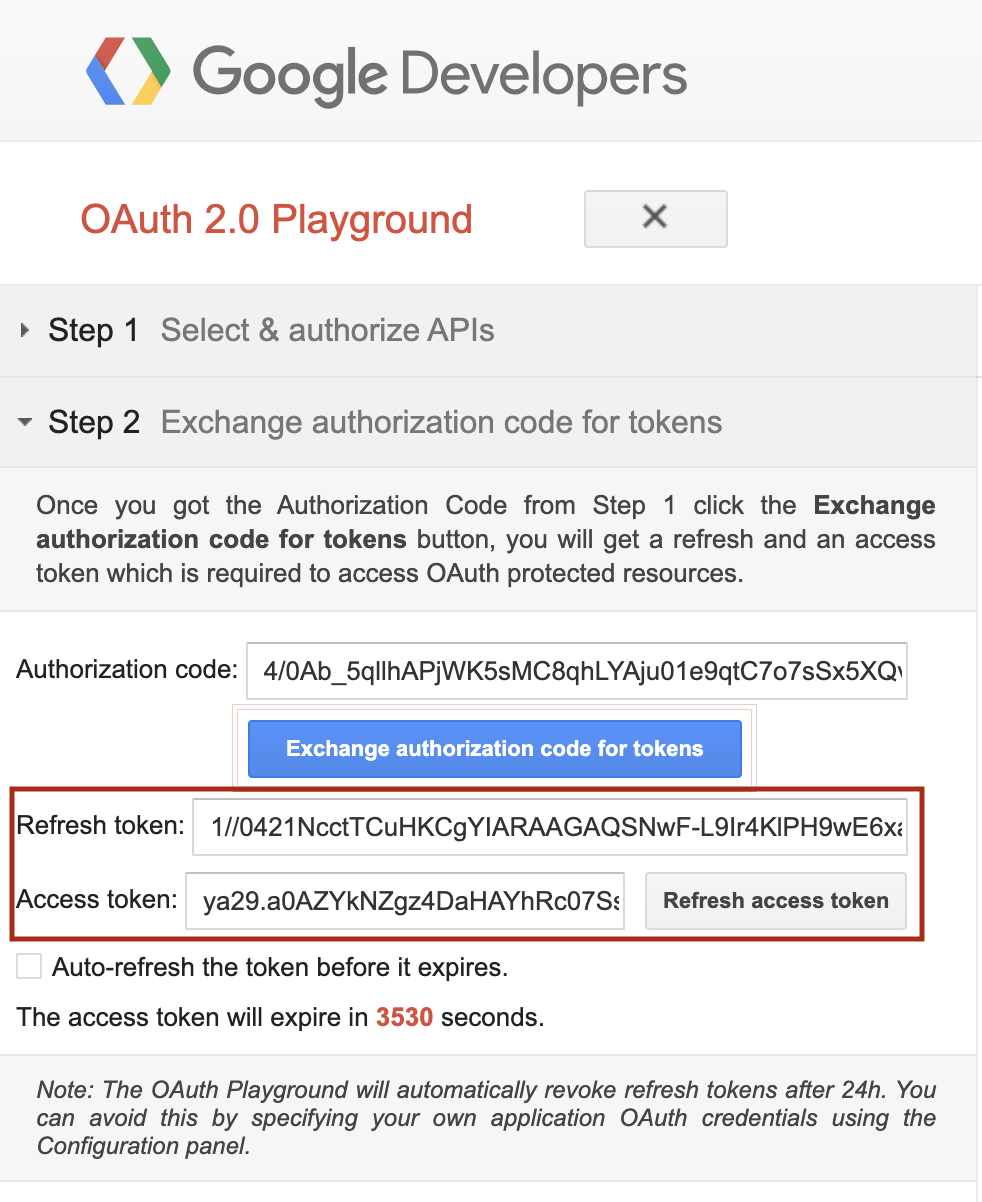
- After successful authorization, click Exchange authorization code for tokens.
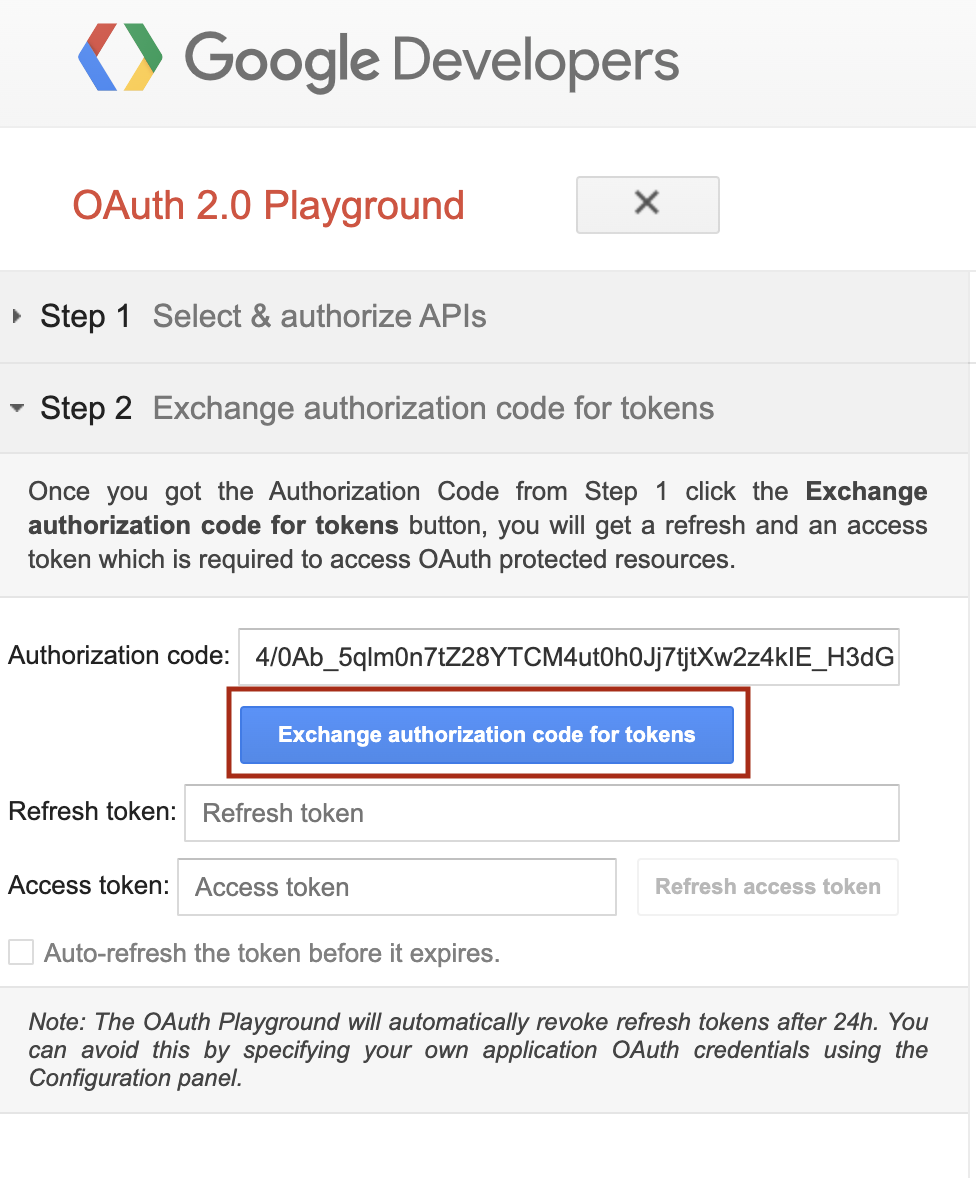
- The Playground will display both the Access Token and the Refresh Token.Copy the Refresh Token — you’ll need it when configuring the grabber in Magify.
Developer token
The Developer Token is a unique key used to identify your application when making requests to the Google Ads API. Without it, no requests from the grabber will be accepted by Google.
Where to get your Developer Token:
- Go to your Google Ads Manager (MCC) account.
- In the left-hand navigation menu, click Admin → then select API Center (or go directly to ads.google.com/aw/apicenter if you're already in the correct account)
- On the page, you’ll see the Developer Token field — copy the value shown there.

Manager Customer ID
The Manager Customer ID (or MCC ID) is a unique identifier of your Google Ads Manager Account. The grabber uses this ID to operate on behalf of your account when fetching data.
Where to find your Manager Customer ID:
- Log in to Google Ads with the account you plan to use in Magify.
- Open the account you intend to connect.
- The Customer ID will be displayed in one of the following locations:
- In the top-right corner of the interface, near the account name
- Or in the top-left corner, next to the dropdown menu where you switch accounts (For Manager accounts, click the down arrow next to the MCC account name — the ID will be shown there.)
The ID will follow the format: 123-456-7890 This is your Manager Customer ID — copy and paste it into the corresponding field in Magify.
