This guide explains how to set up a Transaction Validator in the Magify analytics system.
The validator enables the real-time verification of in-app purchase events by connecting to third-party platforms (such as Google Play or Apple App Store) to confirm transaction authenticity and prevent revenue loss due to fraud.
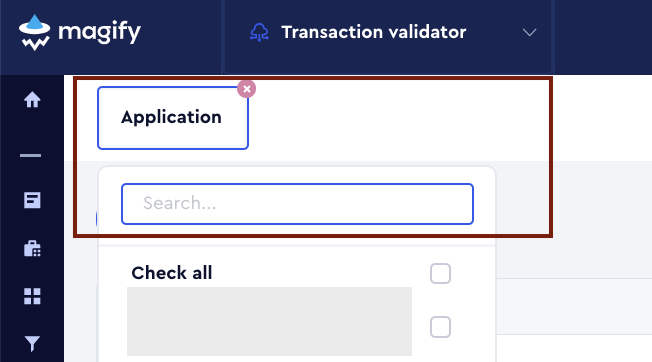
Navigate to Configurations > Integrations > Transaction Validator in the Magify interface.
In the Application filter, find and select your application from the dropdown list for which the transaction validation will be enabled.
A configuration form will open.
This form is used to connect Magify to your in-app purchase validation sources by providing the required credentials for RevenueCat and Google Play.
You’ll need to specify the application, optionally limit validation by app version, and provide access credentials such as the RevenueCat authorization code, Google Client ID, Client Secret, and Refresh Token.
Select the minimum app version from the dropdown list to start applying validation rules from that version onward (optional).
Setting Up Validation by Platform
The setup process differs slightly depending on whether your application is built for iOS or Android platforms. This is due to differences in how transactions are validated and which credentials are required.
Below, you'll find platform-specific instructions for each case.
Go to the APIs Console and log in with your Google Play Console account.
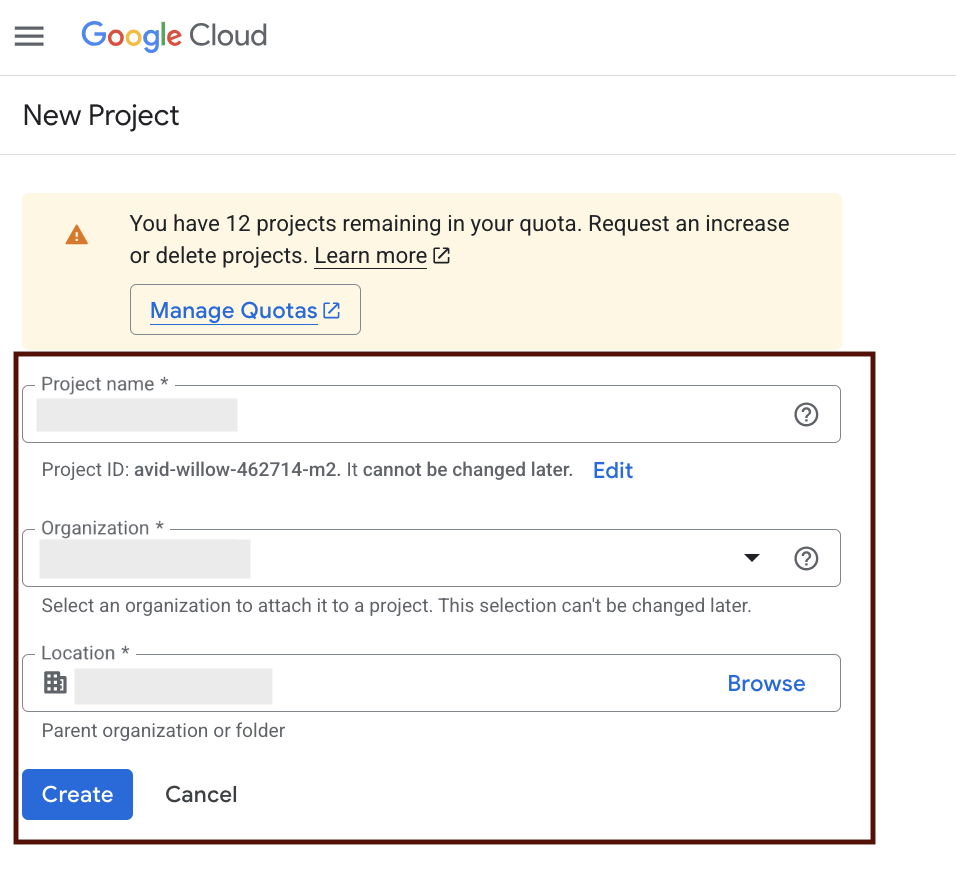
Select Create project.
Provide a Project name in the dialog box that appears and click Create.
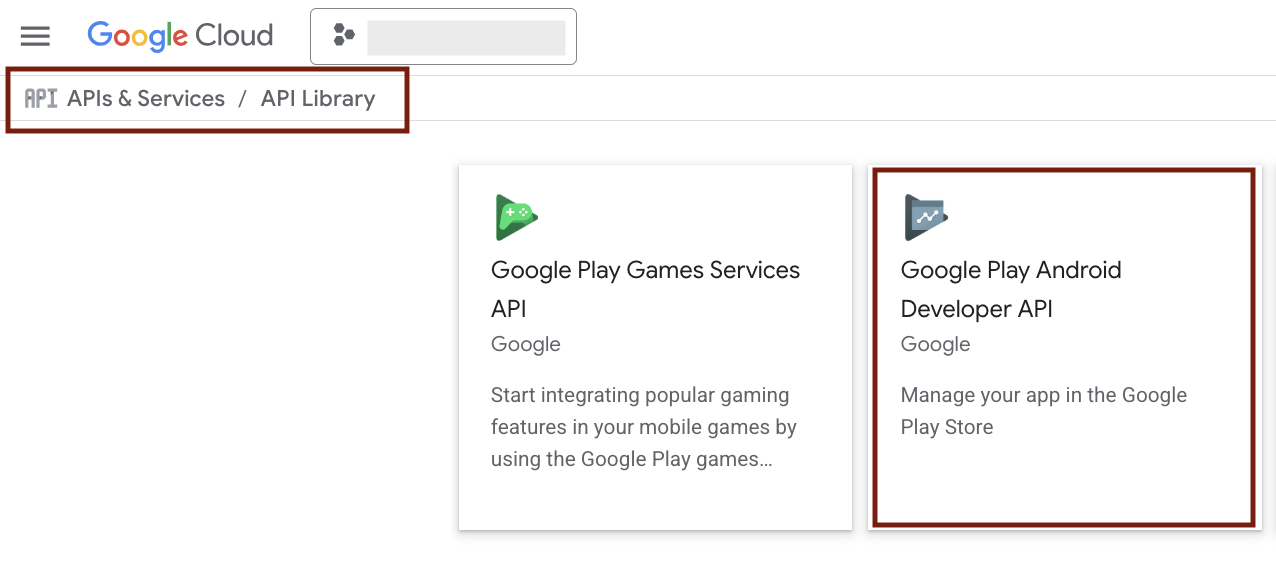
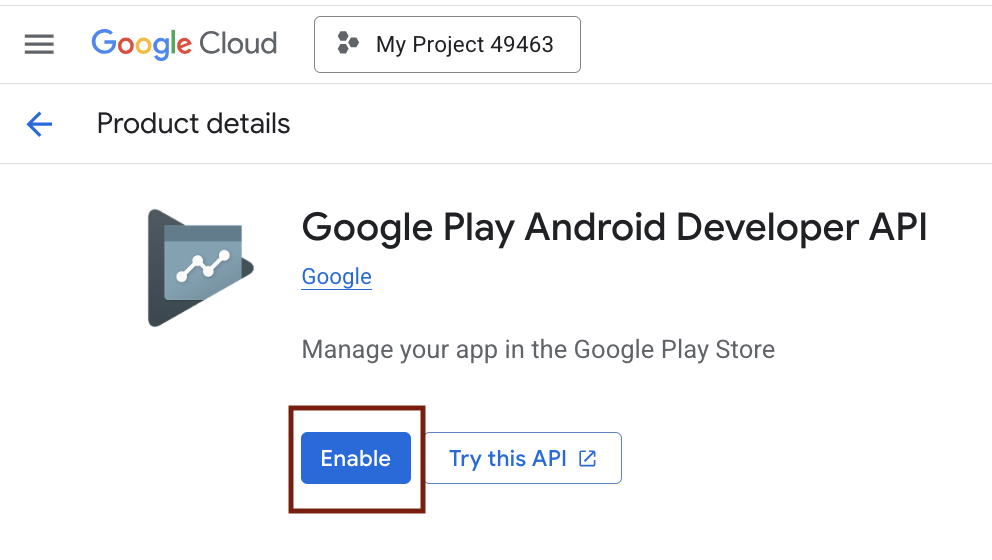
Click on Library in the left panel and find the Google Play Android Developer API.
Turn the Google Play Android Developer API on.
In the left sidebar, select OAuth consent screen.
If you see a screen that says "Google Auth Platform not configured yet", click the Get started button to begin setting up your OAuth configuration.
On the App Information screen, fill in the required fields and check the box "I agree to the Google API Services: User Data Policy". Click Continue to complete the OAuth consent screen setup.
Once the consent screen setup is complete, you’ll be redirected to the OAuth Overview page. Click the Create OAuth client button to generate your credentials. You will proceed to configure your OAuth 2.0 Client ID and Client Secret, which are required for integration in Magify.
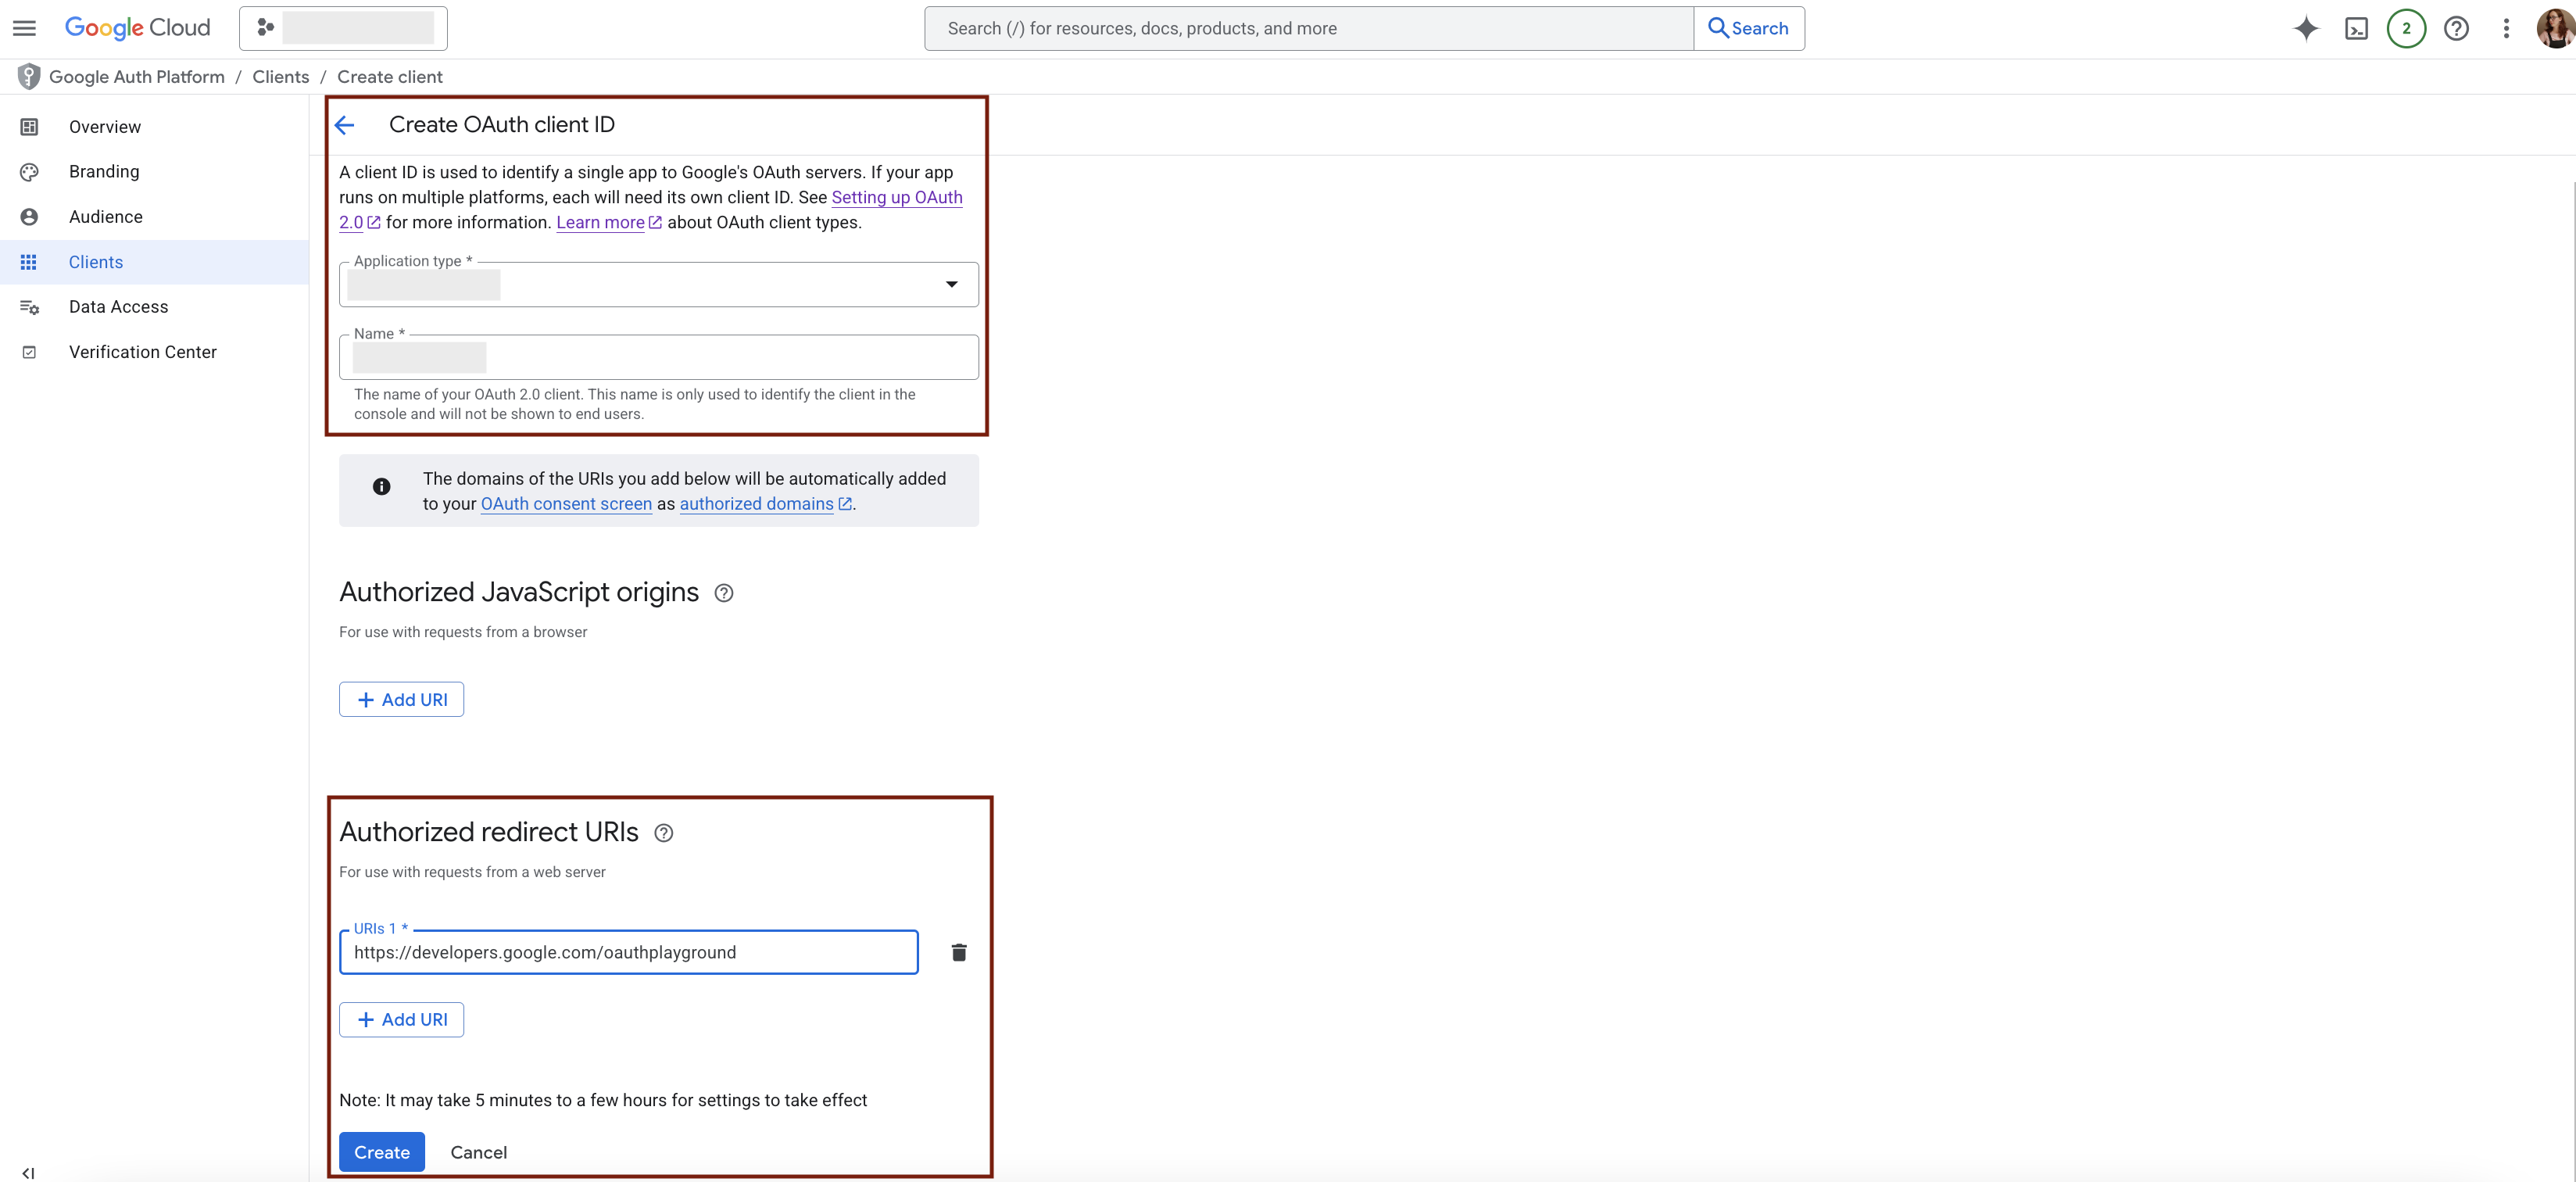
On the Create OAuth client ID screen:
In the Application type dropdown, select Web application.
Provide a name for your app in the Name field (e.g.,Magify Transaction Validator). This name is internal and used only for your reference.
In the Authorized redirect URIs section, you must enter the following URL:https://developers.google.com/oauthplayground . This is required for using OAuth 2.0 Playground to manually generate a refresh token.
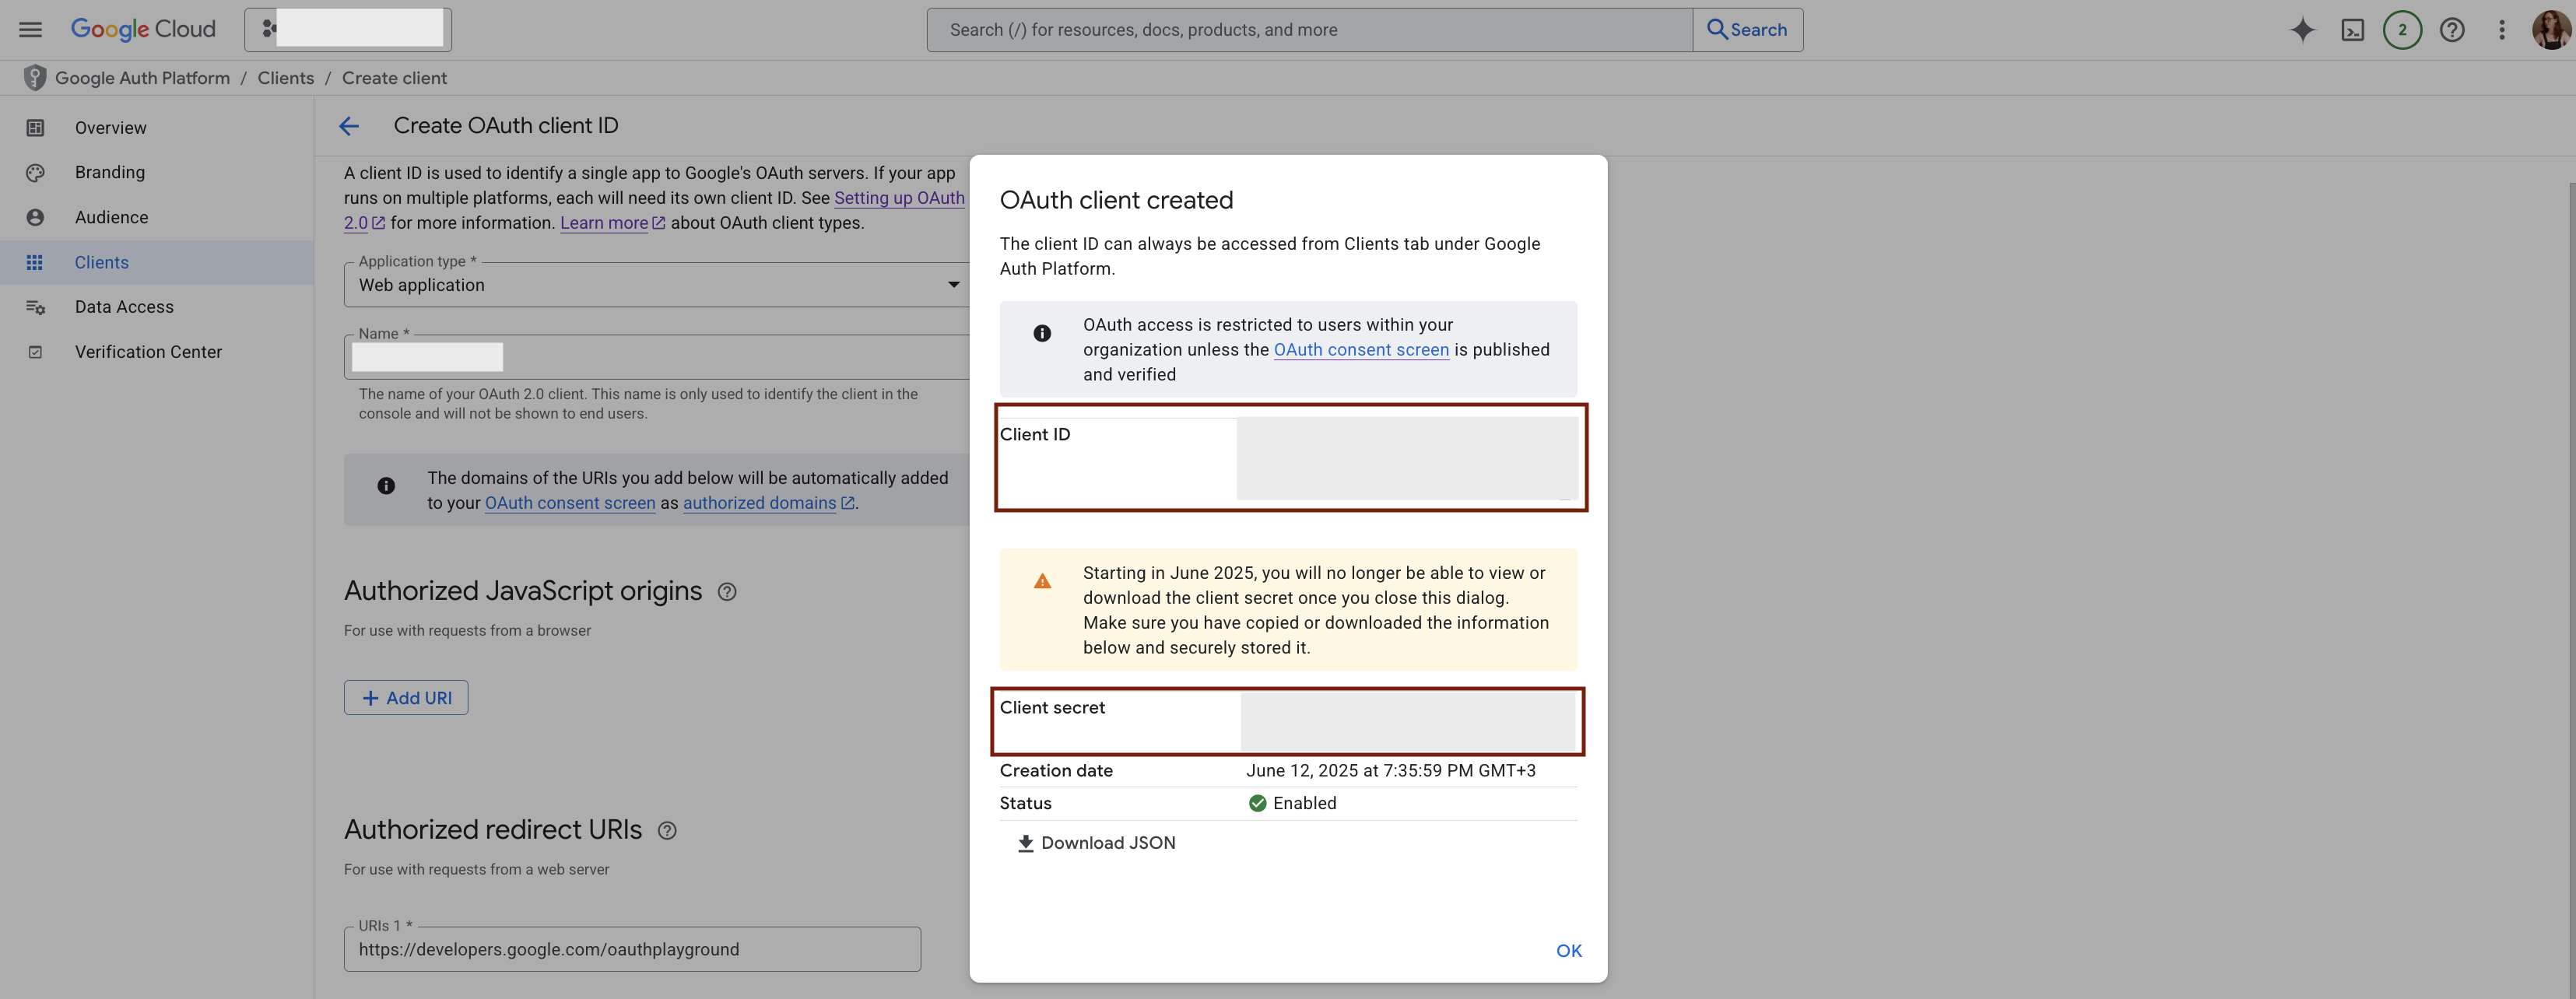
Once completed, click Create to generate your Client ID and Client Secret. These credentials will be used in the Magify interface.
To generate a Refresh Token, follow the steps outlined in the official Google documentation: Generating a Refresh Token, or follow the steps below. This guide will walk you through the process of setting up OAuth 2.0 credentials and retrieving the token required for Magify to access Google Play Developer APIs.
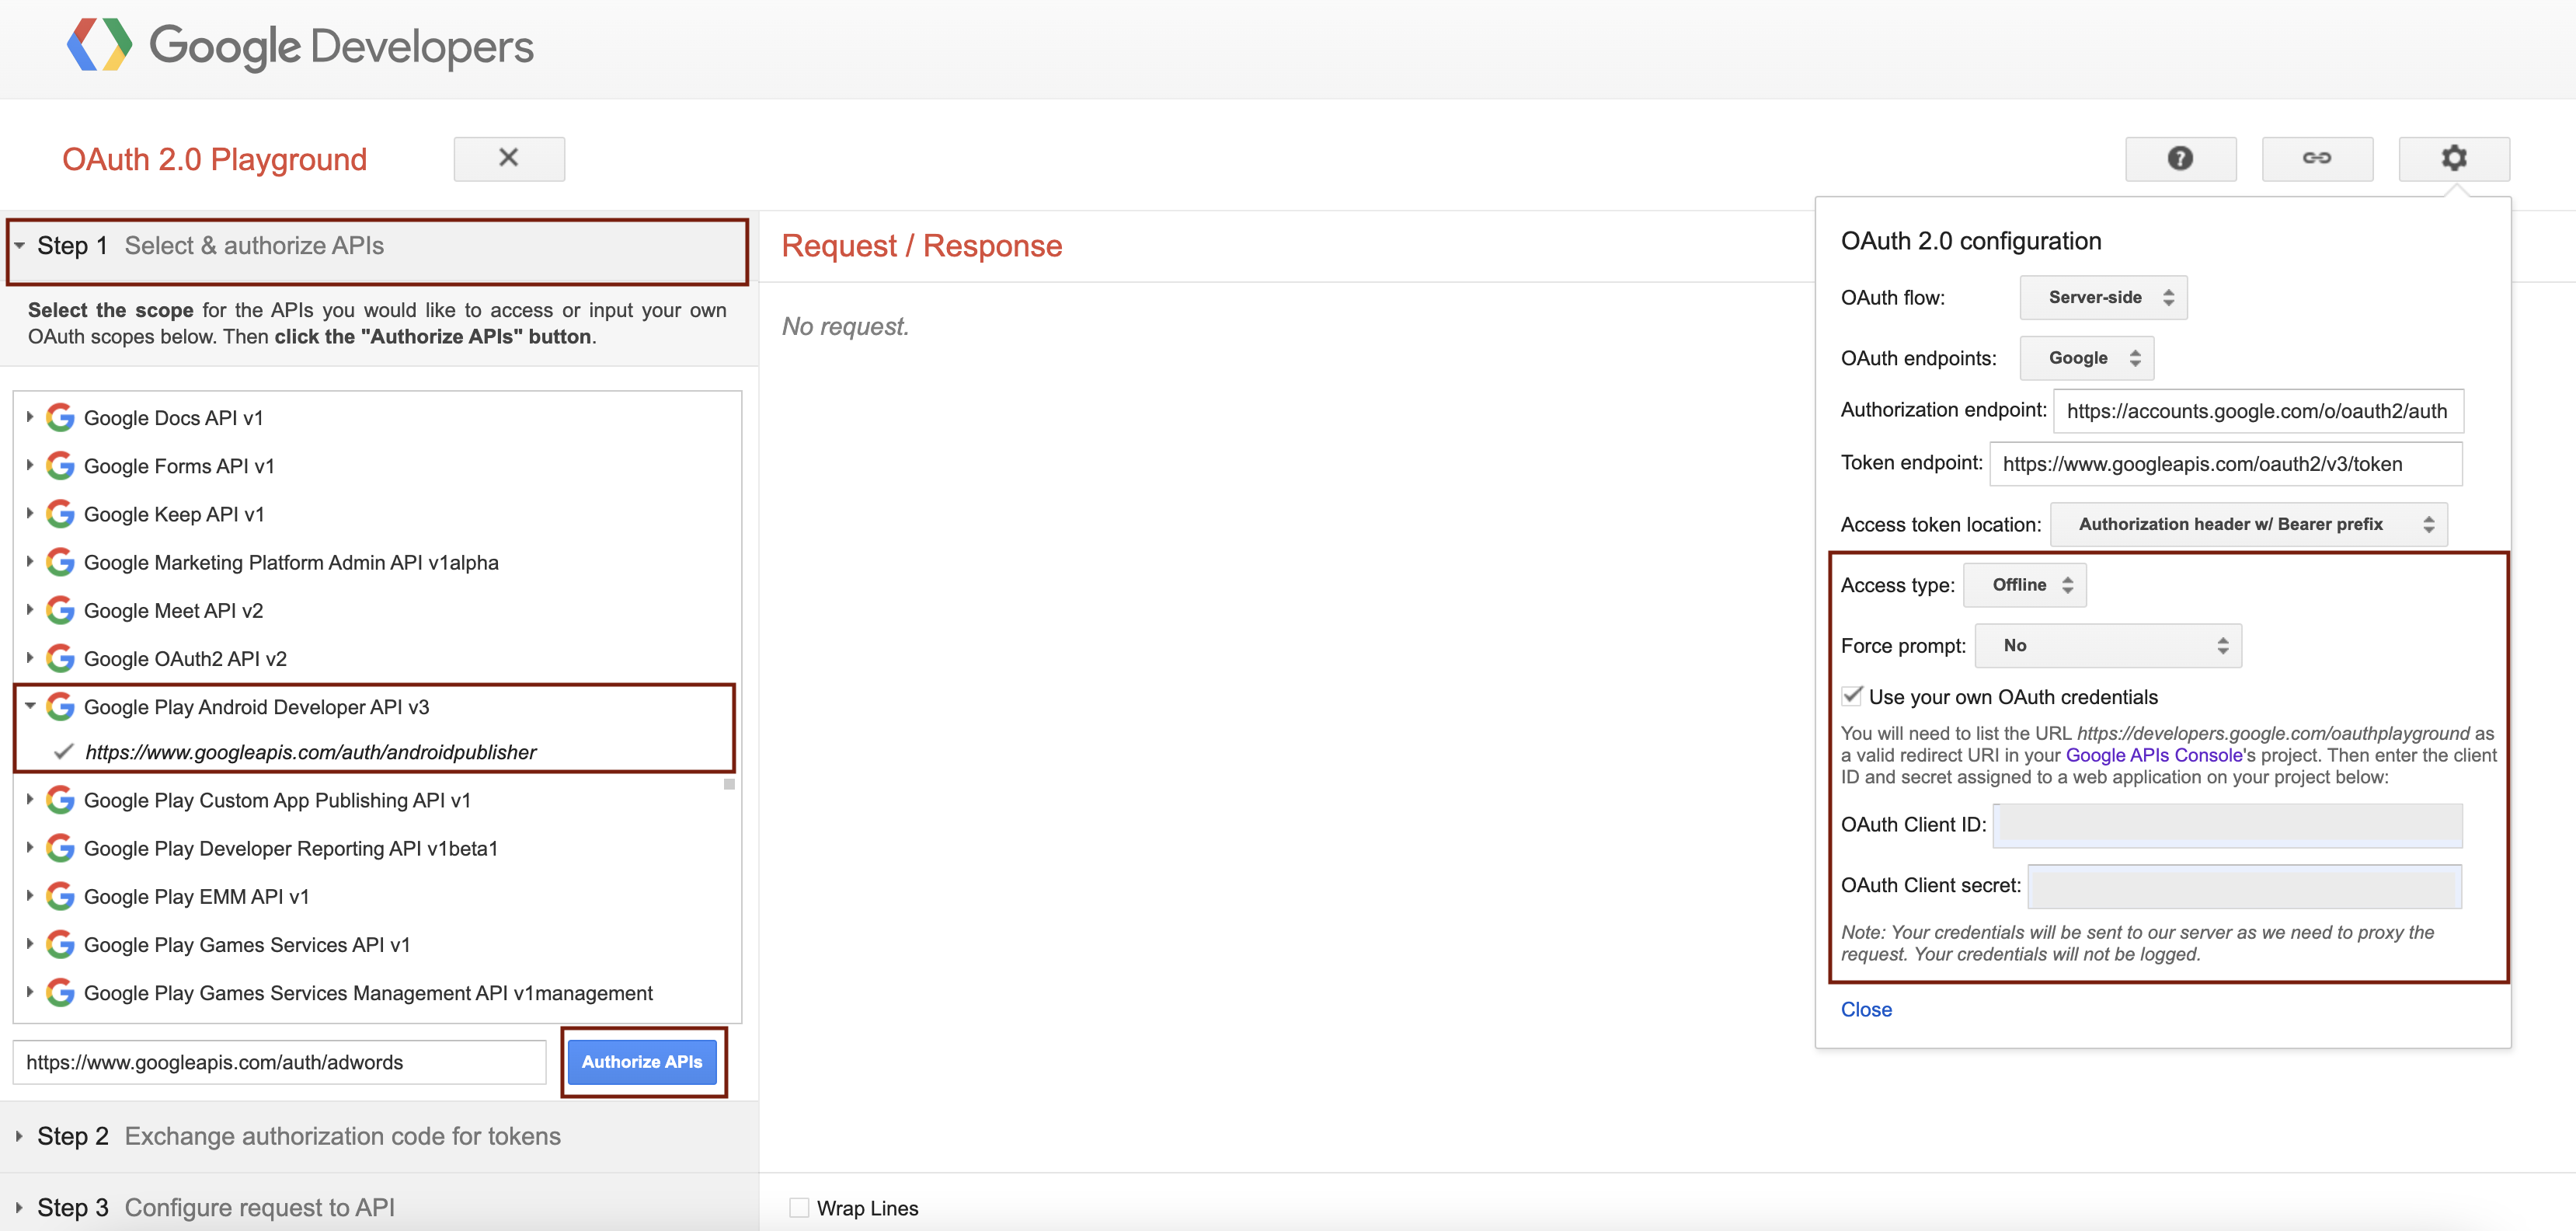
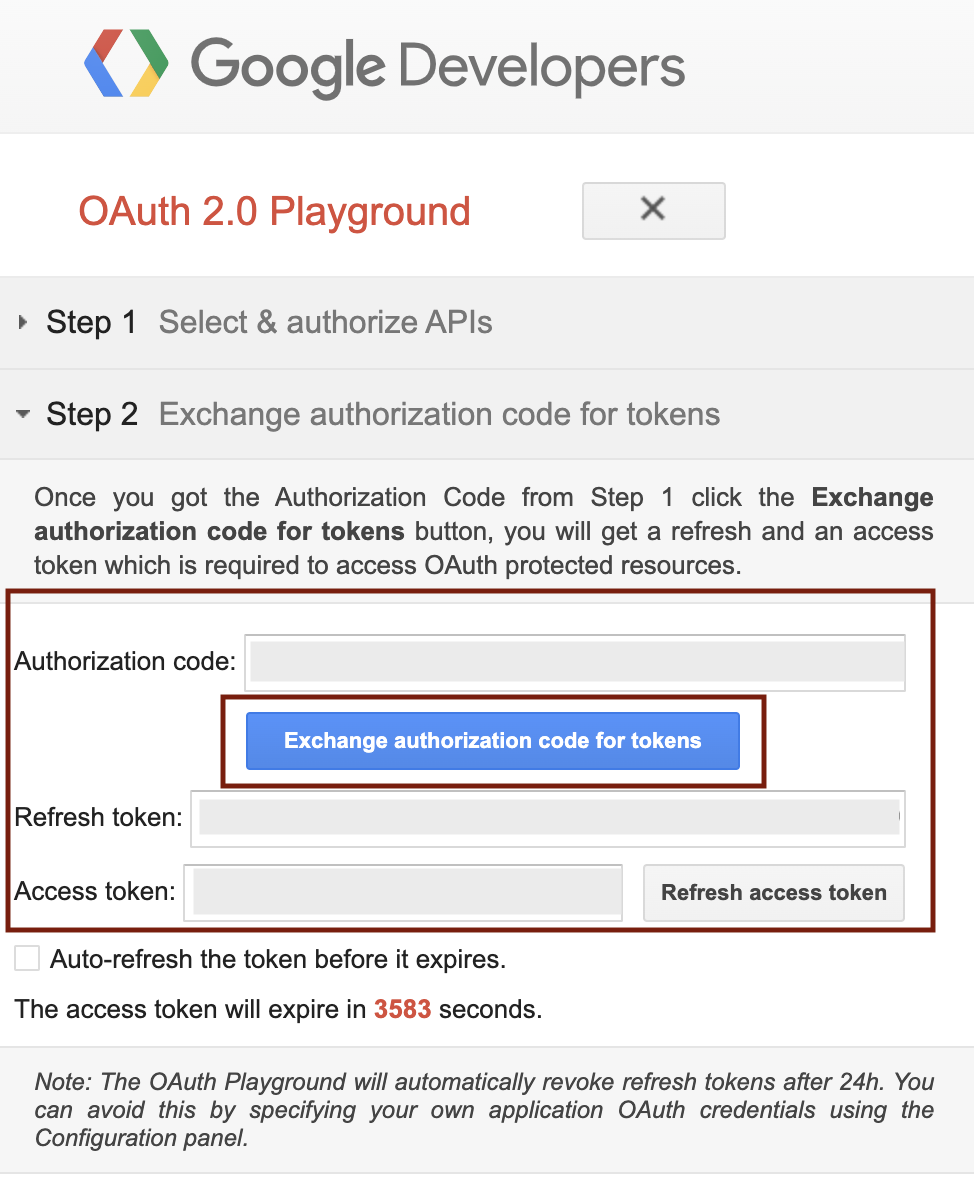
Click the settings icon (⚙️) in the upper right corner. From the Force prompt drop-down, select "No", and check the box "Use your own OAuth credentials".
Then, input your Client ID and Client Secret.
In Step 1: Select & Authorize APIs, scroll down to find Google Play Android Developer API v3and select the following scope:
https://www.googleapis.com/auth/androidpublisher
Click Authorize APIs to continue the authentication flow. 6. After authorizing the selected scopes, you will receive an Authorization Code in Step 1. Click the Exchange authorization code for tokensbutton. You will then receive:
a Refresh Token (used to generate new access tokens)
an Access Token (used for authenticated API requests)
Paste credentials into the corresponding fields in the Magify configuration form.
If publisher applications have already been added to Magify, there's no need to generate new credentials. All apps created within the same Google Play Console structure share the same OAuth 2.0 credentials.
To reuse existing credentials:
Navigate to Configurations > Integrations > Transaction Validator in the Magify interface.
Find your application that has already been integrated with Google Play.
Copy the following values:
Google Client ID
Google Client Secret
Google Refresh Token
You can safely use these credentials for all other apps linked to the same Google Play developer account.
'%3e%3cpath%20d='M150.127%20195.325C233.04%20195.325%20300.255%20168.696%20300.255%20135.848C300.255%20103%20233.04%2076.3709%20150.127%2076.3709C67.2143%2076.3709%200%20103%200%20135.848C0%20168.696%2067.2143%20195.325%20150.127%20195.325Z'%20fill='white'/%3e%3cpath%20d='M231.093%20118.256L150.117%20-0.000183105L69.1527%20118.256C68.1365%20119.748%2067.5967%20121.294%2067.5967%20122.871C67.5967%20136.017%20104.538%20146.666%20150.117%20146.666C195.697%20146.666%20232.638%20136.007%20232.638%20122.871C232.638%20121.294%20232.098%20119.748%20231.082%20118.256H231.093Z'%20fill='%2301A9F2'/%3e%3cpath%20d='M150.106%20356.844L98.7265%20281.5L62.3035%20311.117L25.4253%20257.017L50.787%20239.721L68.8556%20266.226L105.279%20236.62L150.106%20302.363L194.934%20236.62L231.357%20266.226L270.045%20209.48L295.407%20226.776L237.898%20311.117L201.475%20281.5L150.106%20356.844Z'%20fill='white'/%3e%3cpath%20d='M592.168%20165.22V237.908H561.482V171.825C561.482%20153.884%20551.807%20143.034%20535.051%20143.034C516.644%20143.034%20505.318%20156.011%20505.318%20175.604V237.908H474.875V171.349C474.875%20153.407%20464.968%20142.791%20448.445%20142.791C429.804%20142.791%20418.711%20156.011%20418.711%20176.07V237.908H388.025V118.964H418.711V134.301C426.502%20122.033%20440.421%20115.418%20458.13%20115.418C477.014%20115.418%20490.7%20122.975%20498.247%20135.953C506.747%20123.208%20521.608%20115.418%20540.725%20115.418C572.819%20115.418%20592.179%20135.476%20592.179%20165.22H592.168Z'%20fill='white'/%3e%3cpath%20d='M899.48%2080.2534C899.48%2068.2182%20909.388%2059.4856%20920.248%2059.4856C931.574%2059.4856%20941.248%2068.9274%20941.248%2080.2534C941.248%2091.3465%20931.574%20100.788%20920.248%20100.788C909.155%20100.788%20899.48%2092.0557%20899.48%2080.2534Z'%20fill='white'/%3e%3cpath%20d='M935.832%20118.955H905.146V237.899H935.832V118.955Z'%20fill='white'/%3e%3cpath%20d='M1140.2%20118.955H1173L1099.84%20288.644H1067.5L1090.6%20237.666L1043.42%20118.955H1076.45L1107.37%20204.81L1140.18%20118.955H1140.2Z'%20fill='white'/%3e%3cpath%20d='M883.182%20115.418H815.904C781.45%20115.418%20755.008%20137.837%20755.008%20171.825C755.008%20206.756%20778.846%20228.466%20815.904%20228.466C831.951%20228.699%20847.288%20231.059%20847.288%20246.64C847.288%20259.617%20835.962%20267.175%20817.555%20267.175C799.148%20267.175%20784.985%20254.664%20781.915%20239.326L756.66%20246.873C763.741%20274.722%20787.346%20292.188%20817.312%20292.188C856.963%20292.188%20876.313%20272.838%20876.313%20249.233C876.313%20234.605%20869.231%20223.036%20855.545%20215.721C868.522%20206.047%20877.022%20190.709%20877.022%20171.825C877.022%20160.986%20871.412%20149.3%20863.145%20140.674H883.182V115.418ZM815.904%20203.919C797.264%20203.919%20782.392%20192.117%20782.392%20171.825C782.392%20151.534%20799.148%20139.964%20815.904%20139.964C832.66%20139.964%20849.416%20151.29%20849.416%20171.825C849.416%20188.814%20835.497%20203.919%20815.904%20203.919Z'%20fill='white'/%3e%3cpath%20d='M737.426%20237.906V118.962H708.158V136.088C698.685%20121.481%20682.796%20115.426%20668.983%20115.426C633.587%20115.426%20608.087%20143.509%20608.087%20179.148C608.087%20214.788%20633.1%20241.452%20668.03%20241.452C682.426%20241.452%20698.24%20235.08%20708.148%20220.917V237.906H737.415H737.426ZM673.471%20213.835C653.645%20213.835%20638.308%20199.207%20638.308%20178.429C638.308%20157.65%20653.889%20143.032%20673.704%20143.032C694.705%20143.032%20709.1%20160.021%20709.1%20178.429C709.1%20196.836%20694.472%20213.835%20673.46%20213.835H673.471Z'%20fill='white'/%3e%3cpath%20d='M1003.29%20111.085C1003.29%2098.5315%201011.17%2091.8842%201023.98%2091.8842C1028.9%2091.8842%201033.83%2092.6251%201037.77%2093.853L1042.2%2068.0043C1038.02%2066.7765%201027.43%2064.7971%201021.27%2064.7971C994.18%2064.7971%20972.607%2081.786%20972.607%20110.355V118.961H956.889V144.216H972.607V164.519V237.915H1003.29V144.216H1038.46V118.961H1003.29V111.096V111.085Z'%20fill='white'/%3e%3c/g%3e%3cdefs%3e%3cclipPath%20id='clip0_1_3'%3e%3crect%20width='1173'%20height='356.842'%20fill='white'/%3e%3c/clipPath%3e%3c/defs%3e%3c/svg%3e)