'%3e%3cpath%20d='M150.127%20195.325C233.04%20195.325%20300.255%20168.696%20300.255%20135.848C300.255%20103%20233.04%2076.3709%20150.127%2076.3709C67.2143%2076.3709%200%20103%200%20135.848C0%20168.696%2067.2143%20195.325%20150.127%20195.325Z'%20fill='white'/%3e%3cpath%20d='M231.093%20118.256L150.117%20-0.000183105L69.1527%20118.256C68.1365%20119.748%2067.5967%20121.294%2067.5967%20122.871C67.5967%20136.017%20104.538%20146.666%20150.117%20146.666C195.697%20146.666%20232.638%20136.007%20232.638%20122.871C232.638%20121.294%20232.098%20119.748%20231.082%20118.256H231.093Z'%20fill='%2301A9F2'/%3e%3cpath%20d='M150.106%20356.844L98.7265%20281.5L62.3035%20311.117L25.4253%20257.017L50.787%20239.721L68.8556%20266.226L105.279%20236.62L150.106%20302.363L194.934%20236.62L231.357%20266.226L270.045%20209.48L295.407%20226.776L237.898%20311.117L201.475%20281.5L150.106%20356.844Z'%20fill='white'/%3e%3cpath%20d='M592.168%20165.22V237.908H561.482V171.825C561.482%20153.884%20551.807%20143.034%20535.051%20143.034C516.644%20143.034%20505.318%20156.011%20505.318%20175.604V237.908H474.875V171.349C474.875%20153.407%20464.968%20142.791%20448.445%20142.791C429.804%20142.791%20418.711%20156.011%20418.711%20176.07V237.908H388.025V118.964H418.711V134.301C426.502%20122.033%20440.421%20115.418%20458.13%20115.418C477.014%20115.418%20490.7%20122.975%20498.247%20135.953C506.747%20123.208%20521.608%20115.418%20540.725%20115.418C572.819%20115.418%20592.179%20135.476%20592.179%20165.22H592.168Z'%20fill='white'/%3e%3cpath%20d='M899.48%2080.2534C899.48%2068.2182%20909.388%2059.4856%20920.248%2059.4856C931.574%2059.4856%20941.248%2068.9274%20941.248%2080.2534C941.248%2091.3465%20931.574%20100.788%20920.248%20100.788C909.155%20100.788%20899.48%2092.0557%20899.48%2080.2534Z'%20fill='white'/%3e%3cpath%20d='M935.832%20118.955H905.146V237.899H935.832V118.955Z'%20fill='white'/%3e%3cpath%20d='M1140.2%20118.955H1173L1099.84%20288.644H1067.5L1090.6%20237.666L1043.42%20118.955H1076.45L1107.37%20204.81L1140.18%20118.955H1140.2Z'%20fill='white'/%3e%3cpath%20d='M883.182%20115.418H815.904C781.45%20115.418%20755.008%20137.837%20755.008%20171.825C755.008%20206.756%20778.846%20228.466%20815.904%20228.466C831.951%20228.699%20847.288%20231.059%20847.288%20246.64C847.288%20259.617%20835.962%20267.175%20817.555%20267.175C799.148%20267.175%20784.985%20254.664%20781.915%20239.326L756.66%20246.873C763.741%20274.722%20787.346%20292.188%20817.312%20292.188C856.963%20292.188%20876.313%20272.838%20876.313%20249.233C876.313%20234.605%20869.231%20223.036%20855.545%20215.721C868.522%20206.047%20877.022%20190.709%20877.022%20171.825C877.022%20160.986%20871.412%20149.3%20863.145%20140.674H883.182V115.418ZM815.904%20203.919C797.264%20203.919%20782.392%20192.117%20782.392%20171.825C782.392%20151.534%20799.148%20139.964%20815.904%20139.964C832.66%20139.964%20849.416%20151.29%20849.416%20171.825C849.416%20188.814%20835.497%20203.919%20815.904%20203.919Z'%20fill='white'/%3e%3cpath%20d='M737.426%20237.906V118.962H708.158V136.088C698.685%20121.481%20682.796%20115.426%20668.983%20115.426C633.587%20115.426%20608.087%20143.509%20608.087%20179.148C608.087%20214.788%20633.1%20241.452%20668.03%20241.452C682.426%20241.452%20698.24%20235.08%20708.148%20220.917V237.906H737.415H737.426ZM673.471%20213.835C653.645%20213.835%20638.308%20199.207%20638.308%20178.429C638.308%20157.65%20653.889%20143.032%20673.704%20143.032C694.705%20143.032%20709.1%20160.021%20709.1%20178.429C709.1%20196.836%20694.472%20213.835%20673.46%20213.835H673.471Z'%20fill='white'/%3e%3cpath%20d='M1003.29%20111.085C1003.29%2098.5315%201011.17%2091.8842%201023.98%2091.8842C1028.9%2091.8842%201033.83%2092.6251%201037.77%2093.853L1042.2%2068.0043C1038.02%2066.7765%201027.43%2064.7971%201021.27%2064.7971C994.18%2064.7971%20972.607%2081.786%20972.607%20110.355V118.961H956.889V144.216H972.607V164.519V237.915H1003.29V144.216H1038.46V118.961H1003.29V111.096V111.085Z'%20fill='white'/%3e%3c/g%3e%3cdefs%3e%3cclipPath%20id='clip0_1_3'%3e%3crect%20width='1173'%20height='356.842'%20fill='white'/%3e%3c/clipPath%3e%3c/defs%3e%3c/svg%3e)

Adjust
This guide explains how to set up an Adjust data grabber in the Magify analytics system.
The grabber enables automated import of ad asset data, geo performance, and other account-level metrics into your analytics pipeline.
Getting Started
- Navigate to: Configurations > Integration > MMP Grabbers and select Adjust from the list.
- Click the Add Grabber button to create a new data source.
- A configuration form will open.
This form is used to configure the integration with Adjust, including linking to an organization and providing access credentials for Amazon S3 storage.
General Settings
Form Overview
The configuration form consists of two sections:
- [Top Section] – general connection parameters: integration name, organization, storage provider, and storage access credentials.
- [Grabbers Section] – list of individual Adjust applications for which data should be collected.
Each field in the form is described below.
Name
A descriptive name for the grabber configuration. Helps identify the data source among other integrations.
Recommended format:
Recommended format: Adjust Grabber [CompanyName]
Optional field – recommended to fill in for easier navigation.
Organization
Select your organization from the dropdown list.
Provider
Select the storage provider where Adjust exports data files.
Available options:
- AWS S3
- Google Cloud Storage
- DigitalOcean Spaces
- Custom S3-compatible endpoint
Storage Access Parameters
These parameters are used by Adjust to upload exported data to the configured storage location.
Access Key
Access Key ID used to authenticate access to the storage.
Access Key Secret
Secret key associated with the Access Key. Ensure the value is copied exactly.
Bucket Name
Name of the bucket or storage container configured for exported Adjust data.
Region Name
Region where the storage bucket is located.
The availability and behavior of this field depend on the selected provider:
The availability and behavior of this field depend on the selected provider:
- AWS S3 — Required. Specify the AWS region code (for example,
eu-west-1). - Google Cloud Storage — Determined automatically and usually does not require manual configuration.
- DigitalOcean Spaces — Required. Specify the DigitalOcean region code (for example,
fra1,nyc3, orams3). - Custom S3-compatible endpoint — Optional. Used only if the storage provider requires a region value.
Endpoint URL
URL of the S3-compatible storage endpoint.
This field is required only when Custom S3-compatible endpoint is selected as the provider.
Enter the full endpoint URL supplied by your storage provider.
For AWS S3, Google Cloud Storage, and DigitalOcean Spaces, the endpoint is configured automatically and does not need to be specified manually.
For DigitalOcean Spaces, the endpoint is generated automatically based on the selected region.
Grabbers Section
This section allows you to configure individual Adjust applications. For each application, add a new grabber with the following fields:
Name
Name of the grabber for this specific application (e.g., App X iOS, App X Android).
Application
Select the corresponding application from the list. It must already be integrated with Adjust and added to Magify.
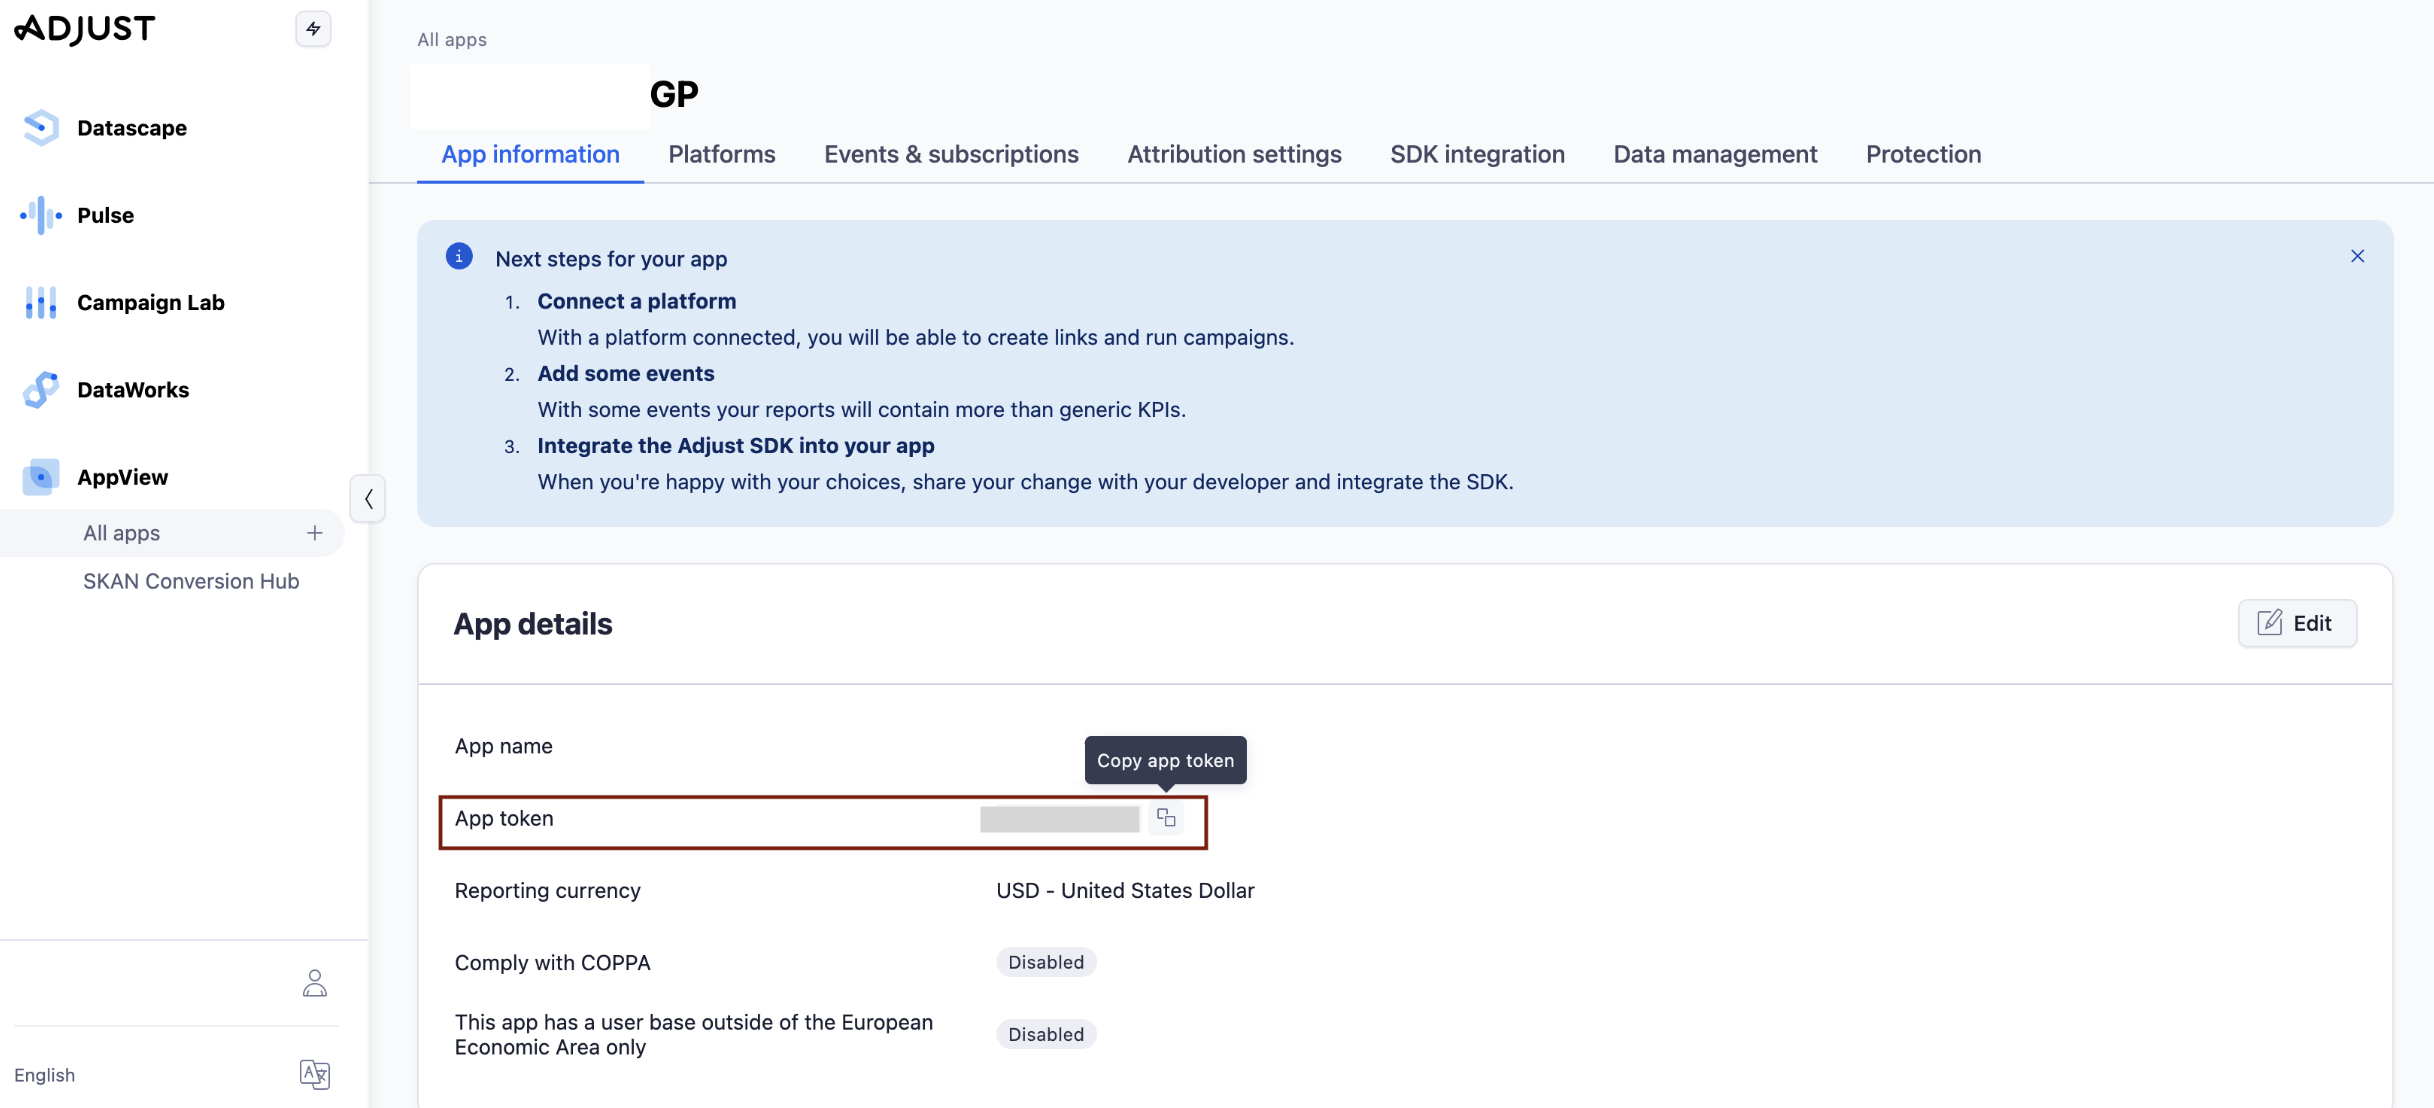
App Token
Unique identifier of the application in Adjust (e.g., abc123xyz...).
How to find it:
- Log in to your Adjust account.
- Navigate to AppView > All Apps.
- Locate the desired application.
- Copy the App Token shown next to the app name.

Alternatively:
- Go to the App Information section of the application.
- Find and copy the App Token field displayed there
Is Enabled
Enable this option to start collecting data immediately. If left unchecked, the configuration is saved but inactive.

You can add multiple applications by clicking + Add Grabbers and repeating the above fields.
Saving the Configuration
Once all required fields are filled in, click Save to complete the setup. The enabled grabber will begin collecting data from Adjust based on the configured schedule.
Additional Configuration in Adjust
The configuration above applies to the setup in Magify. However, to ensure the grabber functions correctly, additional settings must also be applied in your Adjust account.
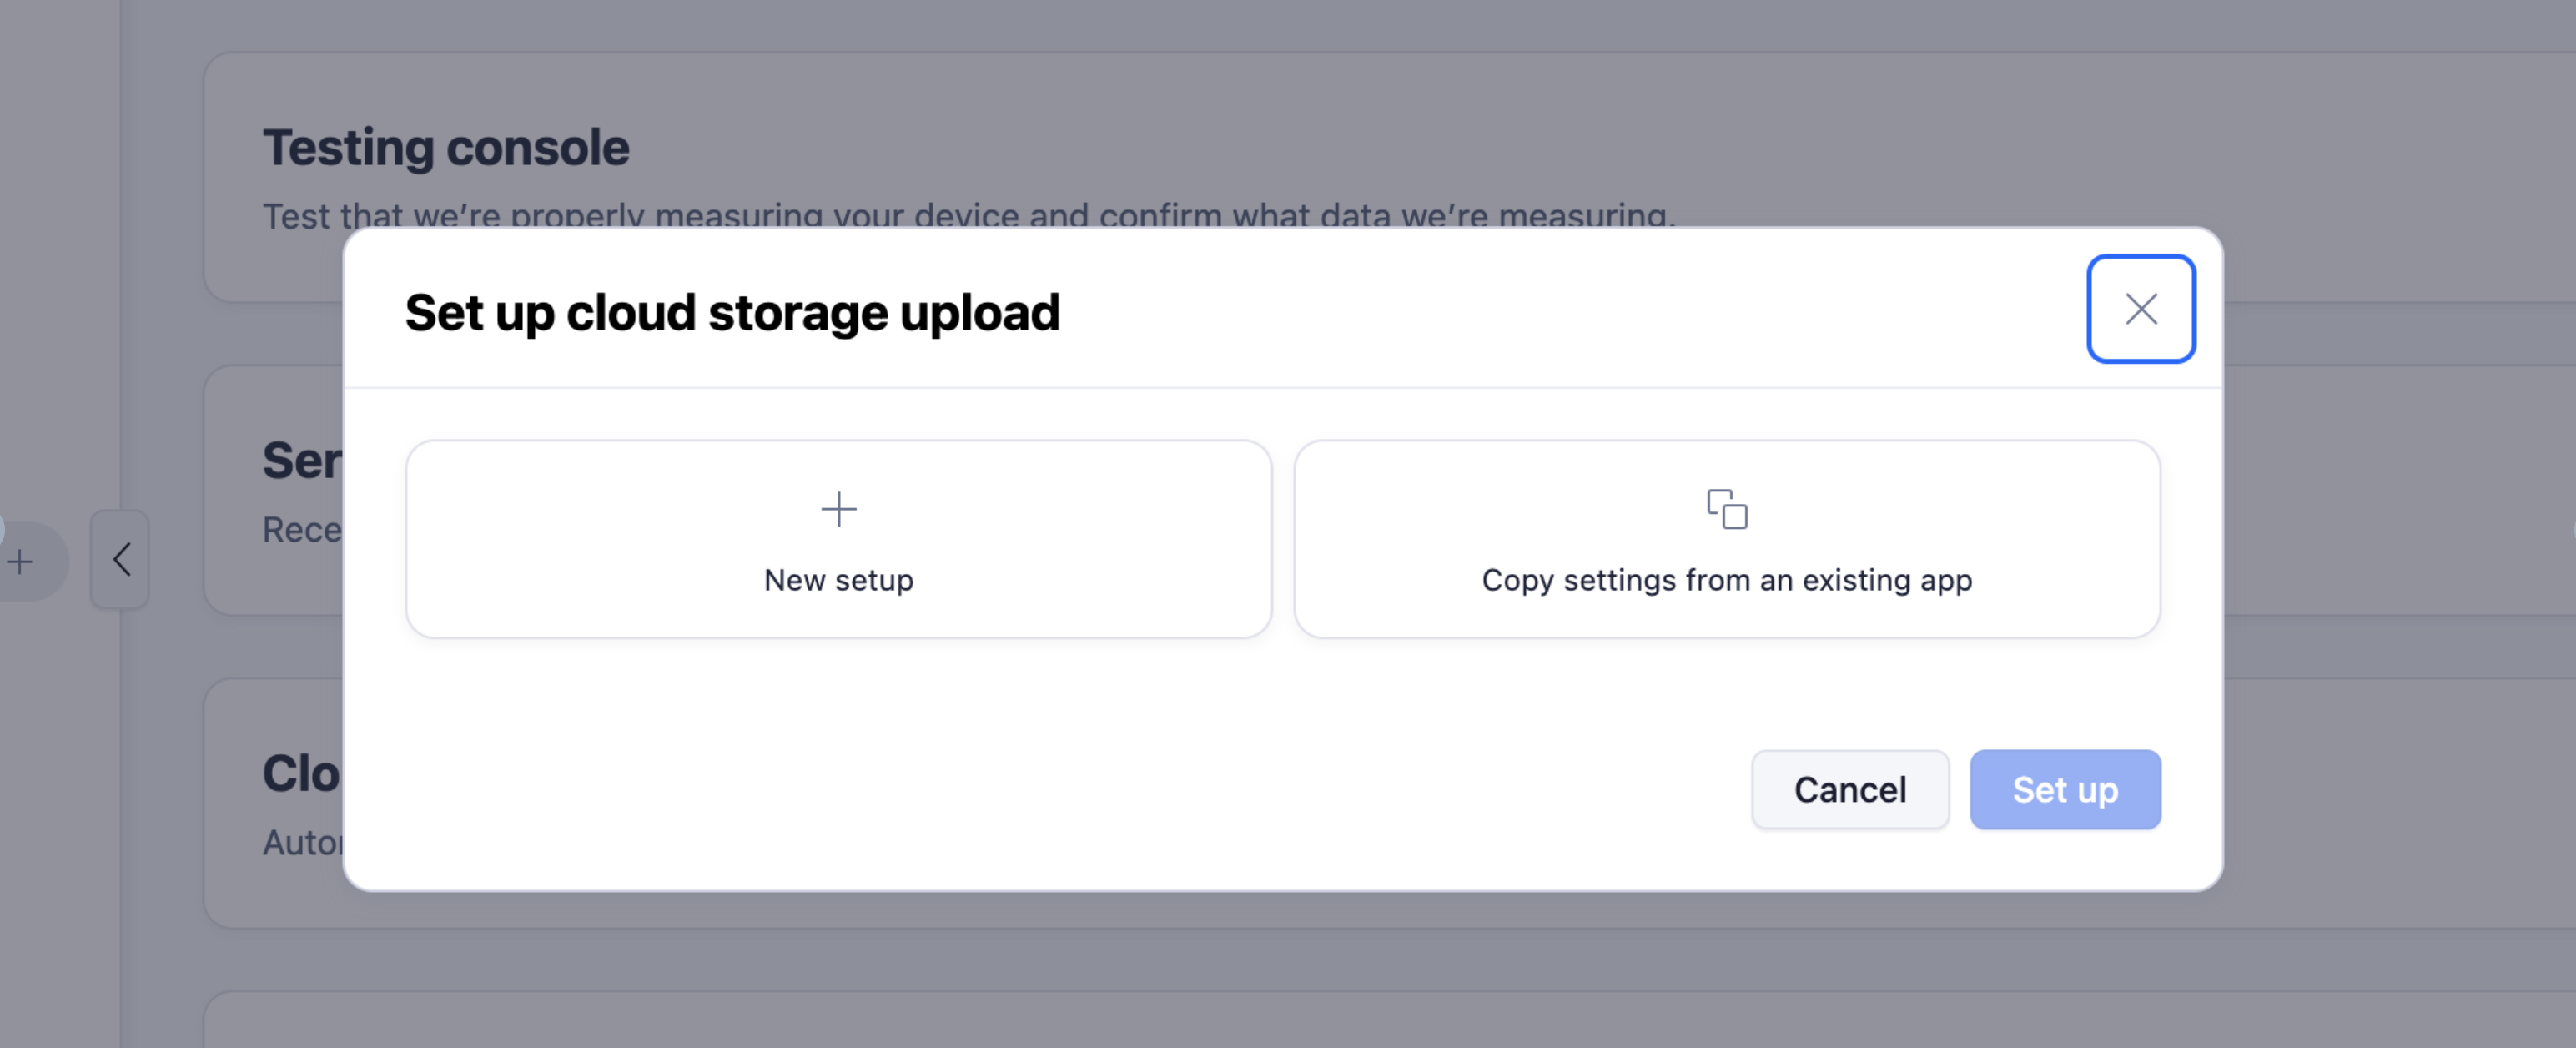
Storage settings
- Click on the application name in Adjust.
- Go to the Data Management tab.
- In the Cloud Storage Upload section, click Configure.

- Choose one of the following options:
- New Setup – for the first application.
- Copy Settings from an Existing App — for subsequent applications.
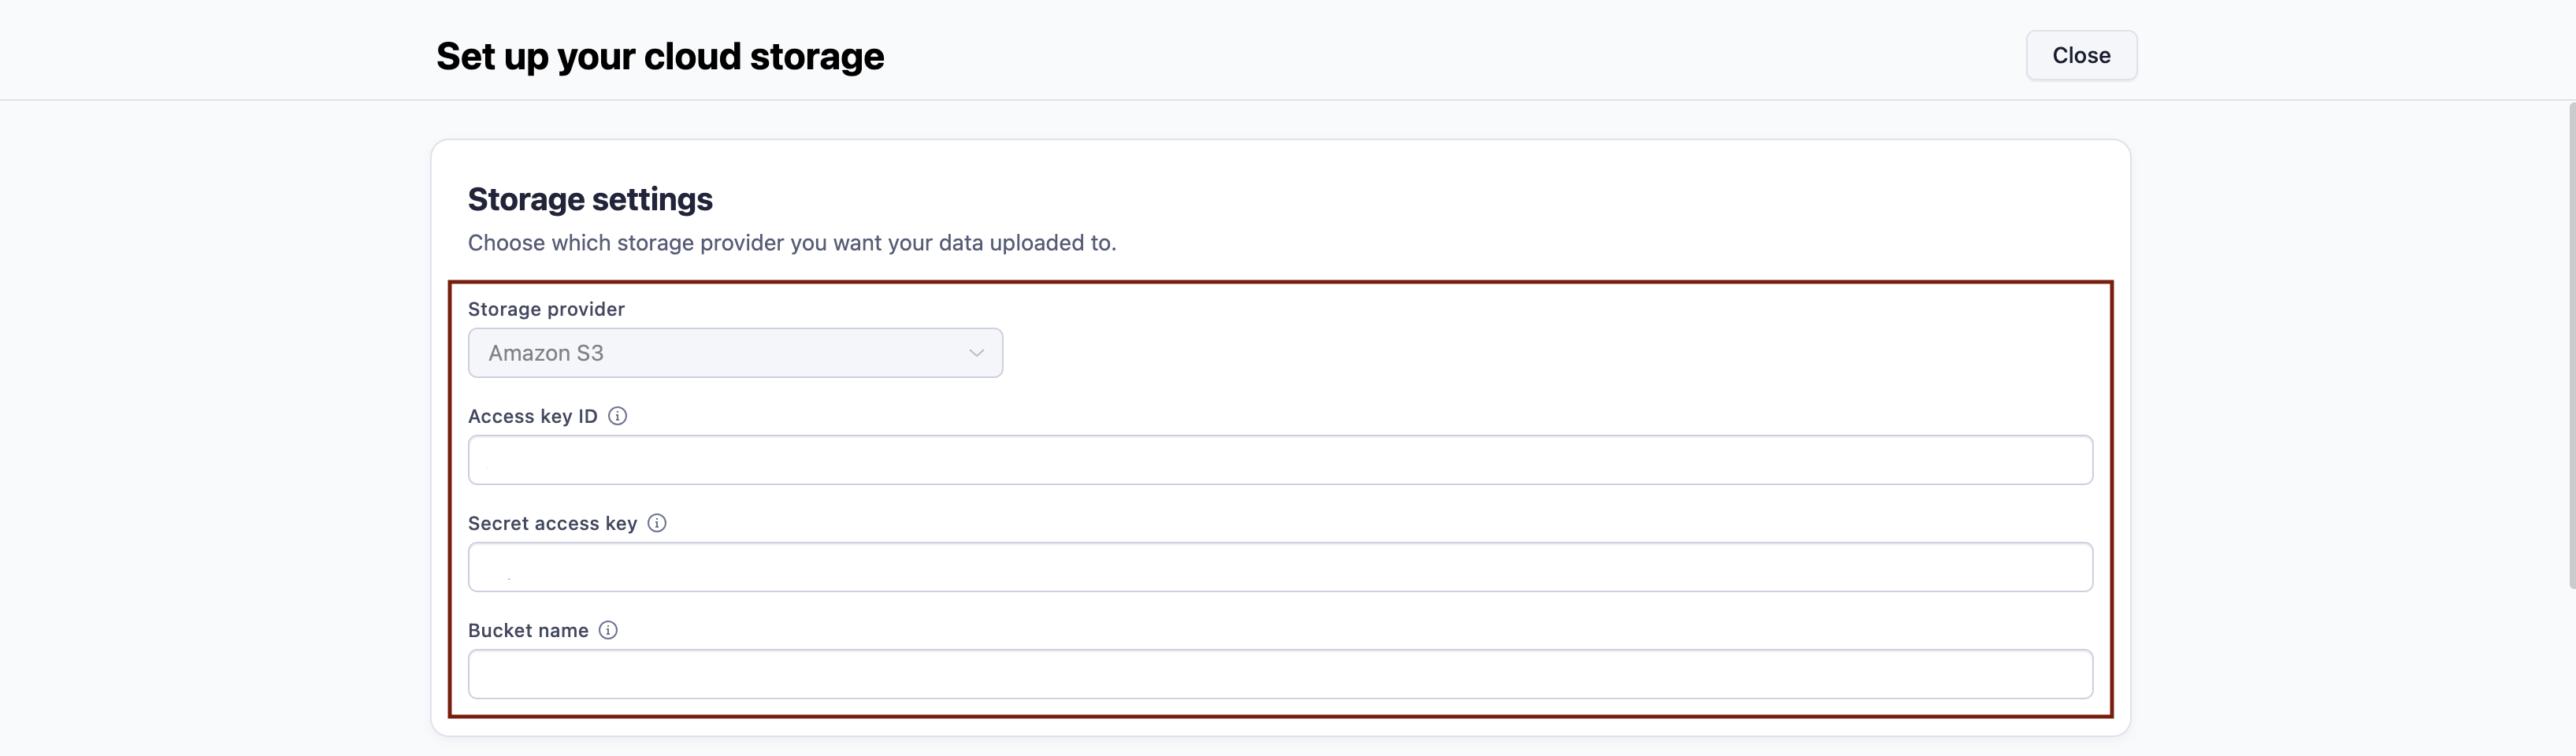
- Set the Storage Provider to Amazon S3and enter:
- Access Key ID – Same as the AWS Access Key above.
- Secret Access Key – Corresponding secret key.
- Bucket Name – Must match the one used in Magify.
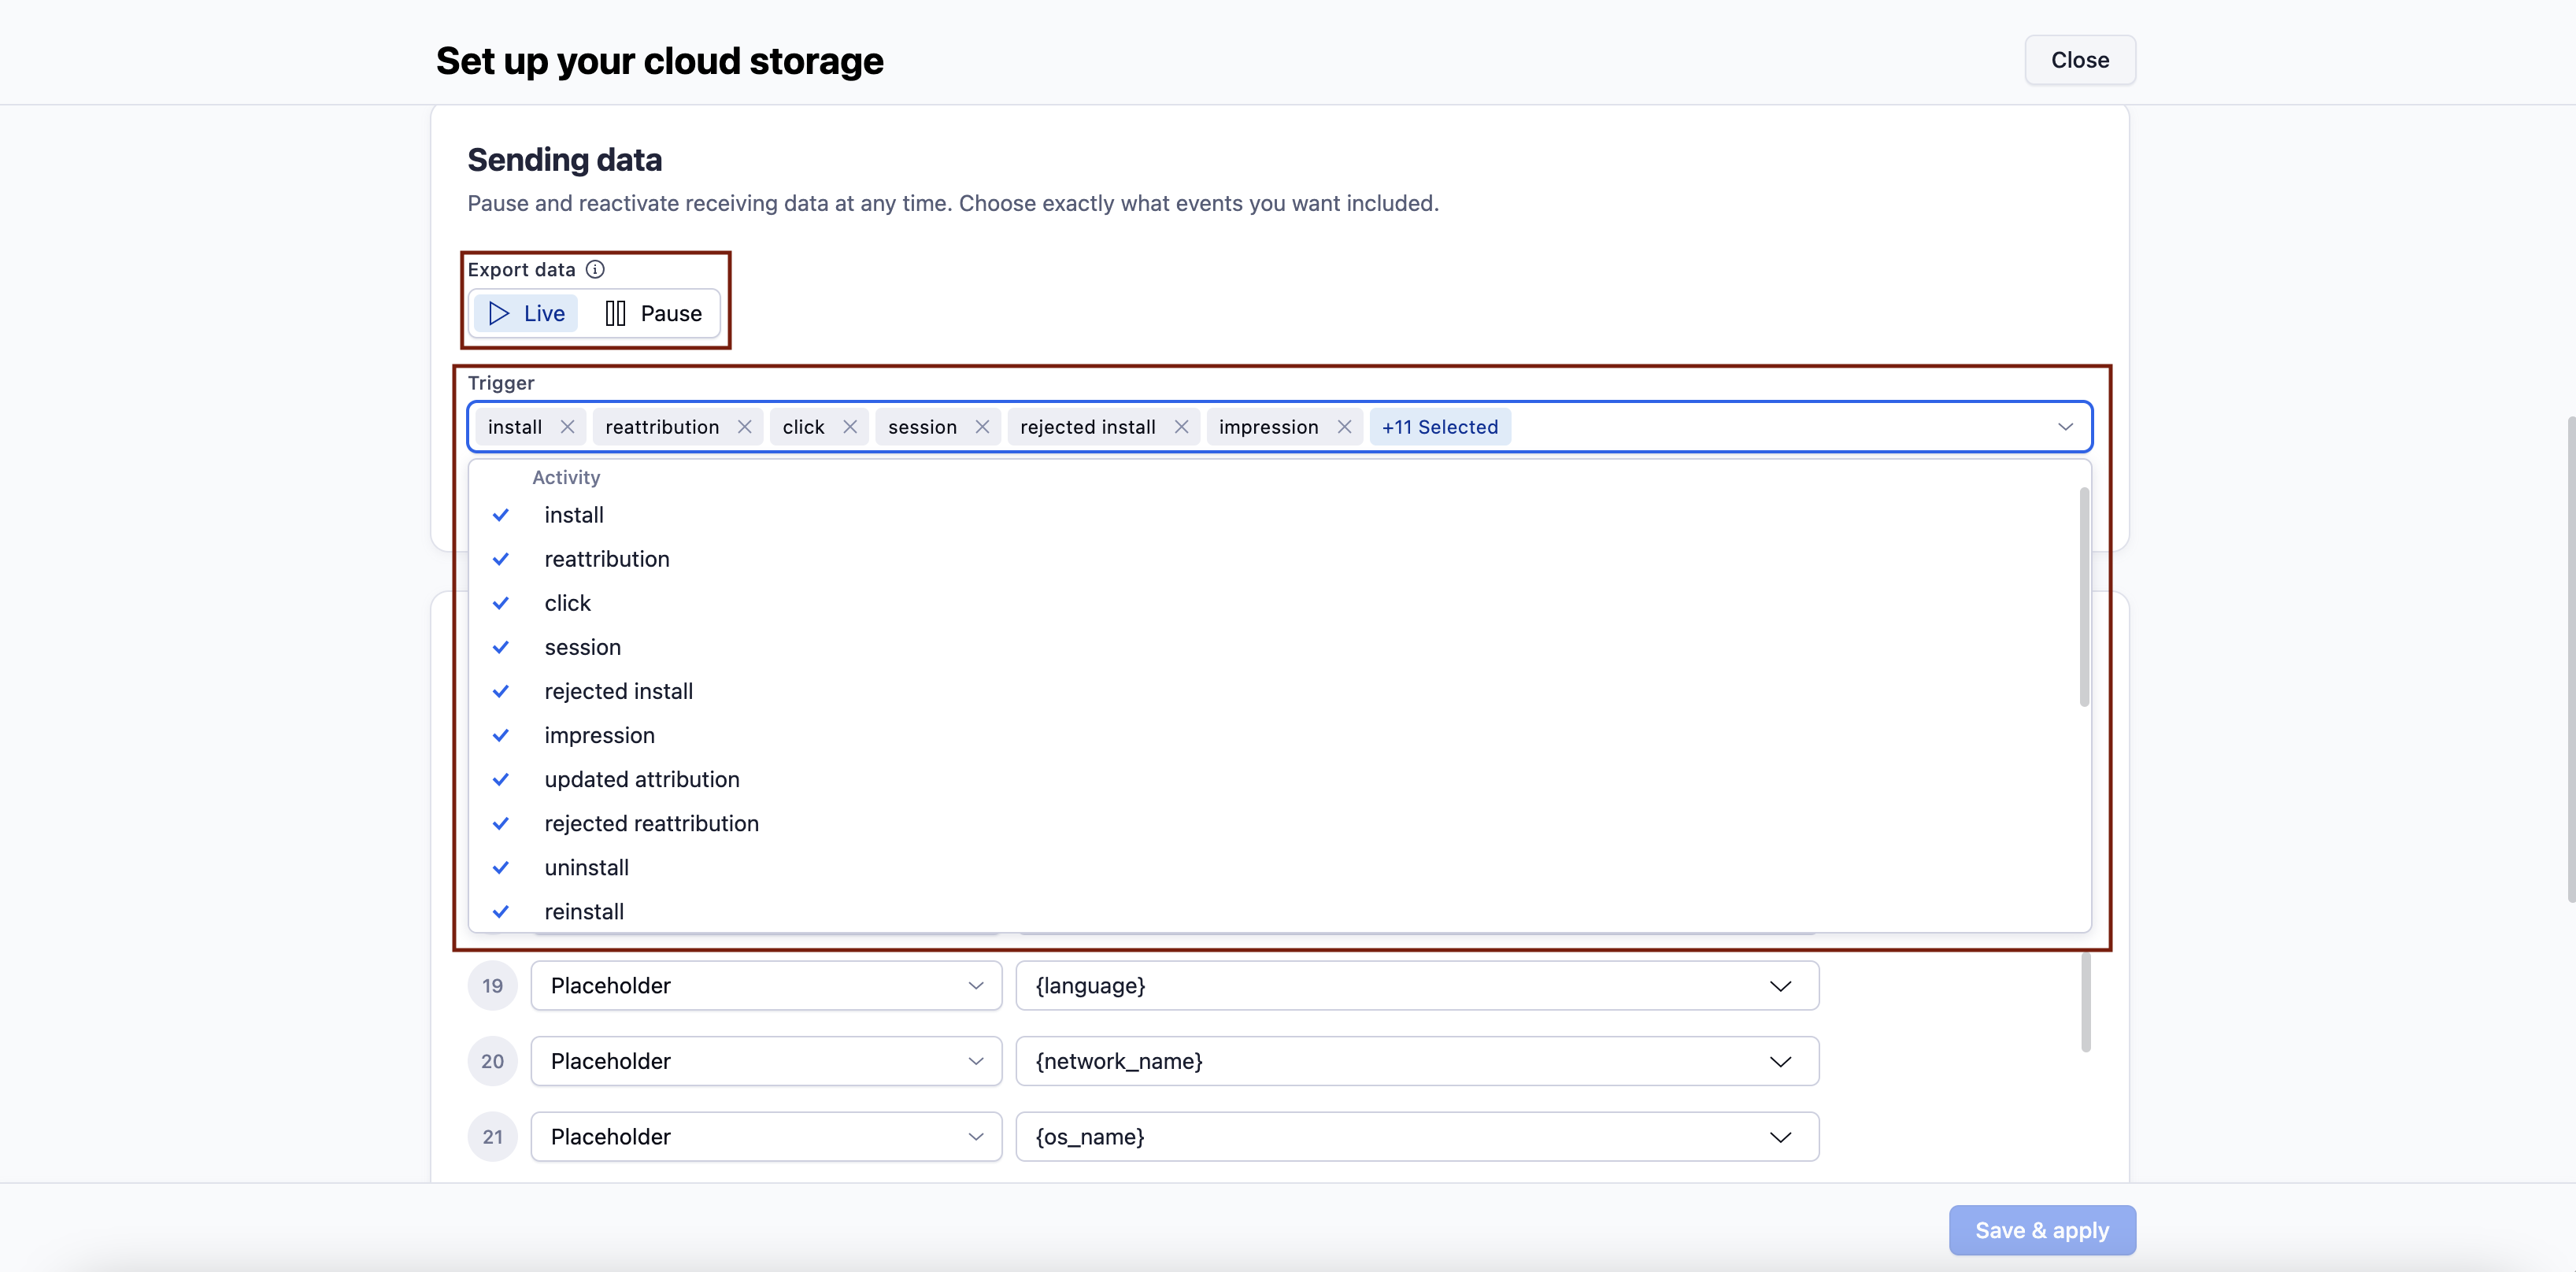
Sending Data Settings
In this section, you need to configure the data export mode and select the event triggers.
- Set Export Data to Live to enable real-time exports. (Use "Pause" to temporarily disable exports.)
- Select activity types to export as event triggers.
Format your CSV Data
In this section, you need to define how the exported data will be structured in the CSV file. Each line you add creates a separate column in the file.
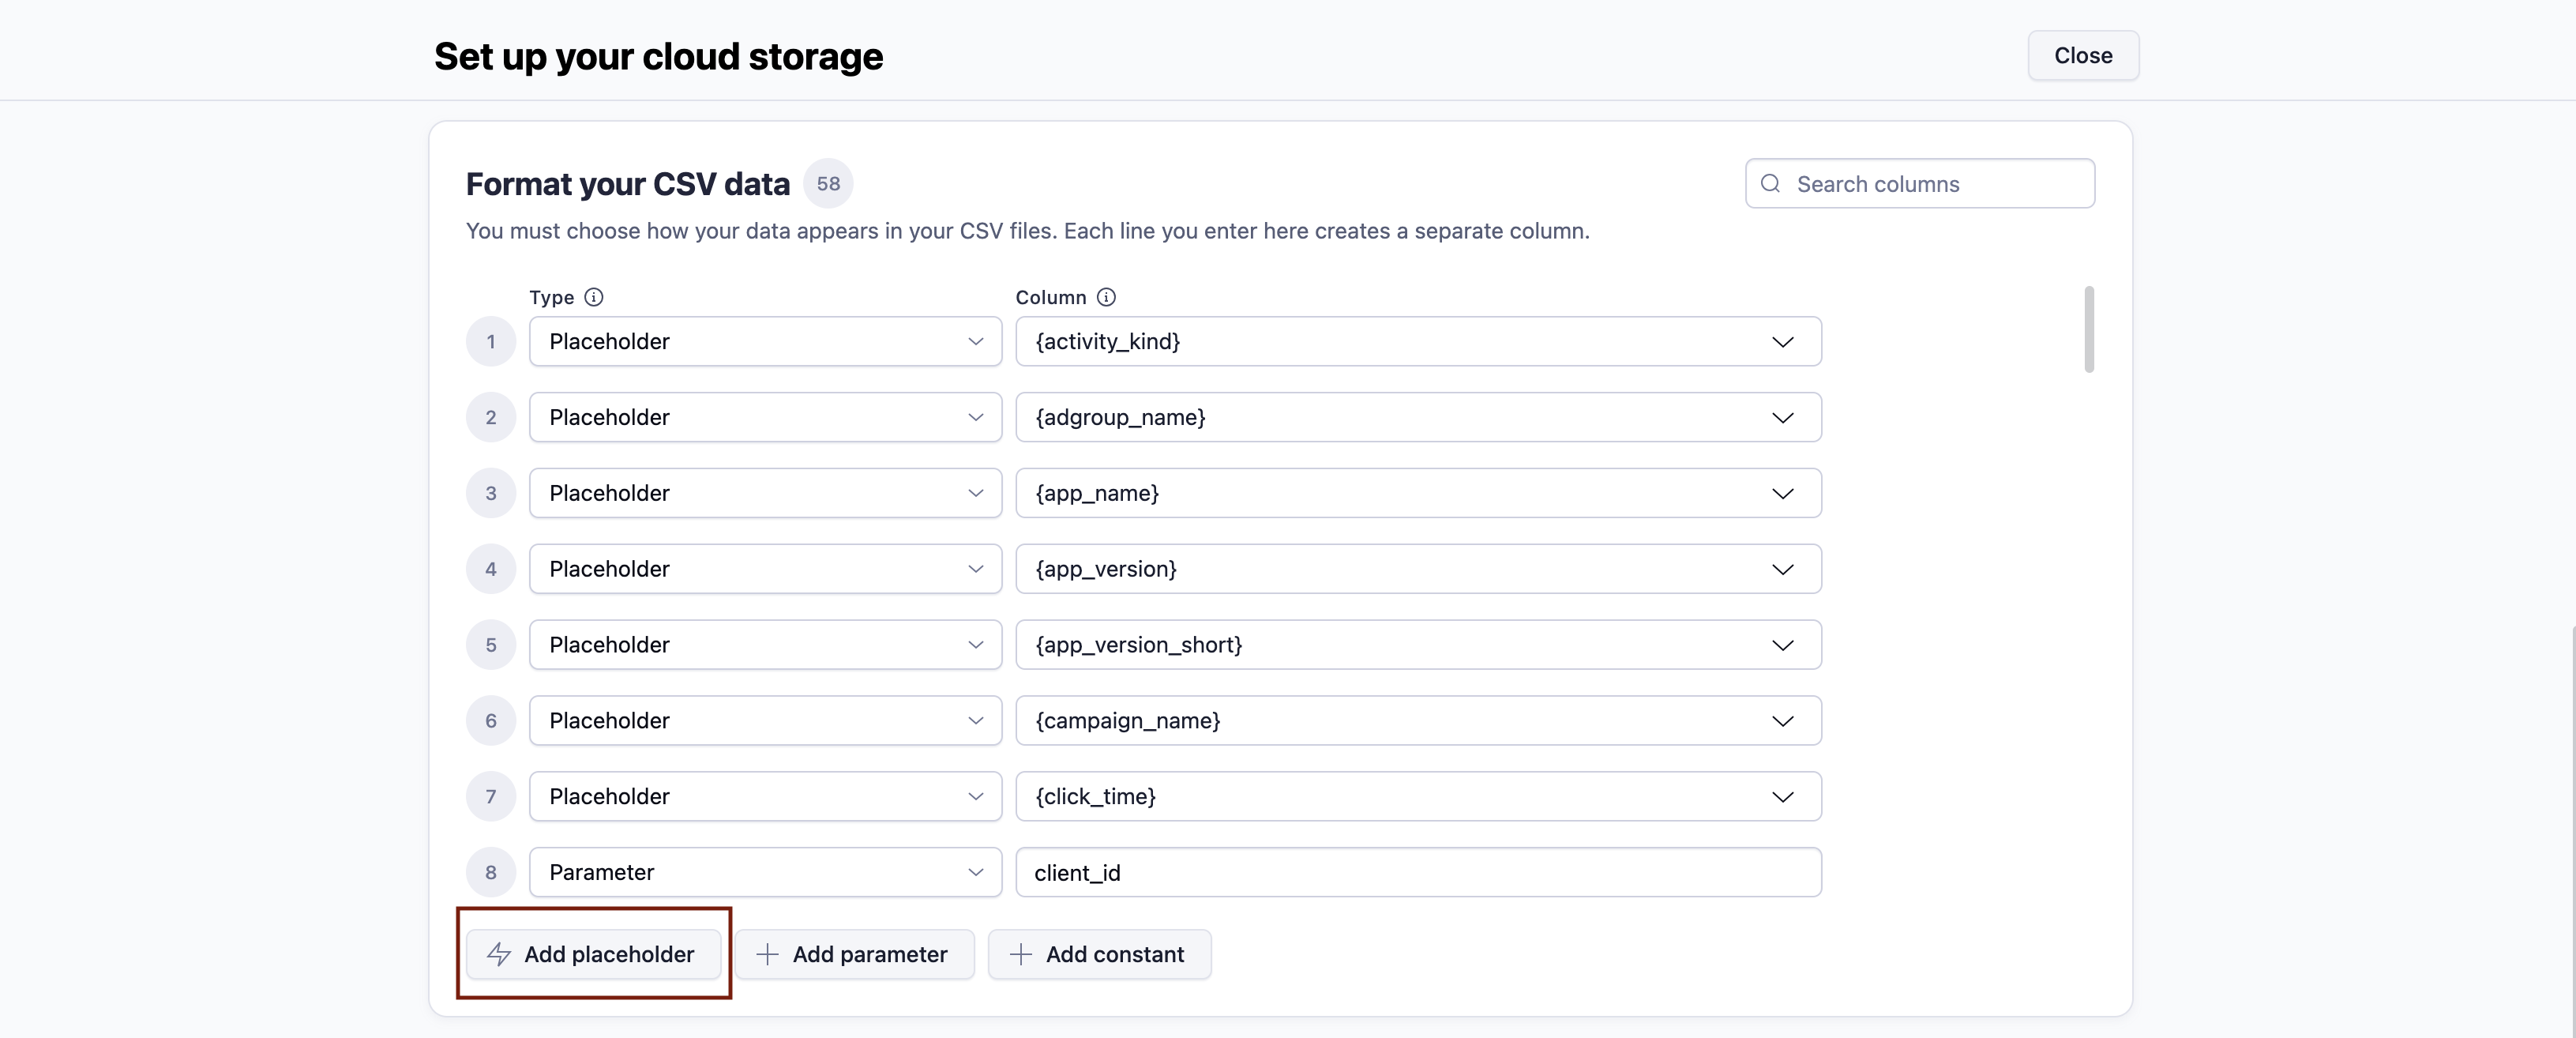
You must add the following placeholders:
- For iOS Applications
{activity_kind}, {adgroup_name}, {app_name}, {app_version}, {app_version_short}, {campaign_name}, {click_time}, {cost_amount}, {cost_currency}, {cost_type}, {country}, {created_at}, {creative_name}, {event_name}, {impression_time}, {installed_at}, {is_organic}, {language}, {network_name}, {os_name}, {sdk_version}, {publisher_parameters}, {device_name}, {device_type}, {google_ads_keyword}, {tracker_name}, {label}, {adid}, {reattributed_at}, {reinstalled_at}, {os_version}, {attribution_updated_at}, {sk_ts}, {sk_payload}, {sk_version}, {sk_network_id}, {sk_campaign_id}, {sk_transaction_id}, {sk_app_id}, {sk_attribution_signature}, {sk_invalid_signature}, {sk_redownload}, {sk_fidelity_type}, {sk_source_app_id}, {sk_conversion_value}, {sk_did_win}, {partner}, {gclid}, {gbraid}, {dcp_wbraid}, {idfa}, {reftag}, {reftags},{revenue}, {currency}, {revenue_usd}, {product_id}
- For Android Applications
{activity_kind}, {adgroup_name}, {app_name}, {app_version}, {app_version_short}, {campaign_name}, {click_time}, {cost_amount}, {cost_currency}, {cost_type}, {country}, {created_at}, {creative_name}, {event_name}, {impression_time}, {installed_at}, {is_organic}, {language}, {network_name}, {os_name}, {sdk_version}, {publisher_parameters}, {device_name}, {device_type}, {google_ads_keyword}, {tracker_name}, {label}, {adid}, {fb_install_referrer}, {fb_install_referrer_ad_id}, {fb_install_referrer_adgroup_id}, {fb_install_referrer_adgroup_name}, {fb_install_referrer_campaign_id}, {fb_install_referrer_campaign_name}, {fb_install_referrer_campaign_group_id}, {fb_install_referrer_campaign_group_name}, {fb_install_referrer_ad_objective_name}, {reattributed_at}, {reinstalled_at}, {os_version}, {attribution_updated_at}, {gclid}, {gbraid}, {dcp_wbraid}, {idfa}, {reftag}, {reftags}, {gps_adid}, {revenue}, {currency}, {revenue_usd}, {product_id}
- Click Save & Apply to confirm the settings.
By default, each grabber is configured to load data for 1 day when created.
If you need to collect data for a longer period (e.g., for initial setup or data recovery), please contact us — we can manually adjust this value for you.