'%3e%3cpath%20d='M150.127%20195.325C233.04%20195.325%20300.255%20168.696%20300.255%20135.848C300.255%20103%20233.04%2076.3709%20150.127%2076.3709C67.2143%2076.3709%200%20103%200%20135.848C0%20168.696%2067.2143%20195.325%20150.127%20195.325Z'%20fill='white'/%3e%3cpath%20d='M231.093%20118.256L150.117%20-0.000183105L69.1527%20118.256C68.1365%20119.748%2067.5967%20121.294%2067.5967%20122.871C67.5967%20136.017%20104.538%20146.666%20150.117%20146.666C195.697%20146.666%20232.638%20136.007%20232.638%20122.871C232.638%20121.294%20232.098%20119.748%20231.082%20118.256H231.093Z'%20fill='%2301A9F2'/%3e%3cpath%20d='M150.106%20356.844L98.7265%20281.5L62.3035%20311.117L25.4253%20257.017L50.787%20239.721L68.8556%20266.226L105.279%20236.62L150.106%20302.363L194.934%20236.62L231.357%20266.226L270.045%20209.48L295.407%20226.776L237.898%20311.117L201.475%20281.5L150.106%20356.844Z'%20fill='white'/%3e%3cpath%20d='M592.168%20165.22V237.908H561.482V171.825C561.482%20153.884%20551.807%20143.034%20535.051%20143.034C516.644%20143.034%20505.318%20156.011%20505.318%20175.604V237.908H474.875V171.349C474.875%20153.407%20464.968%20142.791%20448.445%20142.791C429.804%20142.791%20418.711%20156.011%20418.711%20176.07V237.908H388.025V118.964H418.711V134.301C426.502%20122.033%20440.421%20115.418%20458.13%20115.418C477.014%20115.418%20490.7%20122.975%20498.247%20135.953C506.747%20123.208%20521.608%20115.418%20540.725%20115.418C572.819%20115.418%20592.179%20135.476%20592.179%20165.22H592.168Z'%20fill='white'/%3e%3cpath%20d='M899.48%2080.2534C899.48%2068.2182%20909.388%2059.4856%20920.248%2059.4856C931.574%2059.4856%20941.248%2068.9274%20941.248%2080.2534C941.248%2091.3465%20931.574%20100.788%20920.248%20100.788C909.155%20100.788%20899.48%2092.0557%20899.48%2080.2534Z'%20fill='white'/%3e%3cpath%20d='M935.832%20118.955H905.146V237.899H935.832V118.955Z'%20fill='white'/%3e%3cpath%20d='M1140.2%20118.955H1173L1099.84%20288.644H1067.5L1090.6%20237.666L1043.42%20118.955H1076.45L1107.37%20204.81L1140.18%20118.955H1140.2Z'%20fill='white'/%3e%3cpath%20d='M883.182%20115.418H815.904C781.45%20115.418%20755.008%20137.837%20755.008%20171.825C755.008%20206.756%20778.846%20228.466%20815.904%20228.466C831.951%20228.699%20847.288%20231.059%20847.288%20246.64C847.288%20259.617%20835.962%20267.175%20817.555%20267.175C799.148%20267.175%20784.985%20254.664%20781.915%20239.326L756.66%20246.873C763.741%20274.722%20787.346%20292.188%20817.312%20292.188C856.963%20292.188%20876.313%20272.838%20876.313%20249.233C876.313%20234.605%20869.231%20223.036%20855.545%20215.721C868.522%20206.047%20877.022%20190.709%20877.022%20171.825C877.022%20160.986%20871.412%20149.3%20863.145%20140.674H883.182V115.418ZM815.904%20203.919C797.264%20203.919%20782.392%20192.117%20782.392%20171.825C782.392%20151.534%20799.148%20139.964%20815.904%20139.964C832.66%20139.964%20849.416%20151.29%20849.416%20171.825C849.416%20188.814%20835.497%20203.919%20815.904%20203.919Z'%20fill='white'/%3e%3cpath%20d='M737.426%20237.906V118.962H708.158V136.088C698.685%20121.481%20682.796%20115.426%20668.983%20115.426C633.587%20115.426%20608.087%20143.509%20608.087%20179.148C608.087%20214.788%20633.1%20241.452%20668.03%20241.452C682.426%20241.452%20698.24%20235.08%20708.148%20220.917V237.906H737.415H737.426ZM673.471%20213.835C653.645%20213.835%20638.308%20199.207%20638.308%20178.429C638.308%20157.65%20653.889%20143.032%20673.704%20143.032C694.705%20143.032%20709.1%20160.021%20709.1%20178.429C709.1%20196.836%20694.472%20213.835%20673.46%20213.835H673.471Z'%20fill='white'/%3e%3cpath%20d='M1003.29%20111.085C1003.29%2098.5315%201011.17%2091.8842%201023.98%2091.8842C1028.9%2091.8842%201033.83%2092.6251%201037.77%2093.853L1042.2%2068.0043C1038.02%2066.7765%201027.43%2064.7971%201021.27%2064.7971C994.18%2064.7971%20972.607%2081.786%20972.607%20110.355V118.961H956.889V144.216H972.607V164.519V237.915H1003.29V144.216H1038.46V118.961H1003.29V111.096V111.085Z'%20fill='white'/%3e%3c/g%3e%3cdefs%3e%3cclipPath%20id='clip0_1_3'%3e%3crect%20width='1173'%20height='356.842'%20fill='white'/%3e%3c/clipPath%3e%3c/defs%3e%3c/svg%3e)

AdMob
This guide explains how to set up an AdMob monetization data grabber in the Magify analytics system.
The grabber enables the automated import of monetization data, including ad revenue, impressions, eCPM, ad unit performance, and other AdMob-specific metrics from your Google AdMob account into your analytics pipeline.
Getting Started
- Navigate to Configurations > Integrations > Monetizations Grabbers in the Magify interface.
- Find AdMob in the list and click Add Grabber to create a new data source.
- A configuration form will open.

This form is used to connect Magify to your AdMob account by providing the required credentials: Publisher ID, Client ID, Client Secret, Refresh Token, Grabbing Start Date, and a custom integration name.
Each field in the form is described below.
Name
A descriptive name for the grabber configuration. Helps identify the data source among other integrations.
Recommended format: AdMob Grabber [CompanyName]
Optional field – recommended to fill in for easier navigation.
Organization
Select your organization from the dropdown list.
Publisher ID
The Publisher ID is a unique identifier assigned to your AdMob account. It is required to authenticate and retrieve monetization data via the AdMob API.
How to find it:
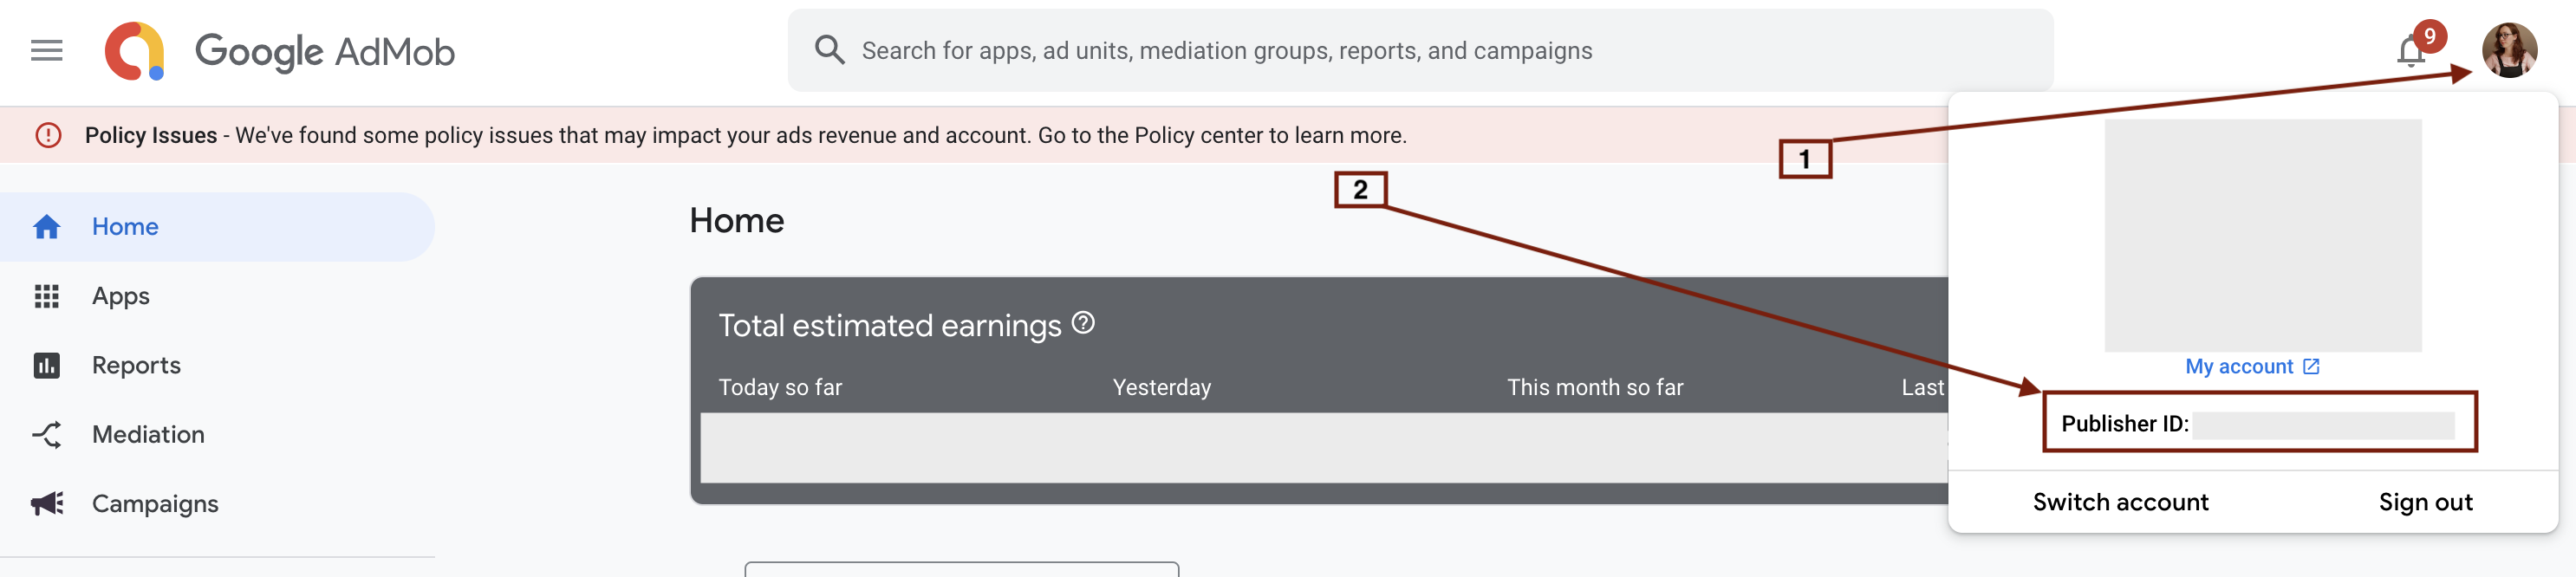
- Log in to your Google AdMob account.
- Сlick on your Google account avatar in the top right corner of the screen.
- In the dropdown that appears, locate and copy your Publisher ID — it will be shown under your account information, formatted like:
pub-xxxxxxxxxxxxxxxx
Client ID and Client Secret
These credentials are used to authenticate Magify’s access to your AdMob data through the Google OAuth 2.0 API. They are required to authorize secure communication and allow Magify to retrieve monetization reports from your AdMob account.
How to obtain them:
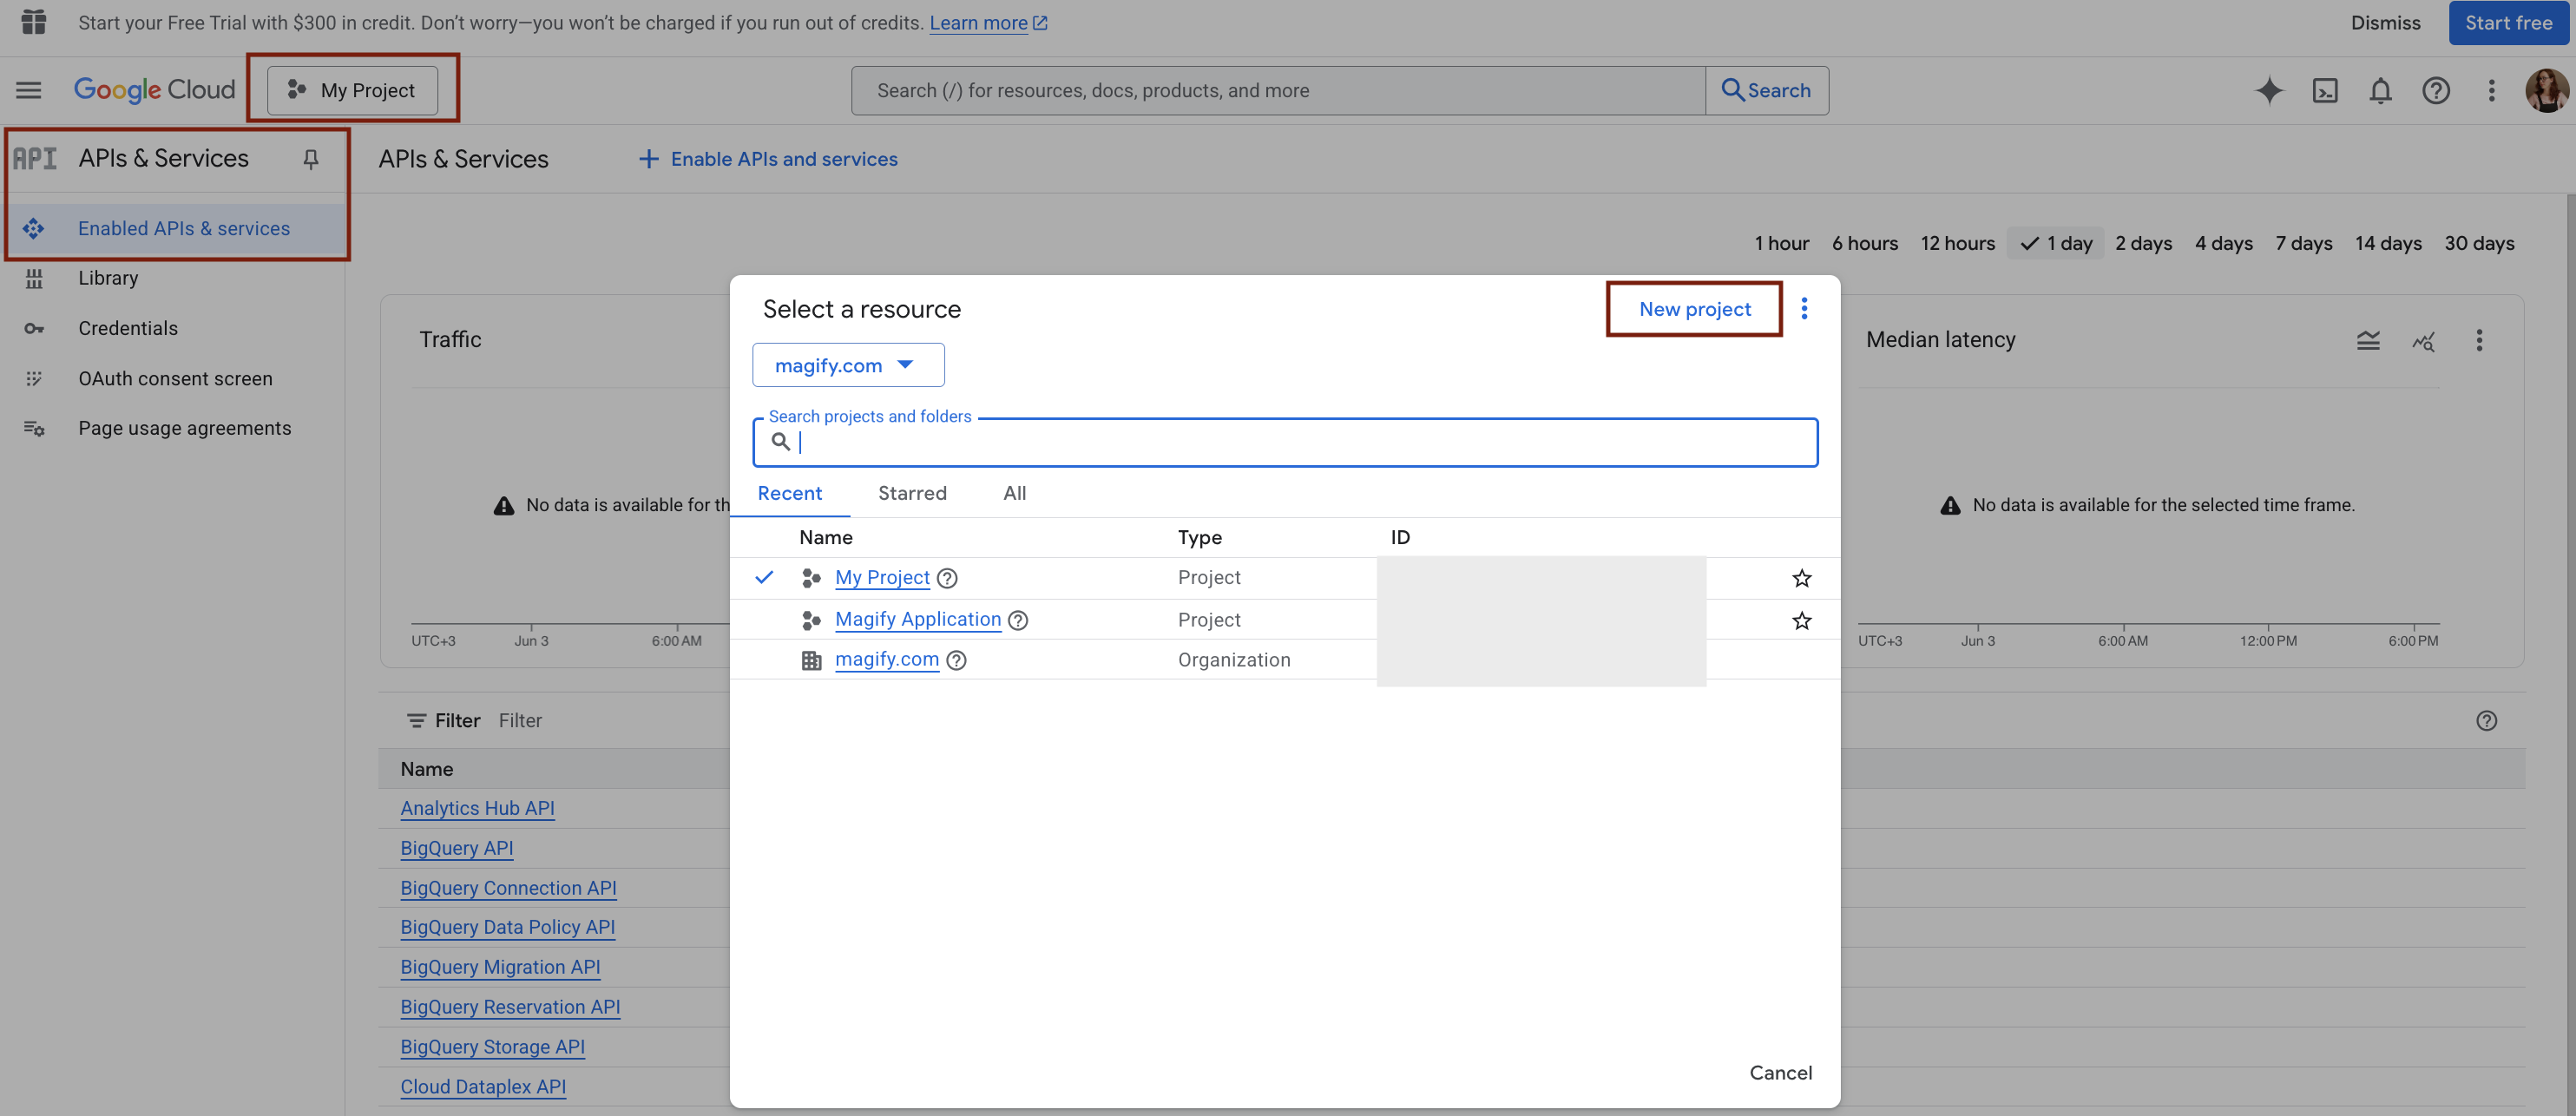
- Go to the Google Cloud Console.
- Click on the APIs & Services button in the menu.
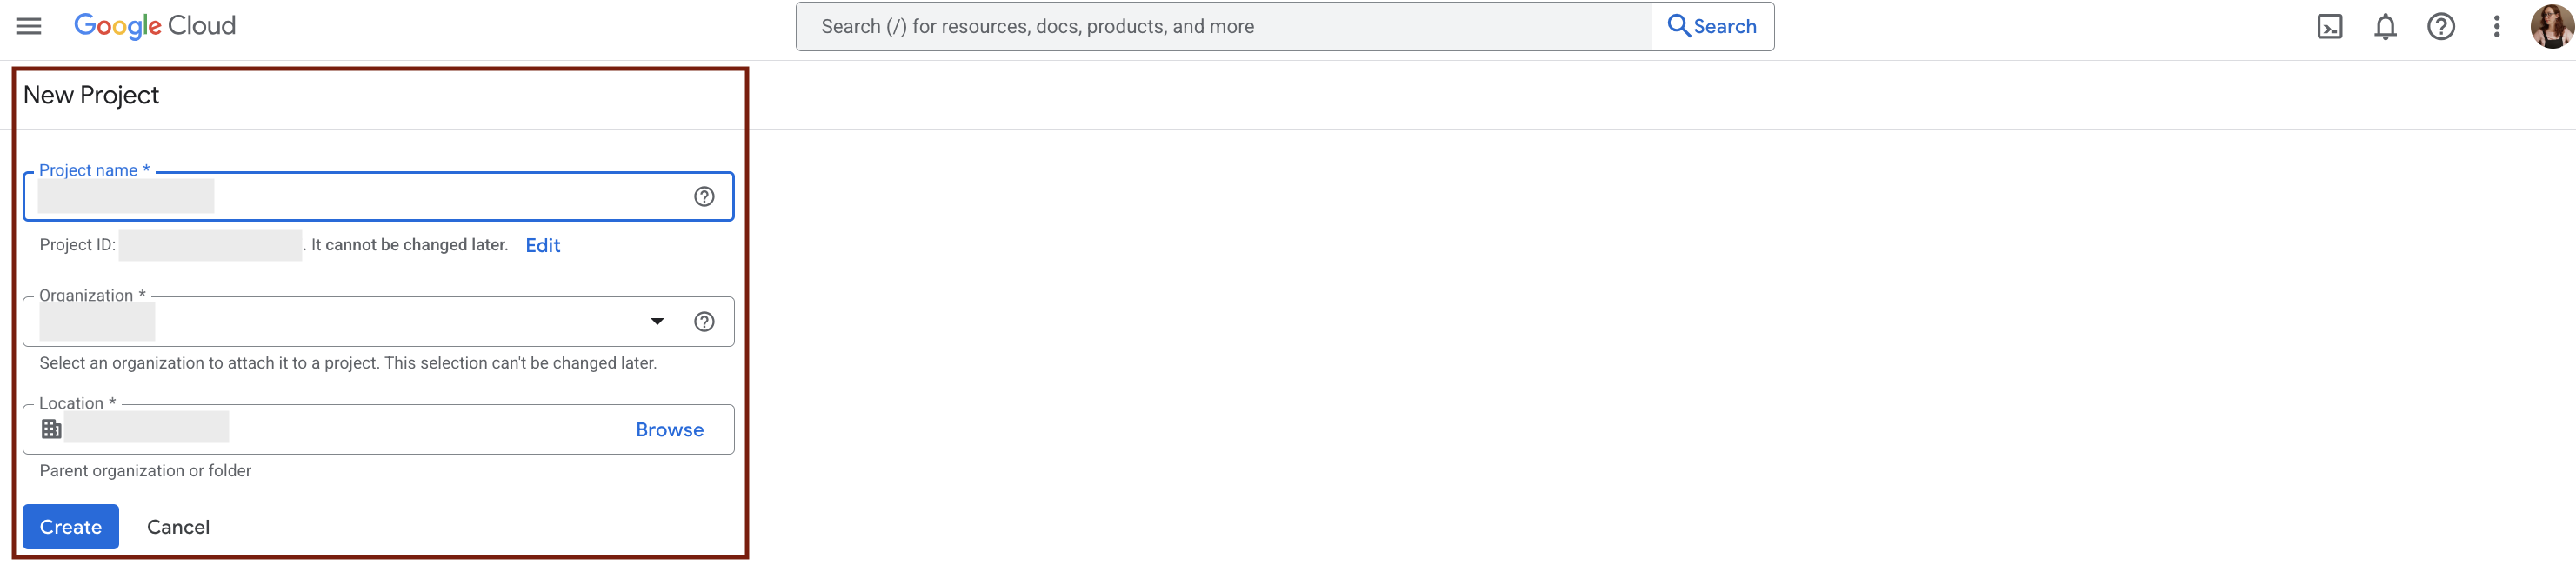
- Open the project picker at the upper-left of the page. Select New Project, or choose an existing project you already created for this app.
In the case you are creating a new project for this purpose, provide a Project name in the dialog box that appears and click Create.
- In the left sidebar, select OAuth consent screen.

- If you see a screen that says "Google Auth Platform not configured yet", click the Get started button to begin setting up your OAuth configuration.
- On the App Information screen, fill in the required fields and check the box "I agree to the Google API Services: User Data Policy". Click Continue to complete the OAuth consent screen setup.
- Once the consent screen setup is complete, you’ll be redirected to the OAuth Overview page.Click the Create OAuth client button to generate your credentials. You will proceed to configure your OAuth 2.0 Client ID and Client Secret, which are required for the AdMob grabber integration in Magify.

- On the Create OAuth client ID screen:
- In the Application type dropdown, select Web application.
- Provide a name for your app in the Name field (e.g.,
Magify AdMob Client). This name is internal and used only for your reference. - In the Authorized redirect URIs section, you must enter the following URL:
https://developers.google.com/oauthplaygroundThis is required for using OAuth 2.0 Playground to manually generate a refresh token.

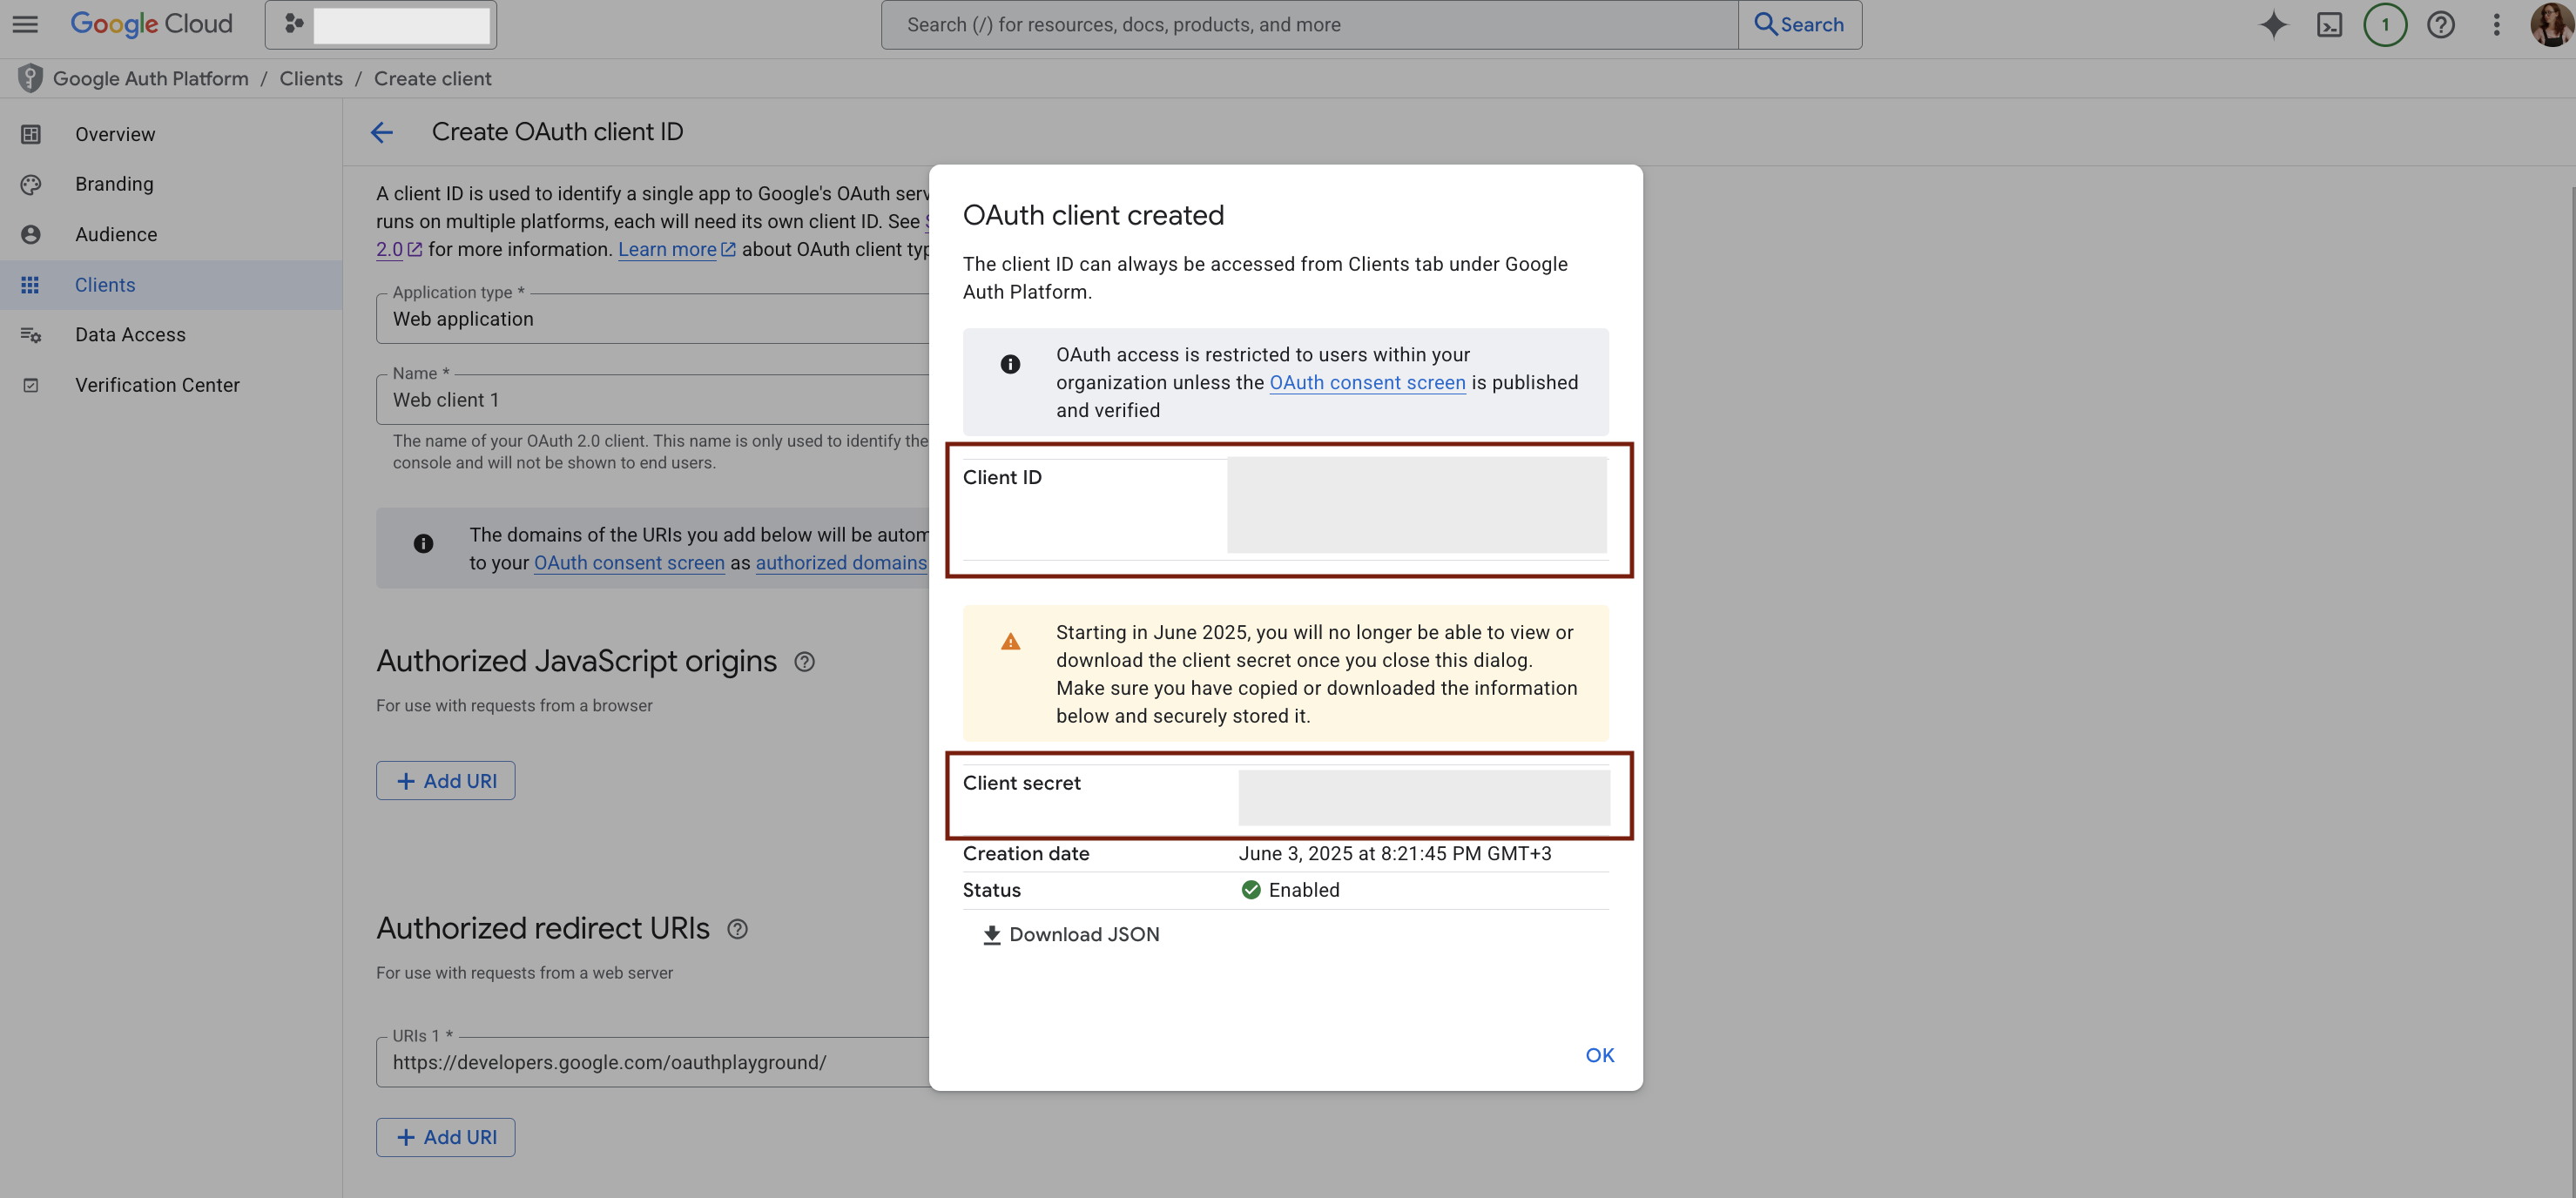
Once completed, click Create to generate your Client ID and Client Secret. These credentials will be used in the Magify interface to connect the AdMob grabber.
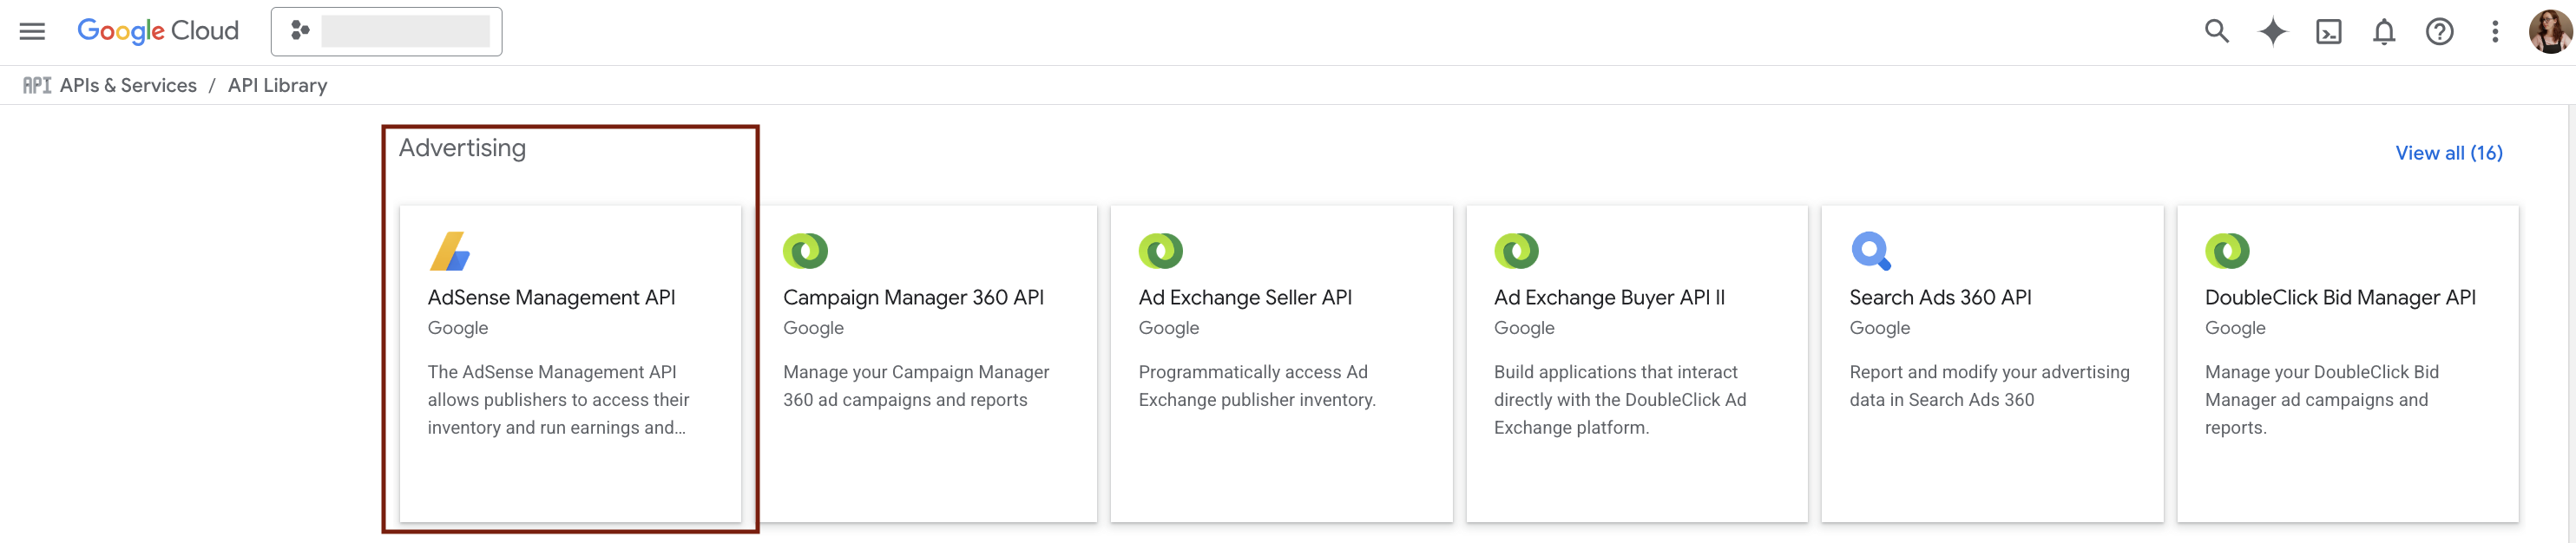
- Go to the API Library. To access the list of available APIs: click on Library in the left-hand menu (located below Enabled APIs & services).

- In the API Library, scroll to the Advertising section and locate the AdSense Management APIcard:
- Click on the AdSense Management API.
- Then, click the Enable button on the API details page.

Refresh Token
To authenticate requests to the AdSense API, you'll need a Refresh token. Follow these steps:
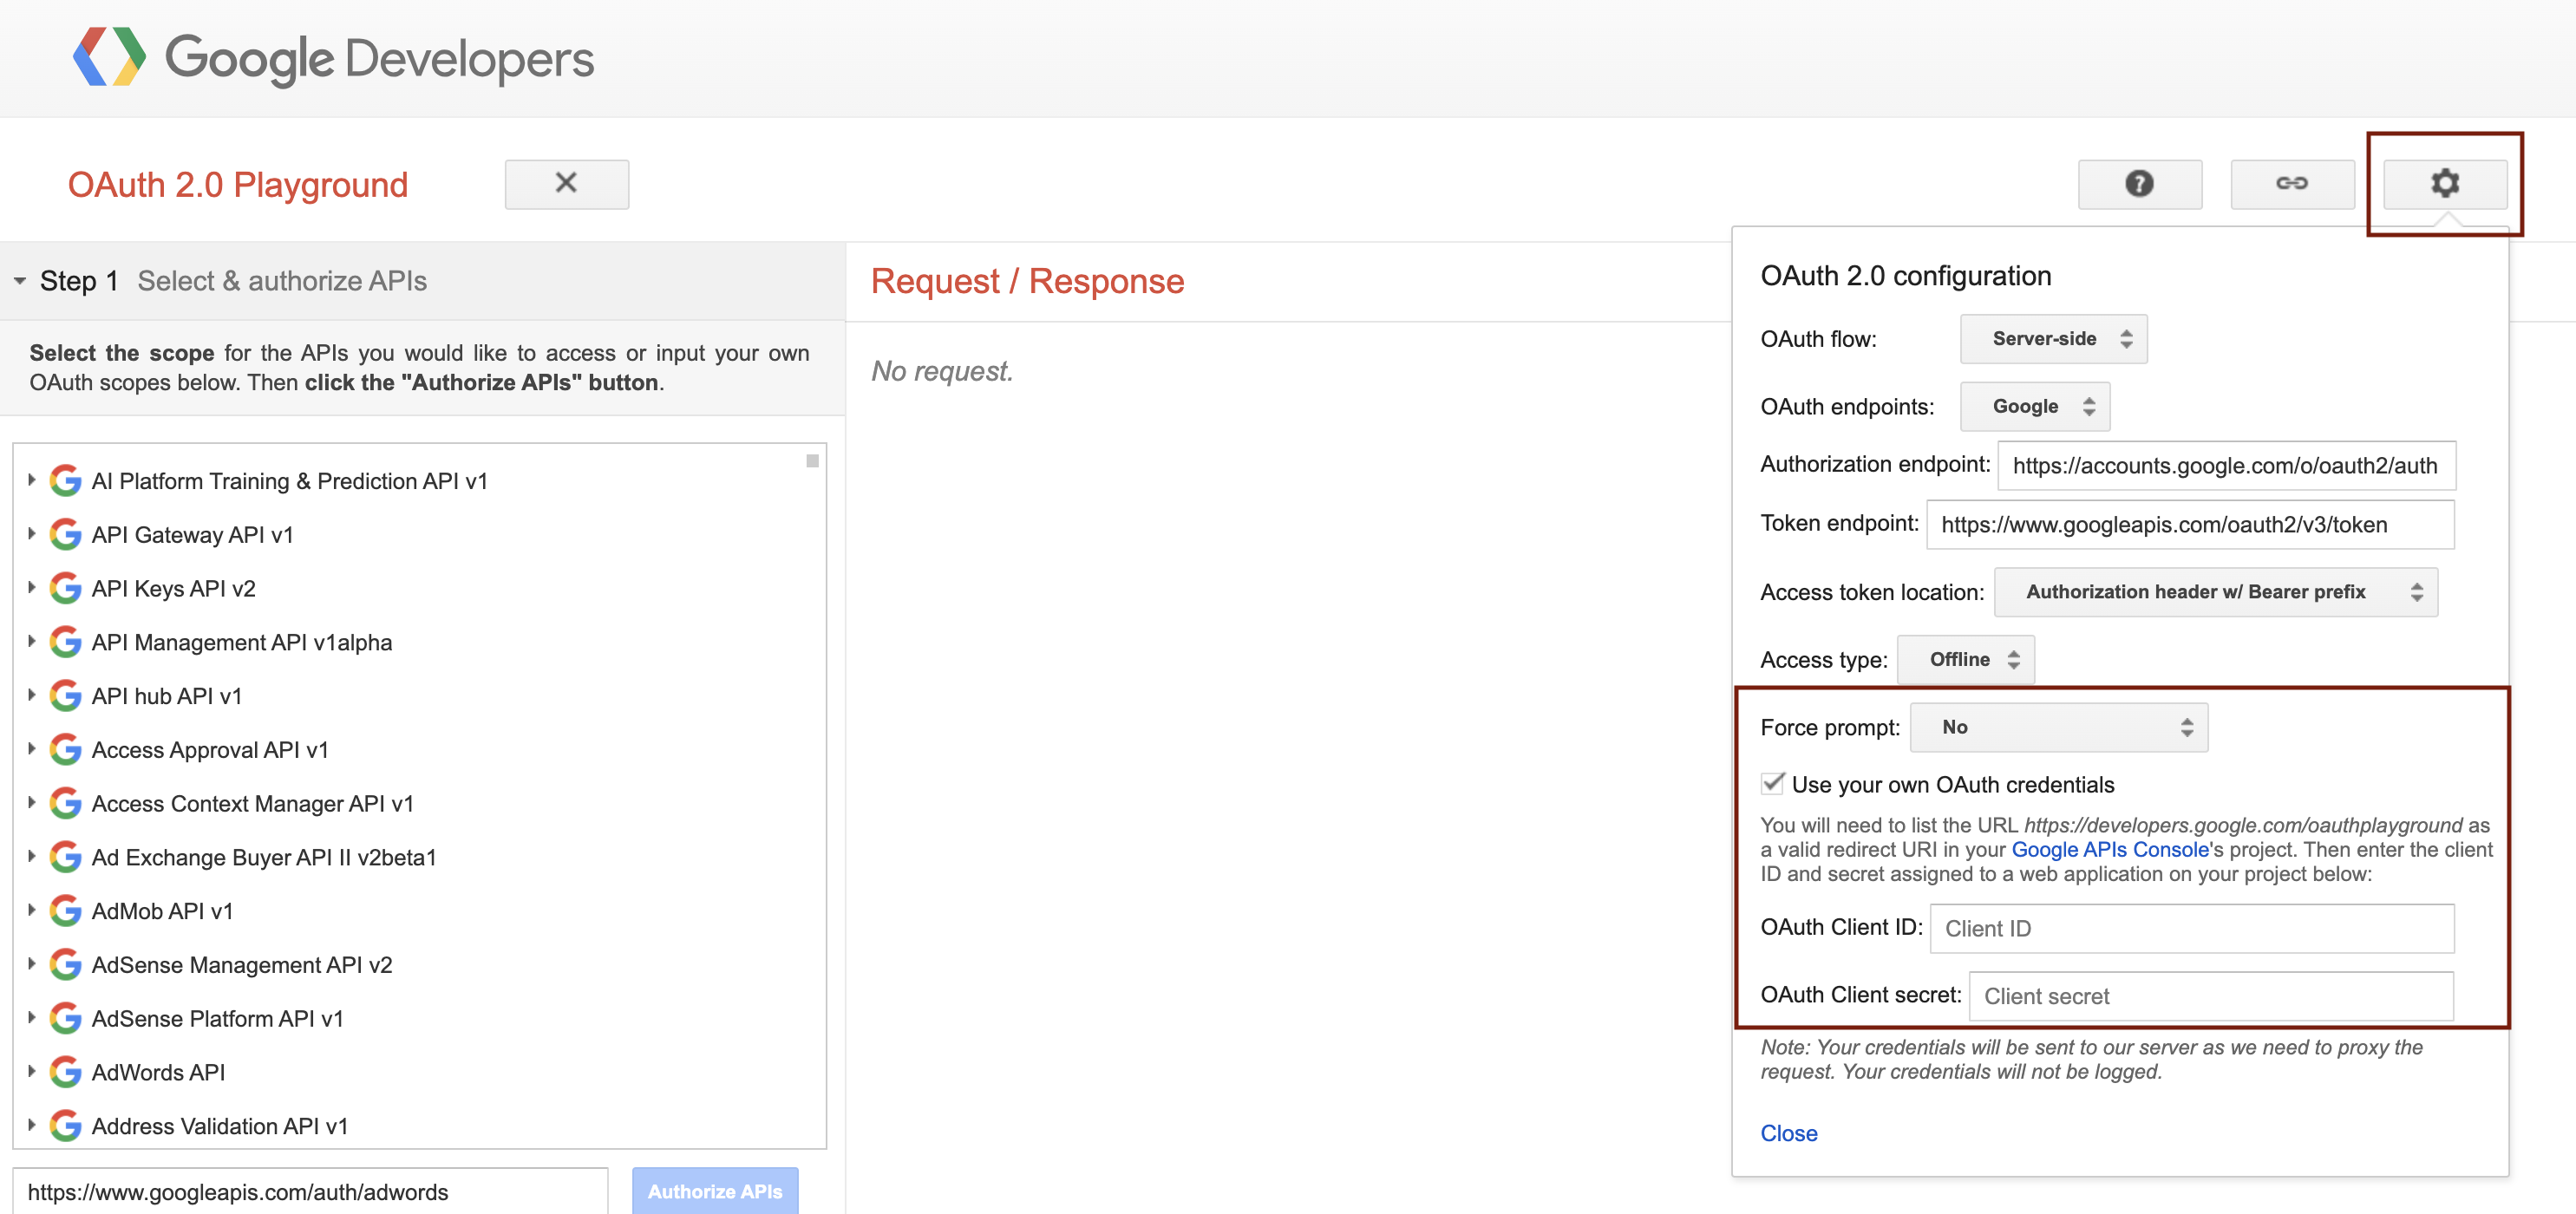
- Go to the OAuth 2.0 Playground.
- Click the settings icon (⚙️) in the upper right corner. From the Force prompt drop-down, select "No", and check the box "Use your own OAuth credentials".
- Then, input your Client ID and Client Secret.
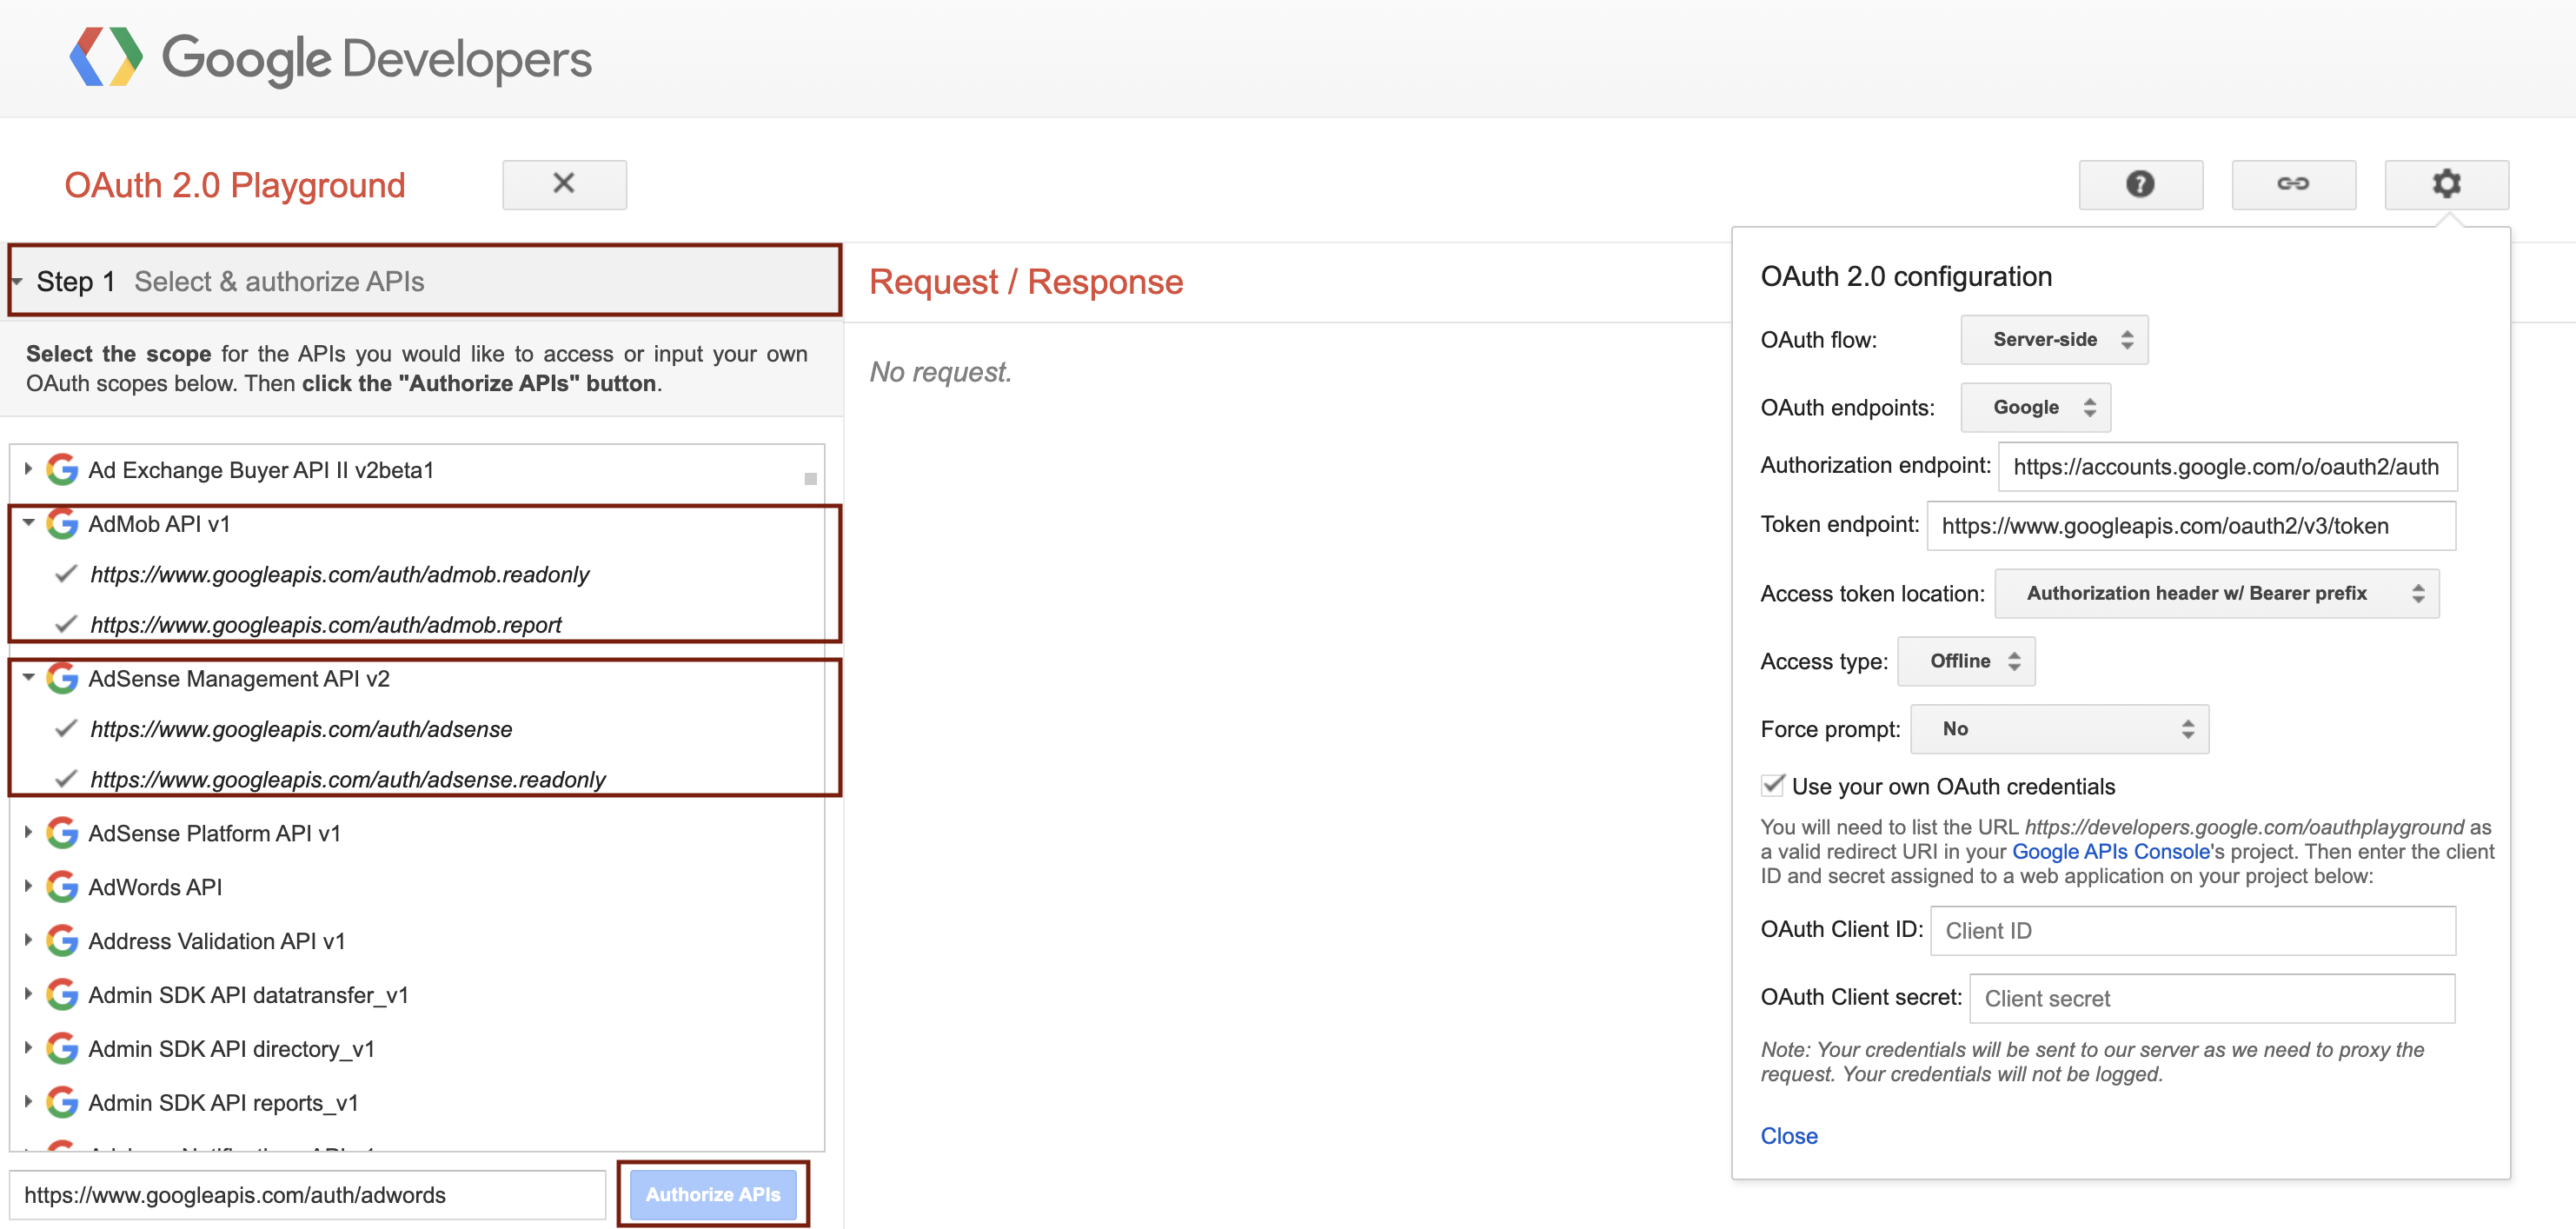
- In Step 1: Select & Authorize APIs, scroll down to find AdSense Management API v2and select the following scopes:
https://www.googleapis.com/auth/adsensehttps://www.googleapis.com/auth/adsense.readonly
- In Step 1: Select & Authorize APIs, scroll down and find AdMob API v1and select the following scopes:
https://www.googleapis.com/auth/admob.readonlyhttps://www.googleapis.com/auth/admob.report
- Click Authorize APIs to continue the authentication flow.
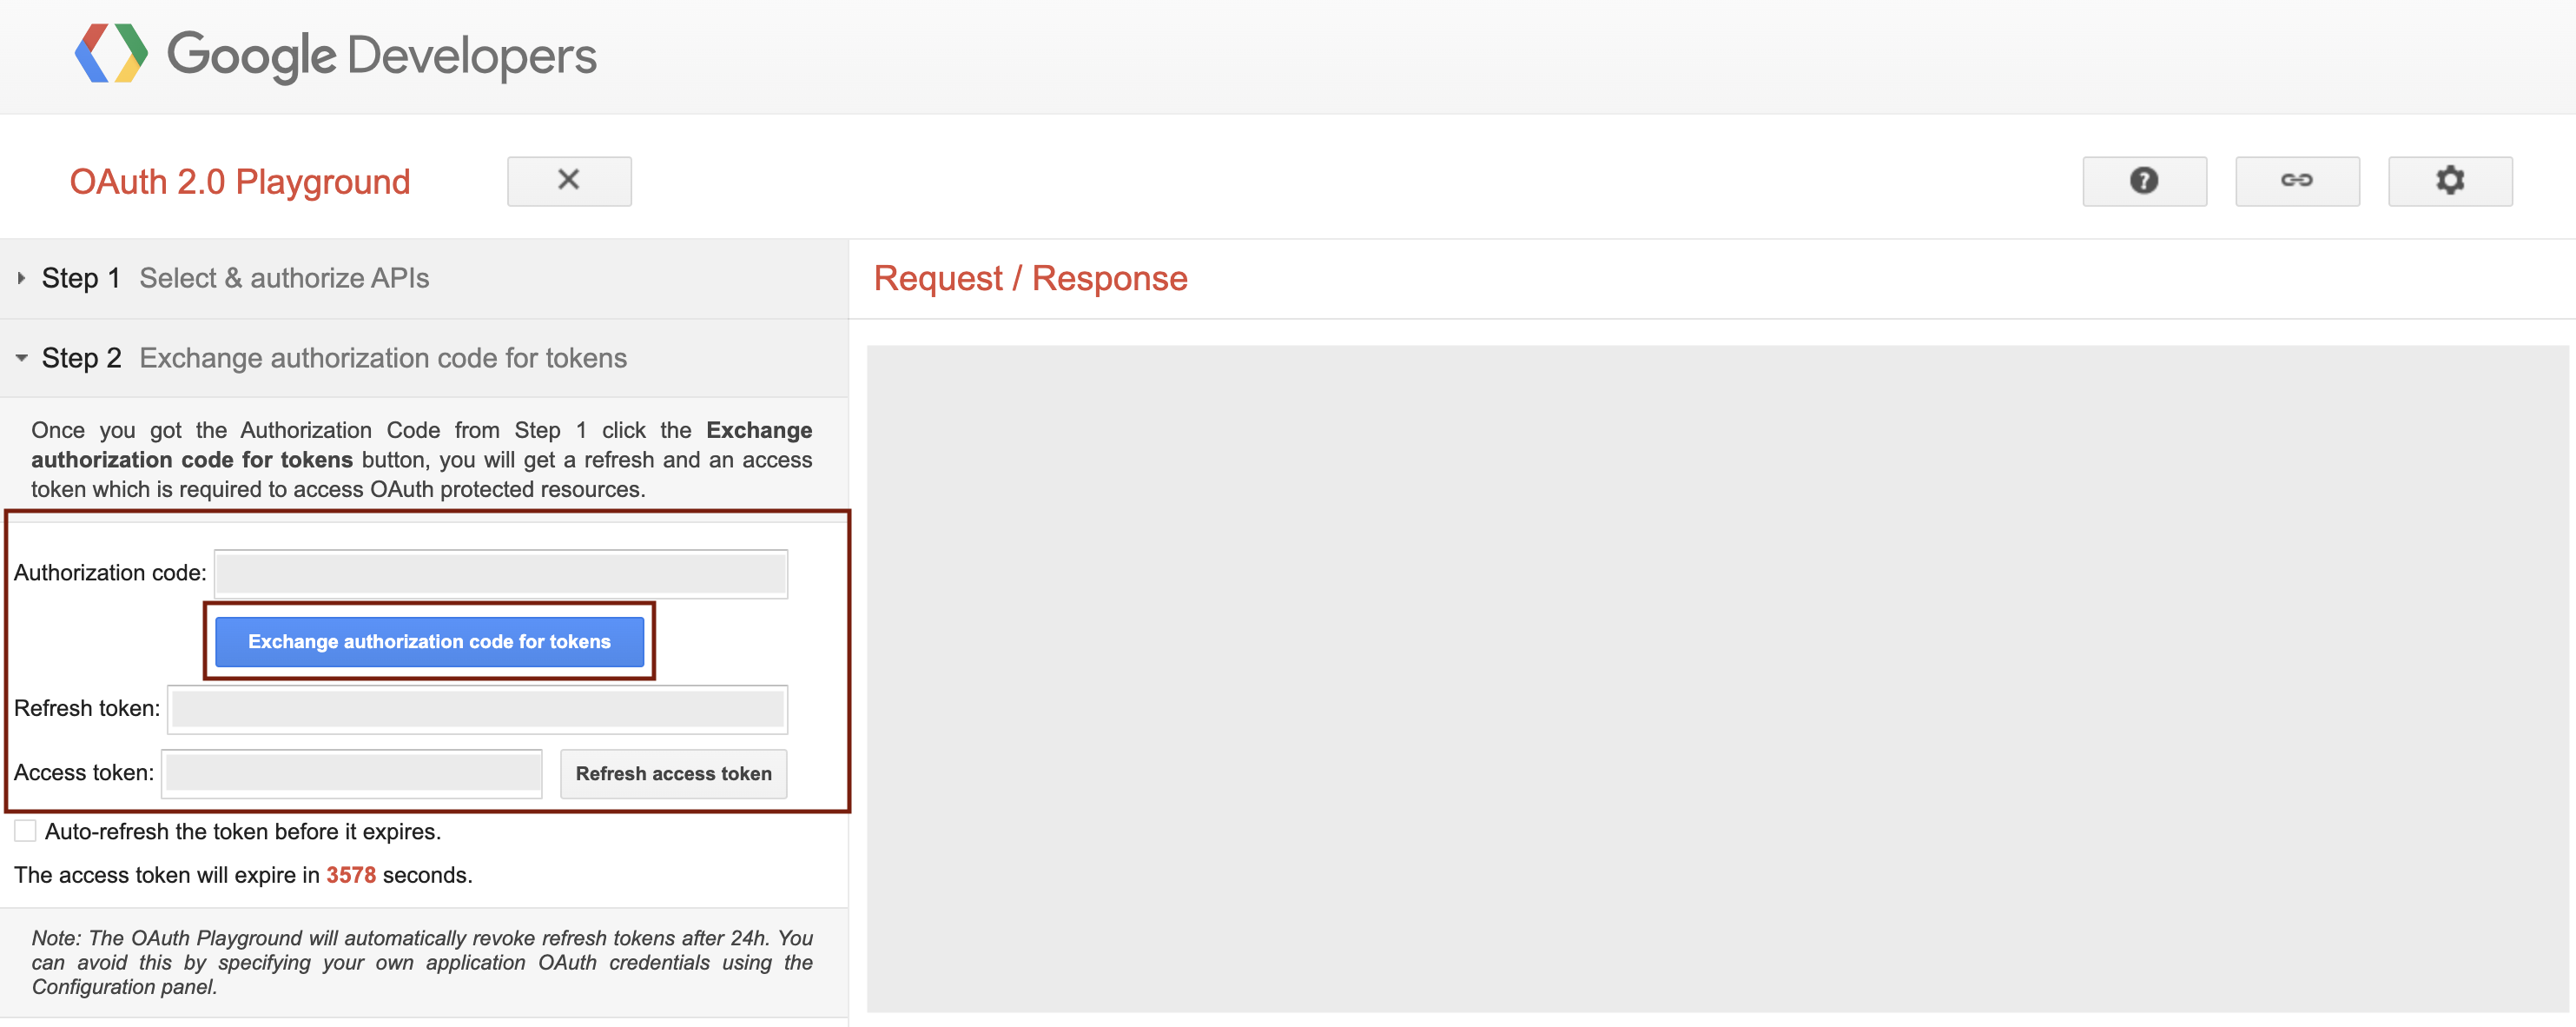
- After authorizing the selected scopes, you will receive an Authorization Code in Step 1. Click the Exchange authorization code for tokensbutton. You will then receive:
- a Refresh Token (used to generate new access tokens)
- an Access Token (used for authenticated API requests)
Grabbing Start Date
This parameter defines the starting date for data fetching from the network’s API.
- Format:
YYYY-MM-DD(e.g.,2025-12-01)
Is Enabled
Enable this option to start collecting data immediately. If left unchecked, the configuration is saved but inactive.

Saving the Configuration
Once all required fields are filled in, click Save to complete the setup. The enabled grabber will then begin collecting data from HyprMX according to the configured schedule.
By default, each grabber is set to load data for one day upon creation.
If you need to collect data for a longer period (e.g., for initial setup or data recovery), please contact us. We can manually adjust this value for you.