'%3e%3cpath%20d='M150.127%20195.325C233.04%20195.325%20300.255%20168.696%20300.255%20135.848C300.255%20103%20233.04%2076.3709%20150.127%2076.3709C67.2143%2076.3709%200%20103%200%20135.848C0%20168.696%2067.2143%20195.325%20150.127%20195.325Z'%20fill='white'/%3e%3cpath%20d='M231.093%20118.256L150.117%20-0.000183105L69.1527%20118.256C68.1365%20119.748%2067.5967%20121.294%2067.5967%20122.871C67.5967%20136.017%20104.538%20146.666%20150.117%20146.666C195.697%20146.666%20232.638%20136.007%20232.638%20122.871C232.638%20121.294%20232.098%20119.748%20231.082%20118.256H231.093Z'%20fill='%2301A9F2'/%3e%3cpath%20d='M150.106%20356.844L98.7265%20281.5L62.3035%20311.117L25.4253%20257.017L50.787%20239.721L68.8556%20266.226L105.279%20236.62L150.106%20302.363L194.934%20236.62L231.357%20266.226L270.045%20209.48L295.407%20226.776L237.898%20311.117L201.475%20281.5L150.106%20356.844Z'%20fill='white'/%3e%3cpath%20d='M592.168%20165.22V237.908H561.482V171.825C561.482%20153.884%20551.807%20143.034%20535.051%20143.034C516.644%20143.034%20505.318%20156.011%20505.318%20175.604V237.908H474.875V171.349C474.875%20153.407%20464.968%20142.791%20448.445%20142.791C429.804%20142.791%20418.711%20156.011%20418.711%20176.07V237.908H388.025V118.964H418.711V134.301C426.502%20122.033%20440.421%20115.418%20458.13%20115.418C477.014%20115.418%20490.7%20122.975%20498.247%20135.953C506.747%20123.208%20521.608%20115.418%20540.725%20115.418C572.819%20115.418%20592.179%20135.476%20592.179%20165.22H592.168Z'%20fill='white'/%3e%3cpath%20d='M899.48%2080.2534C899.48%2068.2182%20909.388%2059.4856%20920.248%2059.4856C931.574%2059.4856%20941.248%2068.9274%20941.248%2080.2534C941.248%2091.3465%20931.574%20100.788%20920.248%20100.788C909.155%20100.788%20899.48%2092.0557%20899.48%2080.2534Z'%20fill='white'/%3e%3cpath%20d='M935.832%20118.955H905.146V237.899H935.832V118.955Z'%20fill='white'/%3e%3cpath%20d='M1140.2%20118.955H1173L1099.84%20288.644H1067.5L1090.6%20237.666L1043.42%20118.955H1076.45L1107.37%20204.81L1140.18%20118.955H1140.2Z'%20fill='white'/%3e%3cpath%20d='M883.182%20115.418H815.904C781.45%20115.418%20755.008%20137.837%20755.008%20171.825C755.008%20206.756%20778.846%20228.466%20815.904%20228.466C831.951%20228.699%20847.288%20231.059%20847.288%20246.64C847.288%20259.617%20835.962%20267.175%20817.555%20267.175C799.148%20267.175%20784.985%20254.664%20781.915%20239.326L756.66%20246.873C763.741%20274.722%20787.346%20292.188%20817.312%20292.188C856.963%20292.188%20876.313%20272.838%20876.313%20249.233C876.313%20234.605%20869.231%20223.036%20855.545%20215.721C868.522%20206.047%20877.022%20190.709%20877.022%20171.825C877.022%20160.986%20871.412%20149.3%20863.145%20140.674H883.182V115.418ZM815.904%20203.919C797.264%20203.919%20782.392%20192.117%20782.392%20171.825C782.392%20151.534%20799.148%20139.964%20815.904%20139.964C832.66%20139.964%20849.416%20151.29%20849.416%20171.825C849.416%20188.814%20835.497%20203.919%20815.904%20203.919Z'%20fill='white'/%3e%3cpath%20d='M737.426%20237.906V118.962H708.158V136.088C698.685%20121.481%20682.796%20115.426%20668.983%20115.426C633.587%20115.426%20608.087%20143.509%20608.087%20179.148C608.087%20214.788%20633.1%20241.452%20668.03%20241.452C682.426%20241.452%20698.24%20235.08%20708.148%20220.917V237.906H737.415H737.426ZM673.471%20213.835C653.645%20213.835%20638.308%20199.207%20638.308%20178.429C638.308%20157.65%20653.889%20143.032%20673.704%20143.032C694.705%20143.032%20709.1%20160.021%20709.1%20178.429C709.1%20196.836%20694.472%20213.835%20673.46%20213.835H673.471Z'%20fill='white'/%3e%3cpath%20d='M1003.29%20111.085C1003.29%2098.5315%201011.17%2091.8842%201023.98%2091.8842C1028.9%2091.8842%201033.83%2092.6251%201037.77%2093.853L1042.2%2068.0043C1038.02%2066.7765%201027.43%2064.7971%201021.27%2064.7971C994.18%2064.7971%20972.607%2081.786%20972.607%20110.355V118.961H956.889V144.216H972.607V164.519V237.915H1003.29V144.216H1038.46V118.961H1003.29V111.096V111.085Z'%20fill='white'/%3e%3c/g%3e%3cdefs%3e%3cclipPath%20id='clip0_1_3'%3e%3crect%20width='1173'%20height='356.842'%20fill='white'/%3e%3c/clipPath%3e%3c/defs%3e%3c/svg%3e)

Importing In-App Products from Google Play via API
Overview
To effectively manage in-app monetization, subscriptions, and promotional campaigns for Android apps, it's essential to maintain an up-to-date list of all in-app products (SKUs) published in Google Play Console. These may include in-app products (one-time purchases) and subscriptions (recurring payments).
While it's possible to manually enter products into Magify, this quickly becomes inefficient when:
- The number of products is large
- Products are frequently updated
- Accuracy and time savings are important
To streamline the process, Magify supports automated product import using two Google Play Developer API methods:
- inappproducts.list — for in-app products
- monetization.subscriptions.list — for subscriptions
Key Benefits
- Full coverage of all active and inactive in-app products and subscriptions
- No manual entry — the entire product catalog is imported automatically
- Reduced workload for marketing, product, and configuration teams
Once imported, you can:
- Define reward parameters (Customs)
- Configure product usage context, visuals, and campaign logic
Before You Start: Complete Your Organization Address (One-Time Setup)
Before importing in-app products from Google Play or the App Store for the first time, you must complete your organization address once. This is required for correct validation of the JSON received from the store. If any mandatory field is missing, the import process will fail.
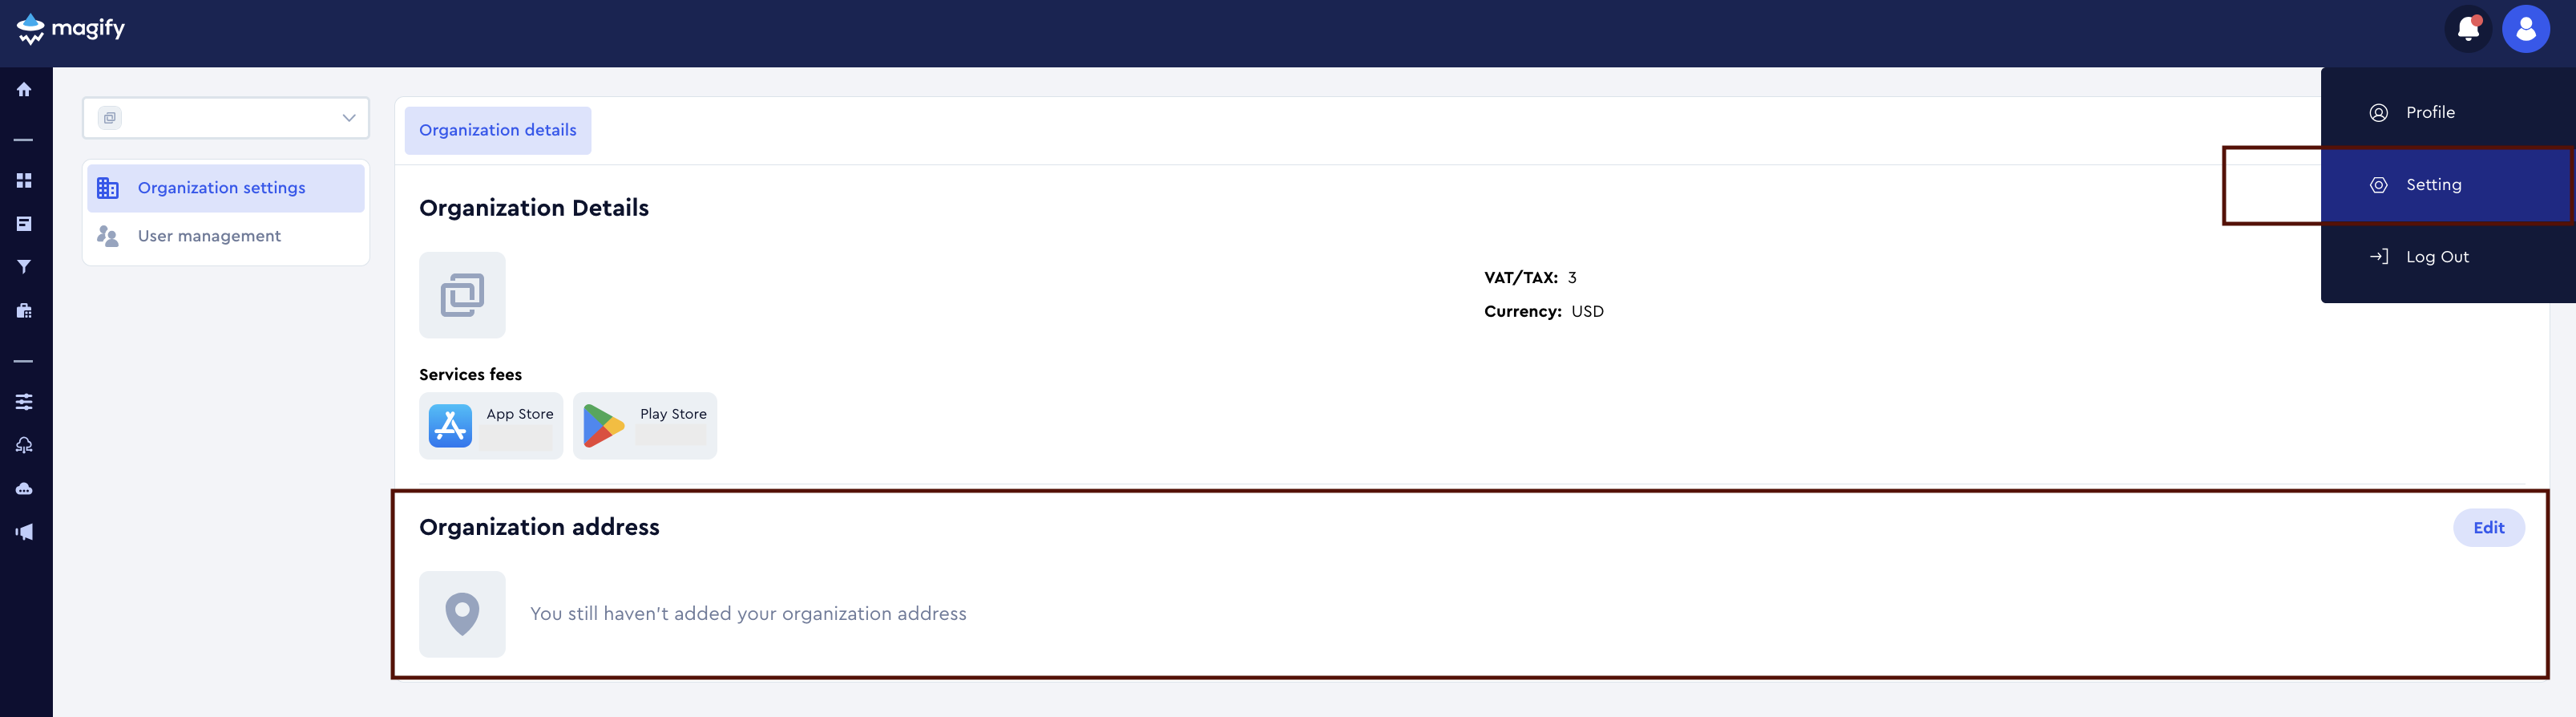
Step 1. Open Organization Settings
- In the top-right corner of the Magify dashboard, click the user menu icon.
- Select Setting.
- Go to Organization address.
- Click Edit.
Step 2. Fill in All Required Fields
Make sure to fill in all fields marked with a red asterisk (*), including:
- Street address
- Country
- City
- Zip or postal code
Optional fields may be filled in as needed.
Step 3. Save Your Changes
After completing all required fields, click Save. This step needs to be done only once. You do not need to repeat it before each import (unless you want to update your address later).
Requirements
Google Play Console Access
- You must have Admin access to Google Play Console
- Your app must already contain products under: Google Play Console > Your App > Monetize with Play > Products > In-app Products and Subscriptions
These products will be fetched via API.
Google Cloud Project Access
- A project in Google Cloud must be available
- You must have permissions to:
- Enable APIs
- Create and manage service accounts
- Generate authentication keys
App Bundle ID Must Be Correct
Important: Ensure that the correct Bundle ID (also known as package name) is specified for your Android app in Magify. The Google Play Developer API retrieves in-app products based on this identifier.
If the Bundle ID does not match the app registered in Google Play Console, product import will fail, and the list may be empty or return errors.
Magify also uses the Bundle ID to correctly associate imported products with in-app creatives, contexts, and campaign logic.
Setting Up the Google Cloud Project
- Go to Google Cloud Console.
- In the top navigation bar, either select an existing project or click New project.

- If creating a new project, enter a name and click Create.
- In the left-hand sidebar, navigate to APIs & Services > Enabled APIs & services.
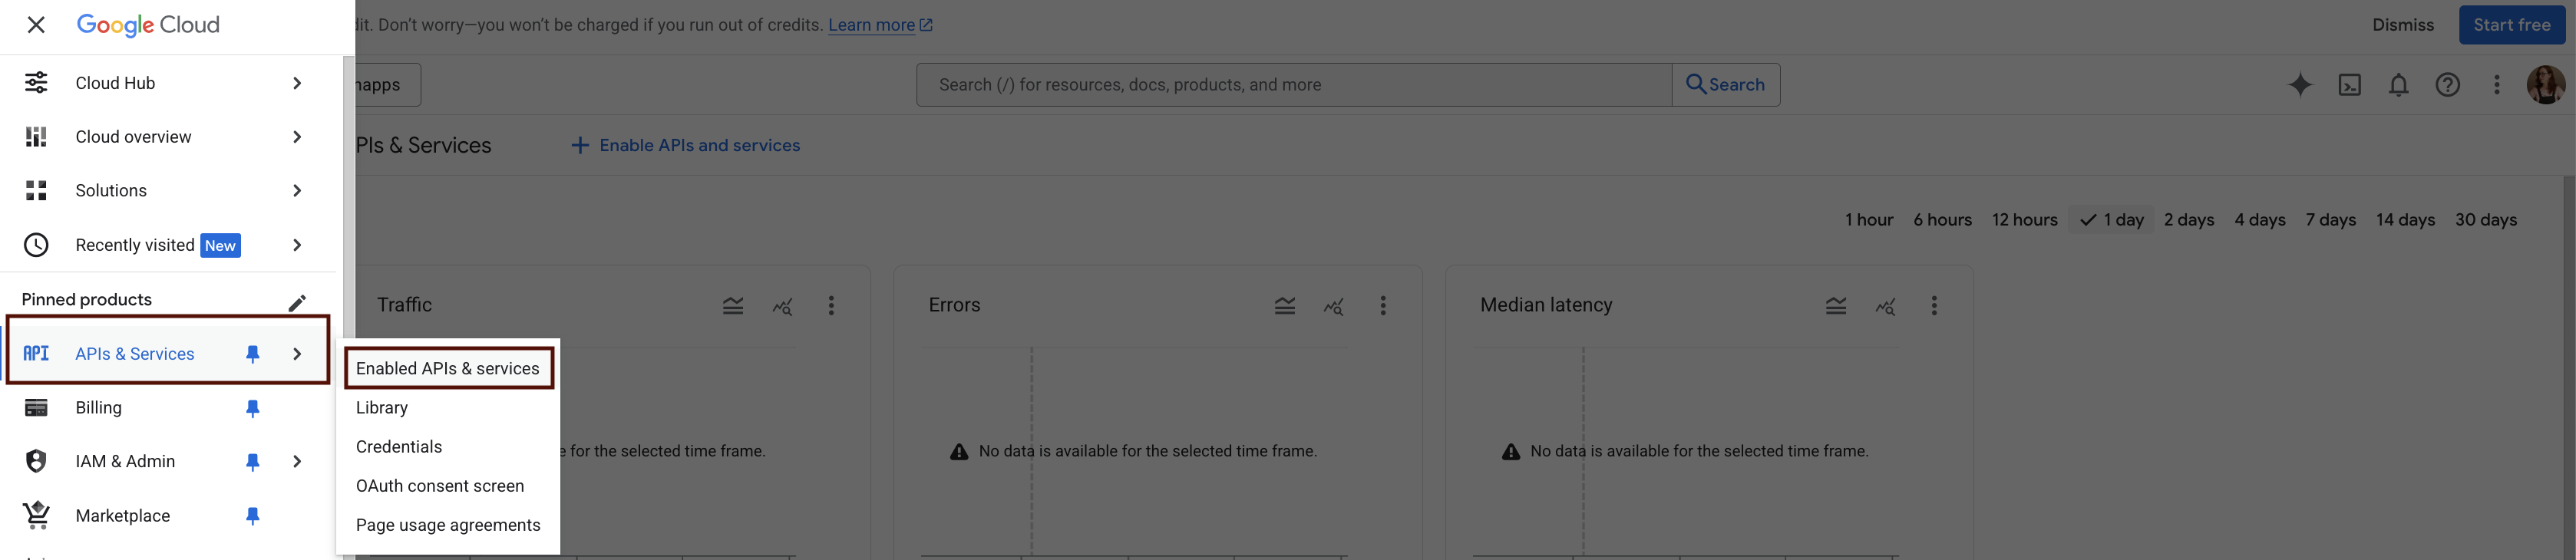
- In the top bar, click + Enable APIs and services.

- In the API Library, search for Google Play Android Developer API.
- Select the API and click Enable.

Creating a Service Account
- Go to IAM & Admin > Service Accounts
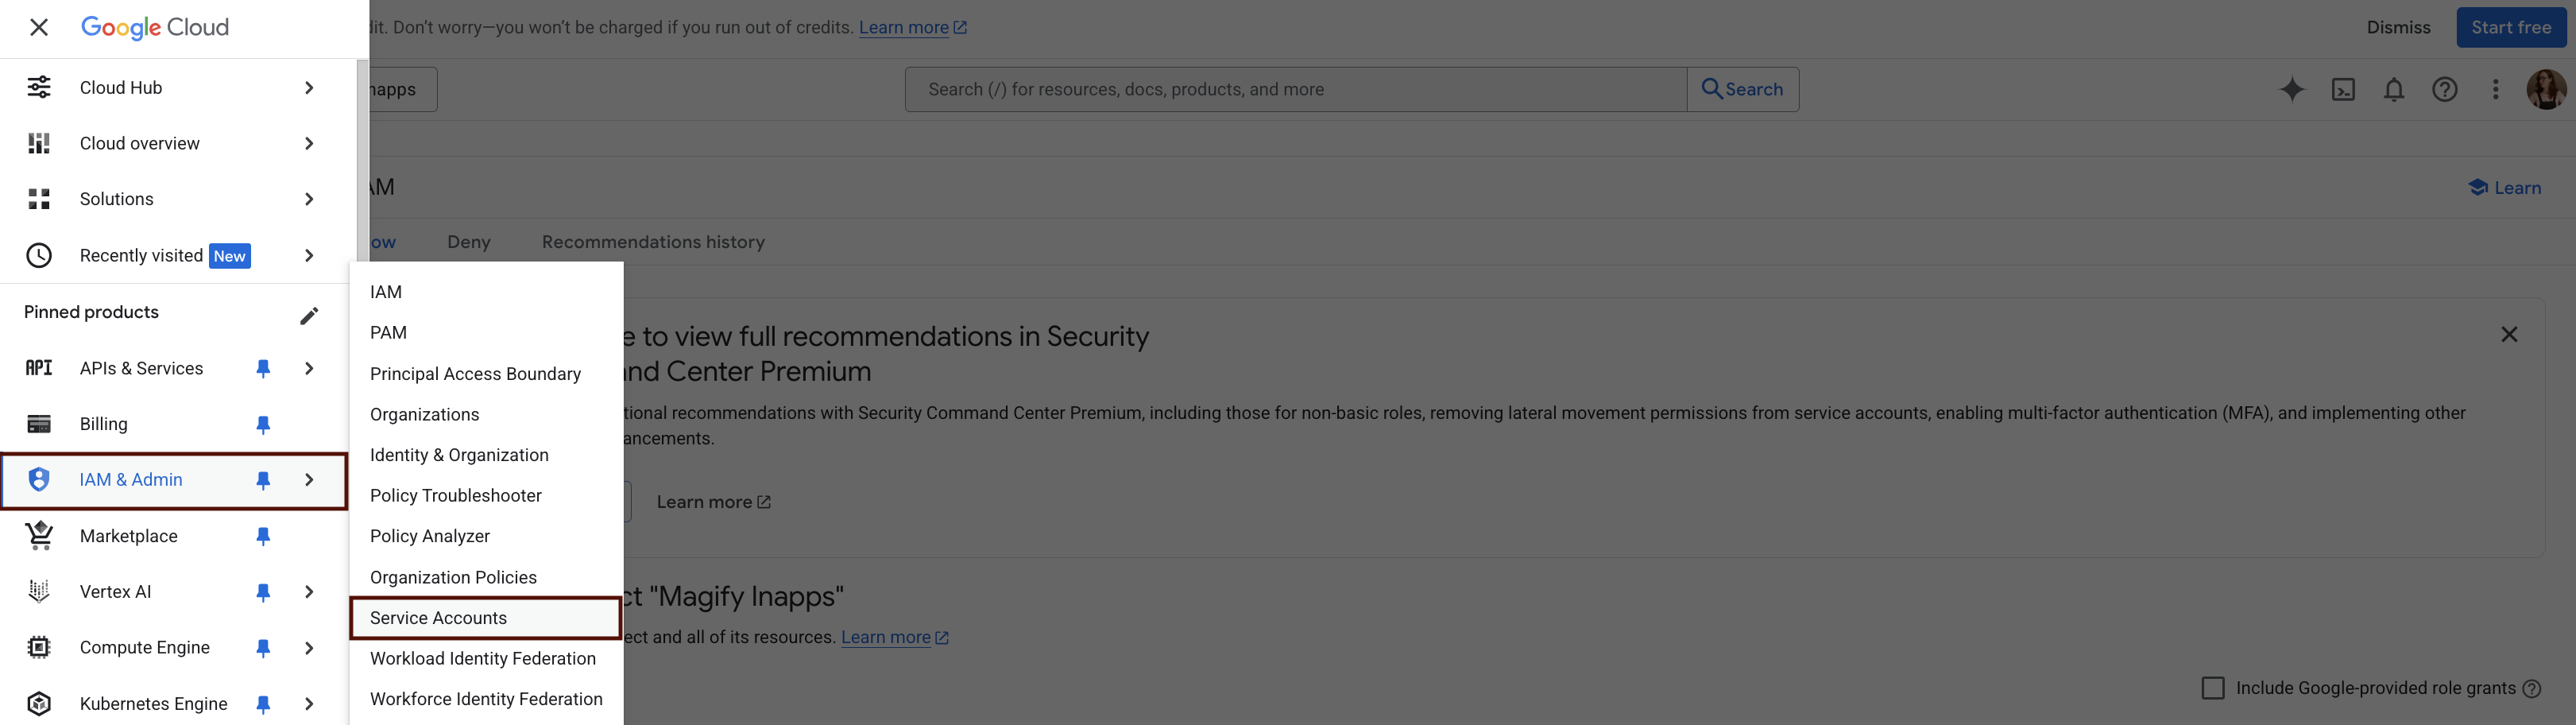
- Click Create Service Account.
- Enter a name (e.g.,
iap-sync-bot) and optional description. - Click Create and Continue.
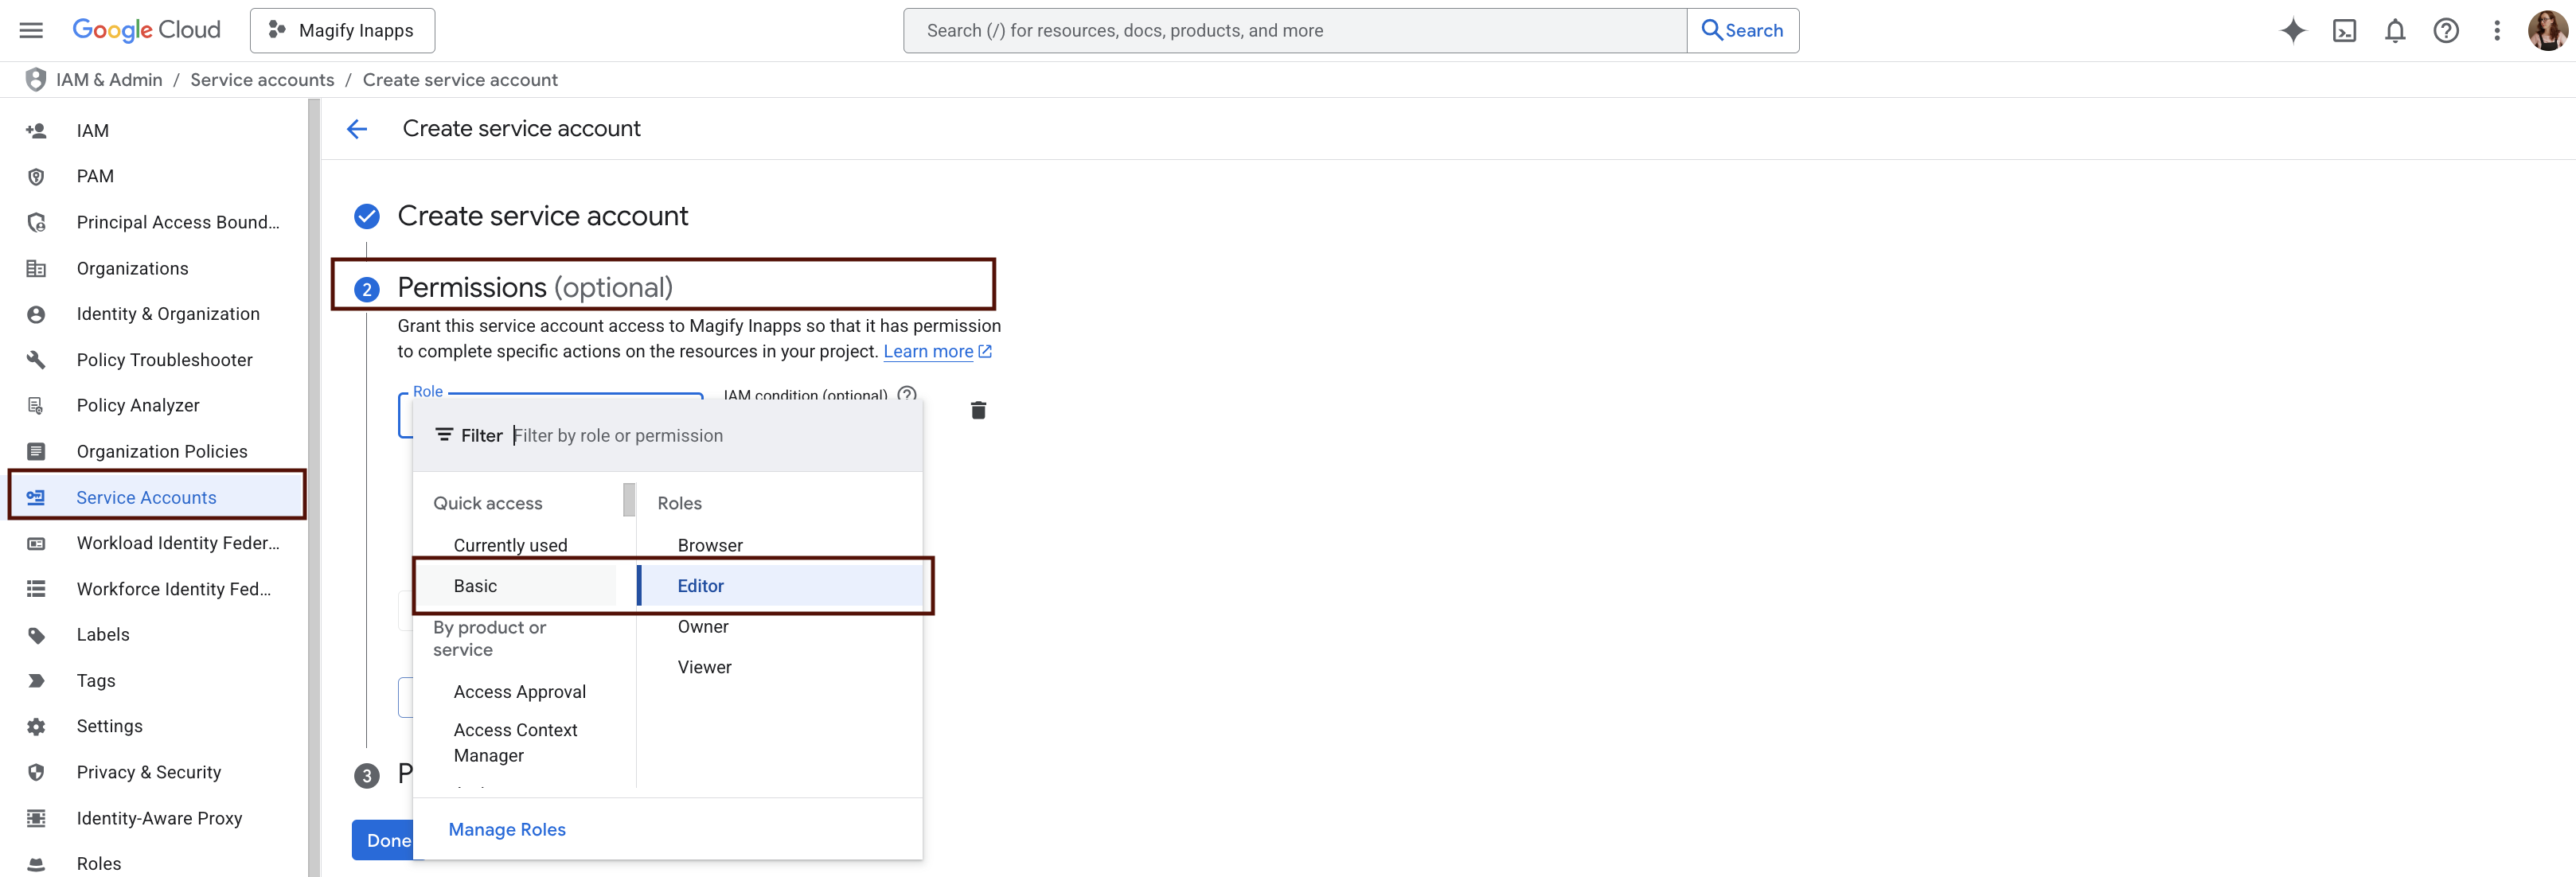
- Assign the Editor role.
- Click Done.
Generating the JSON Key
- Go to IAM & Admin > Service Accounts
- Find the service account you just created
- Click the menu icon (⋮) and select Manage Keys
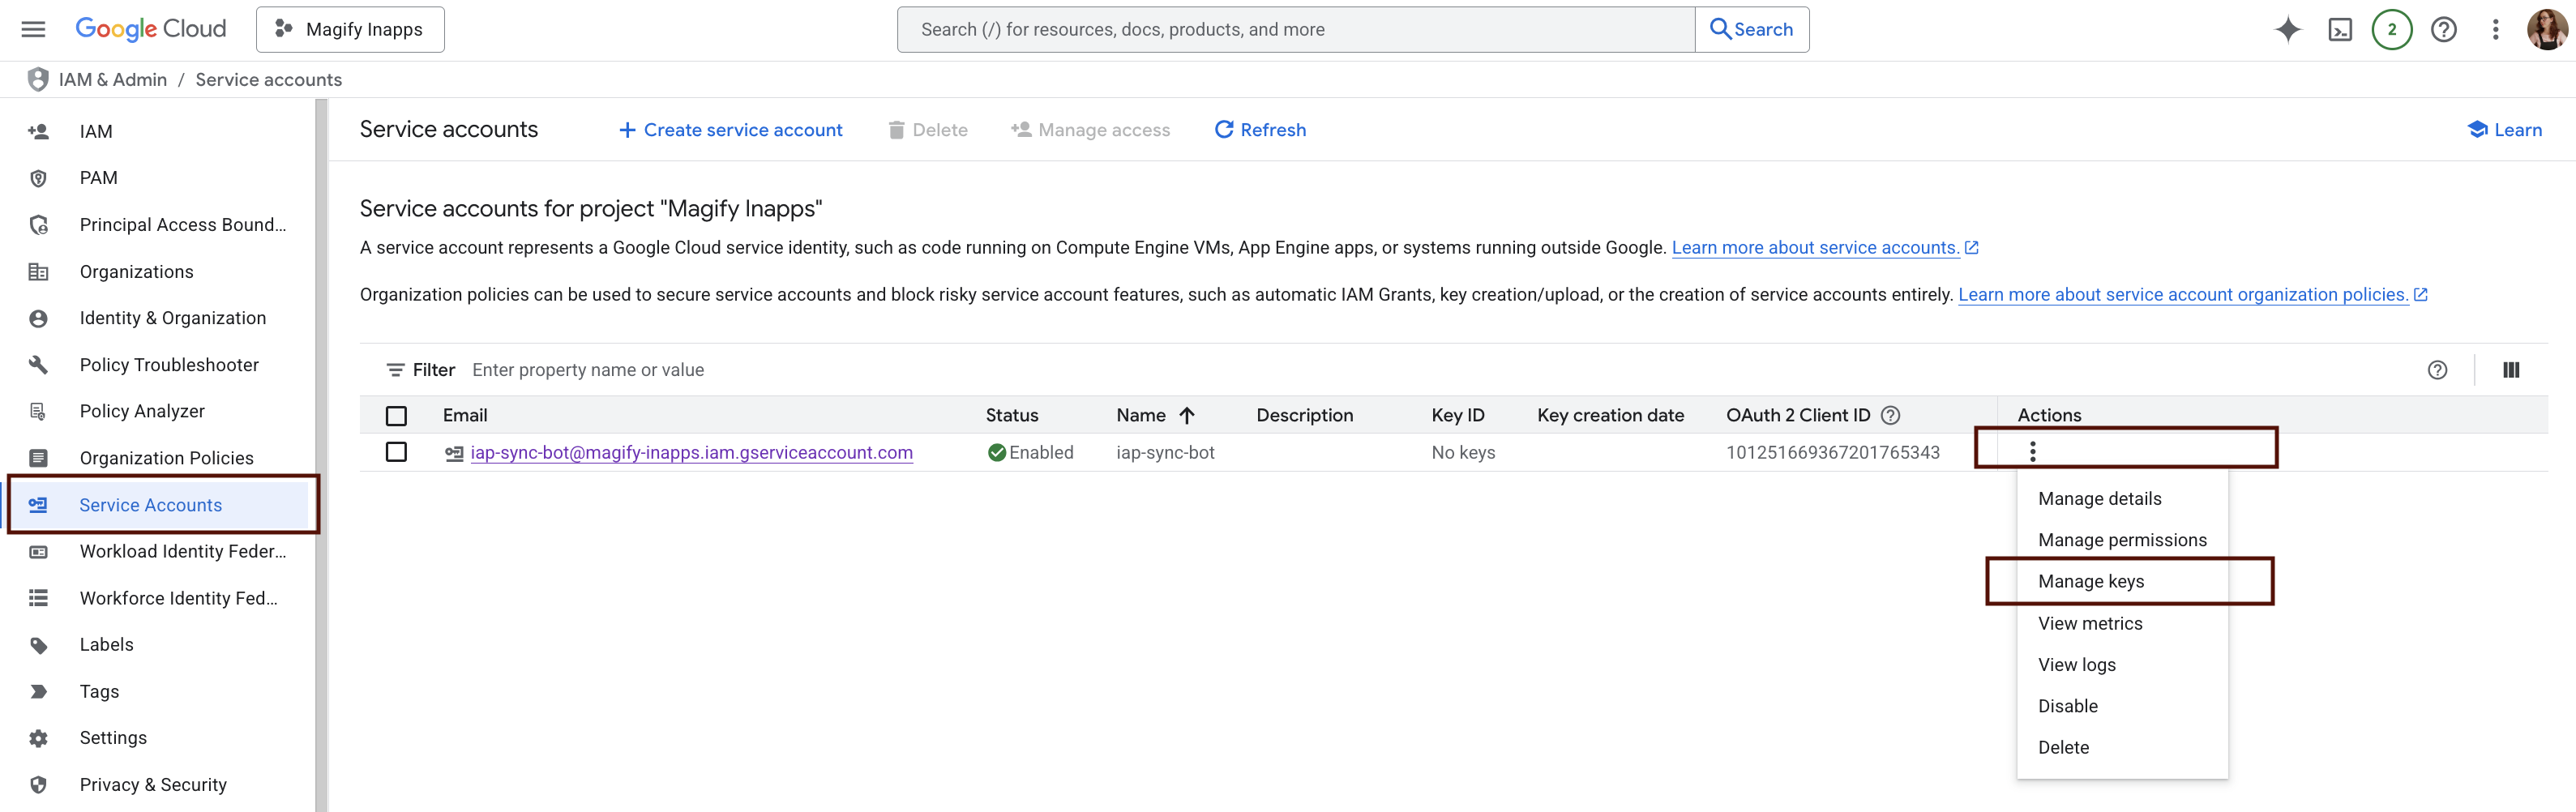
- Under the Keys tab, click Add key > Create new key.
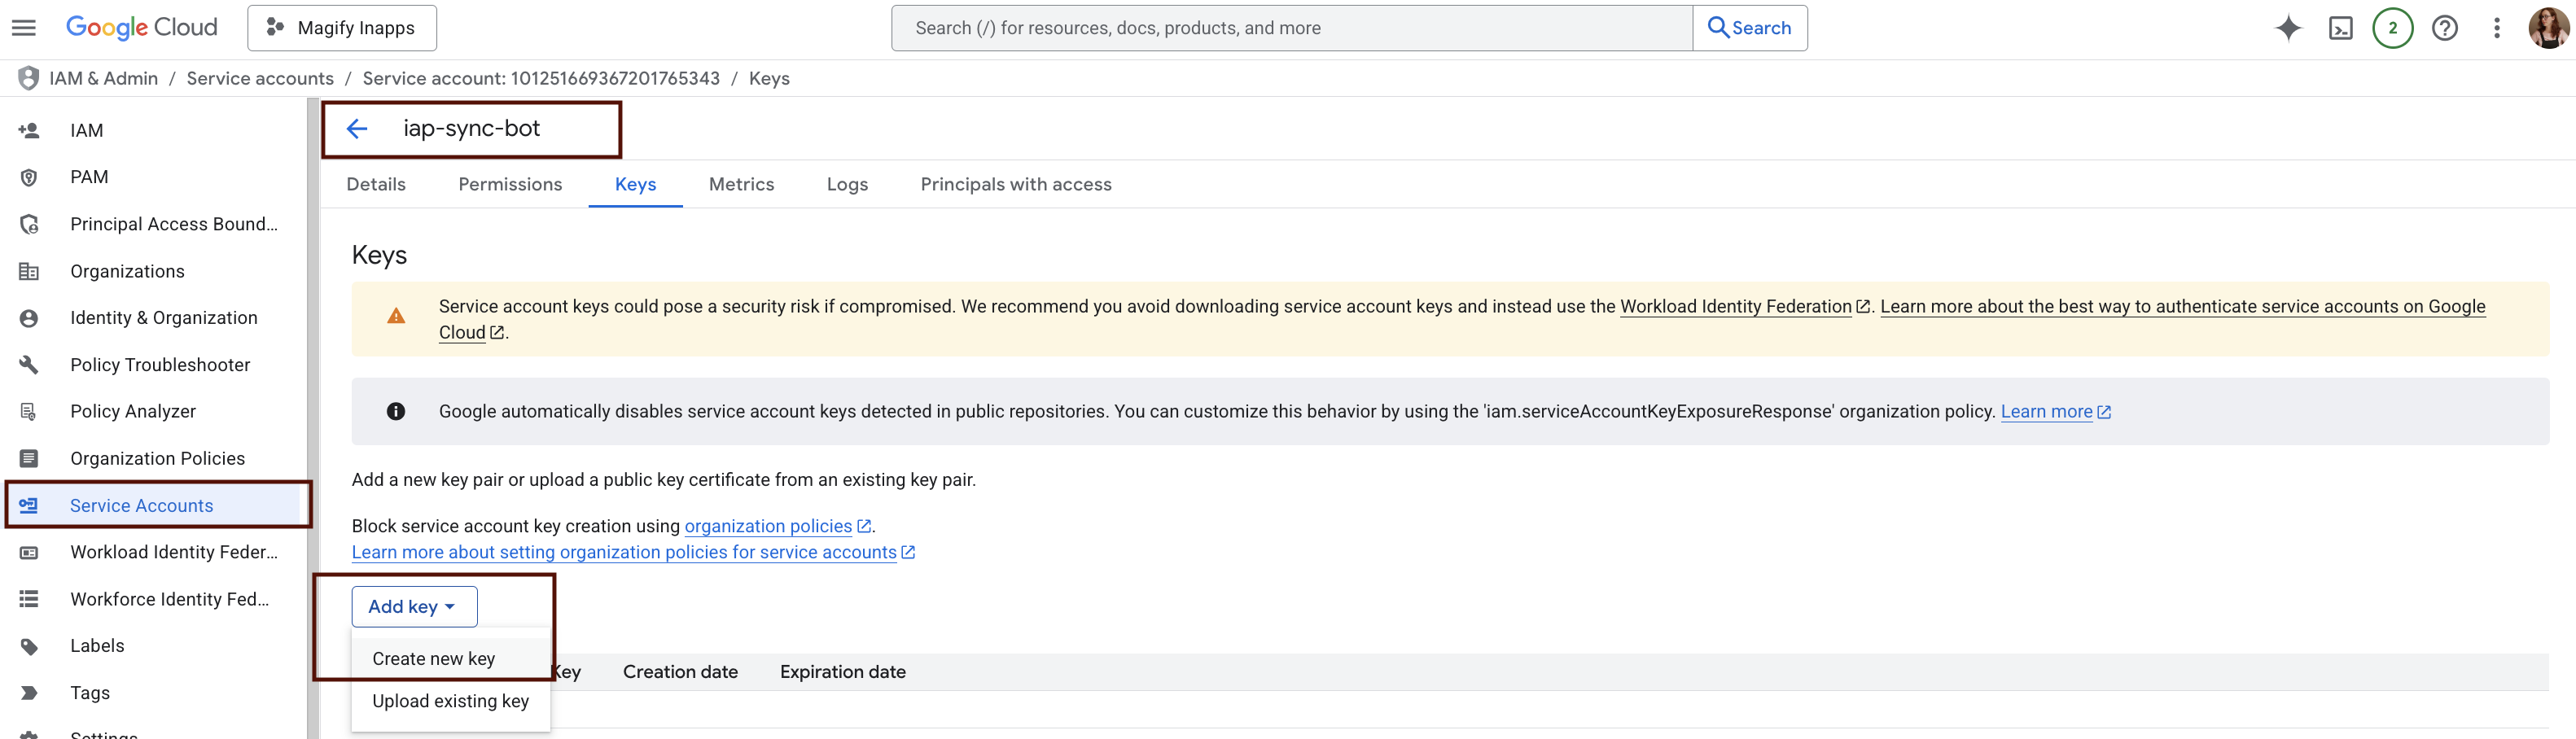
- Select JSON format
- Click Create — a
.jsonkey file will be downloaded
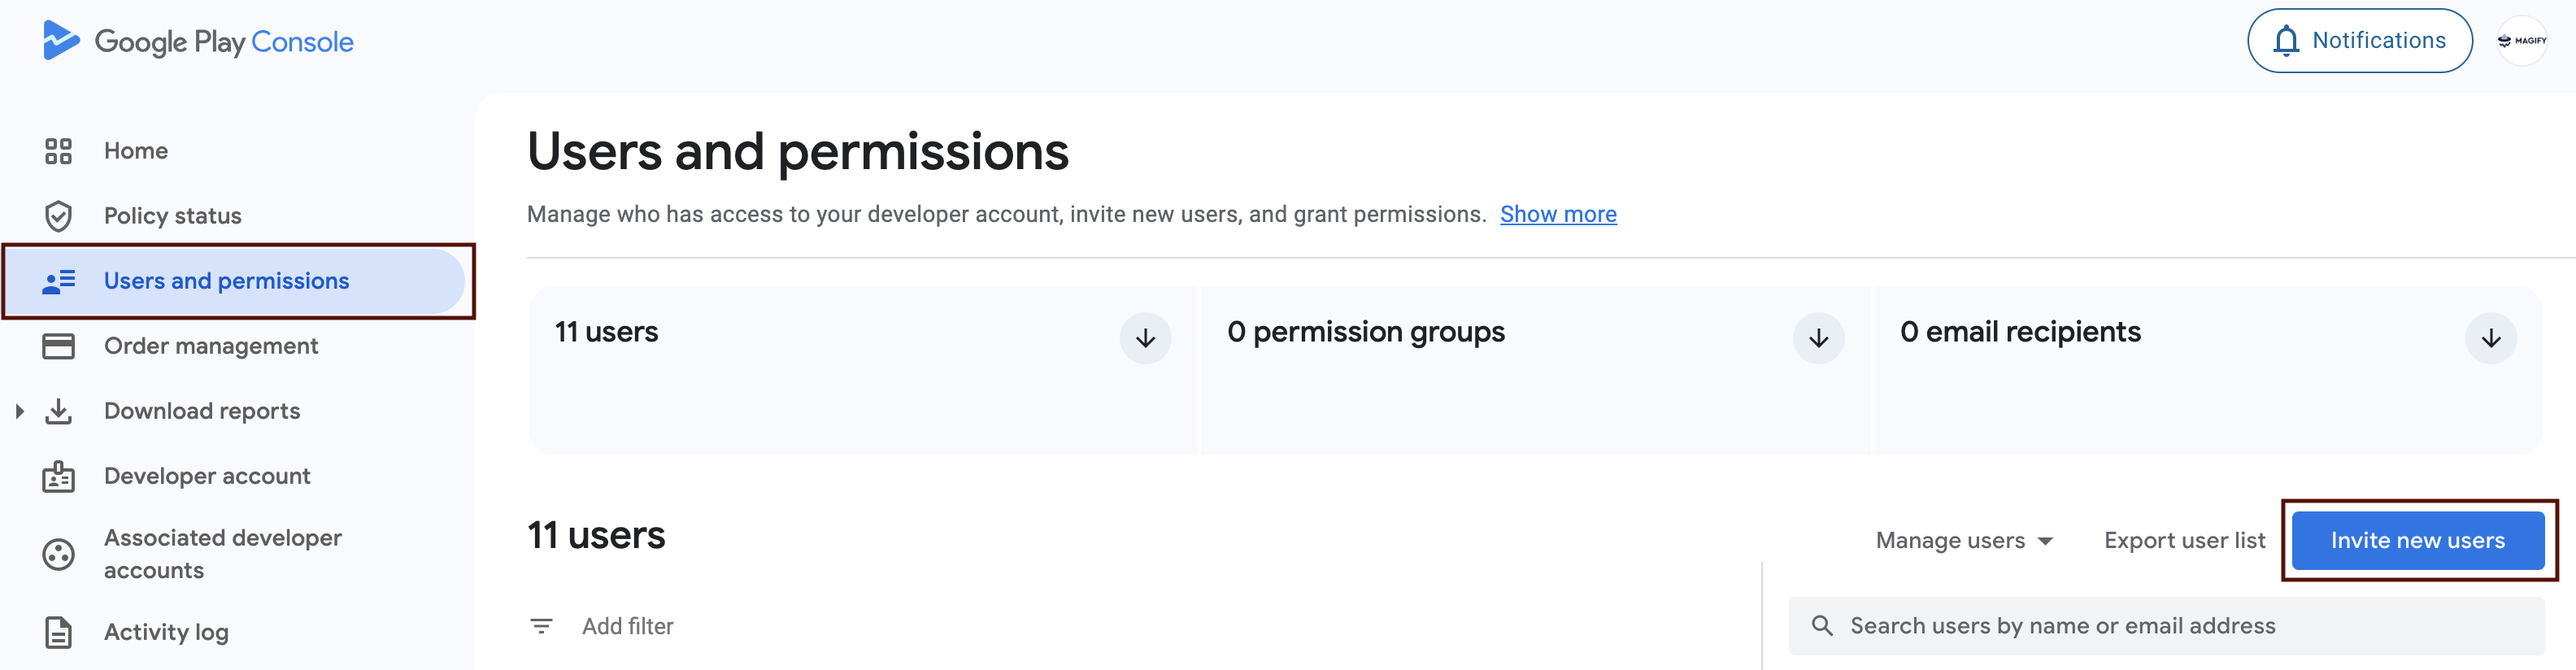
Granting Access in Google Play Console
After creating the service account and generating the key, you need to grant it access through the Google Play Console and assign the appropriate permissions.
- Go to Google Play Console and sign in with an account that has admin rights.
- Navigate to Users and Permissions.
- Click Invite new user.
- Paste the
client_emailfrom the.jsonfile.
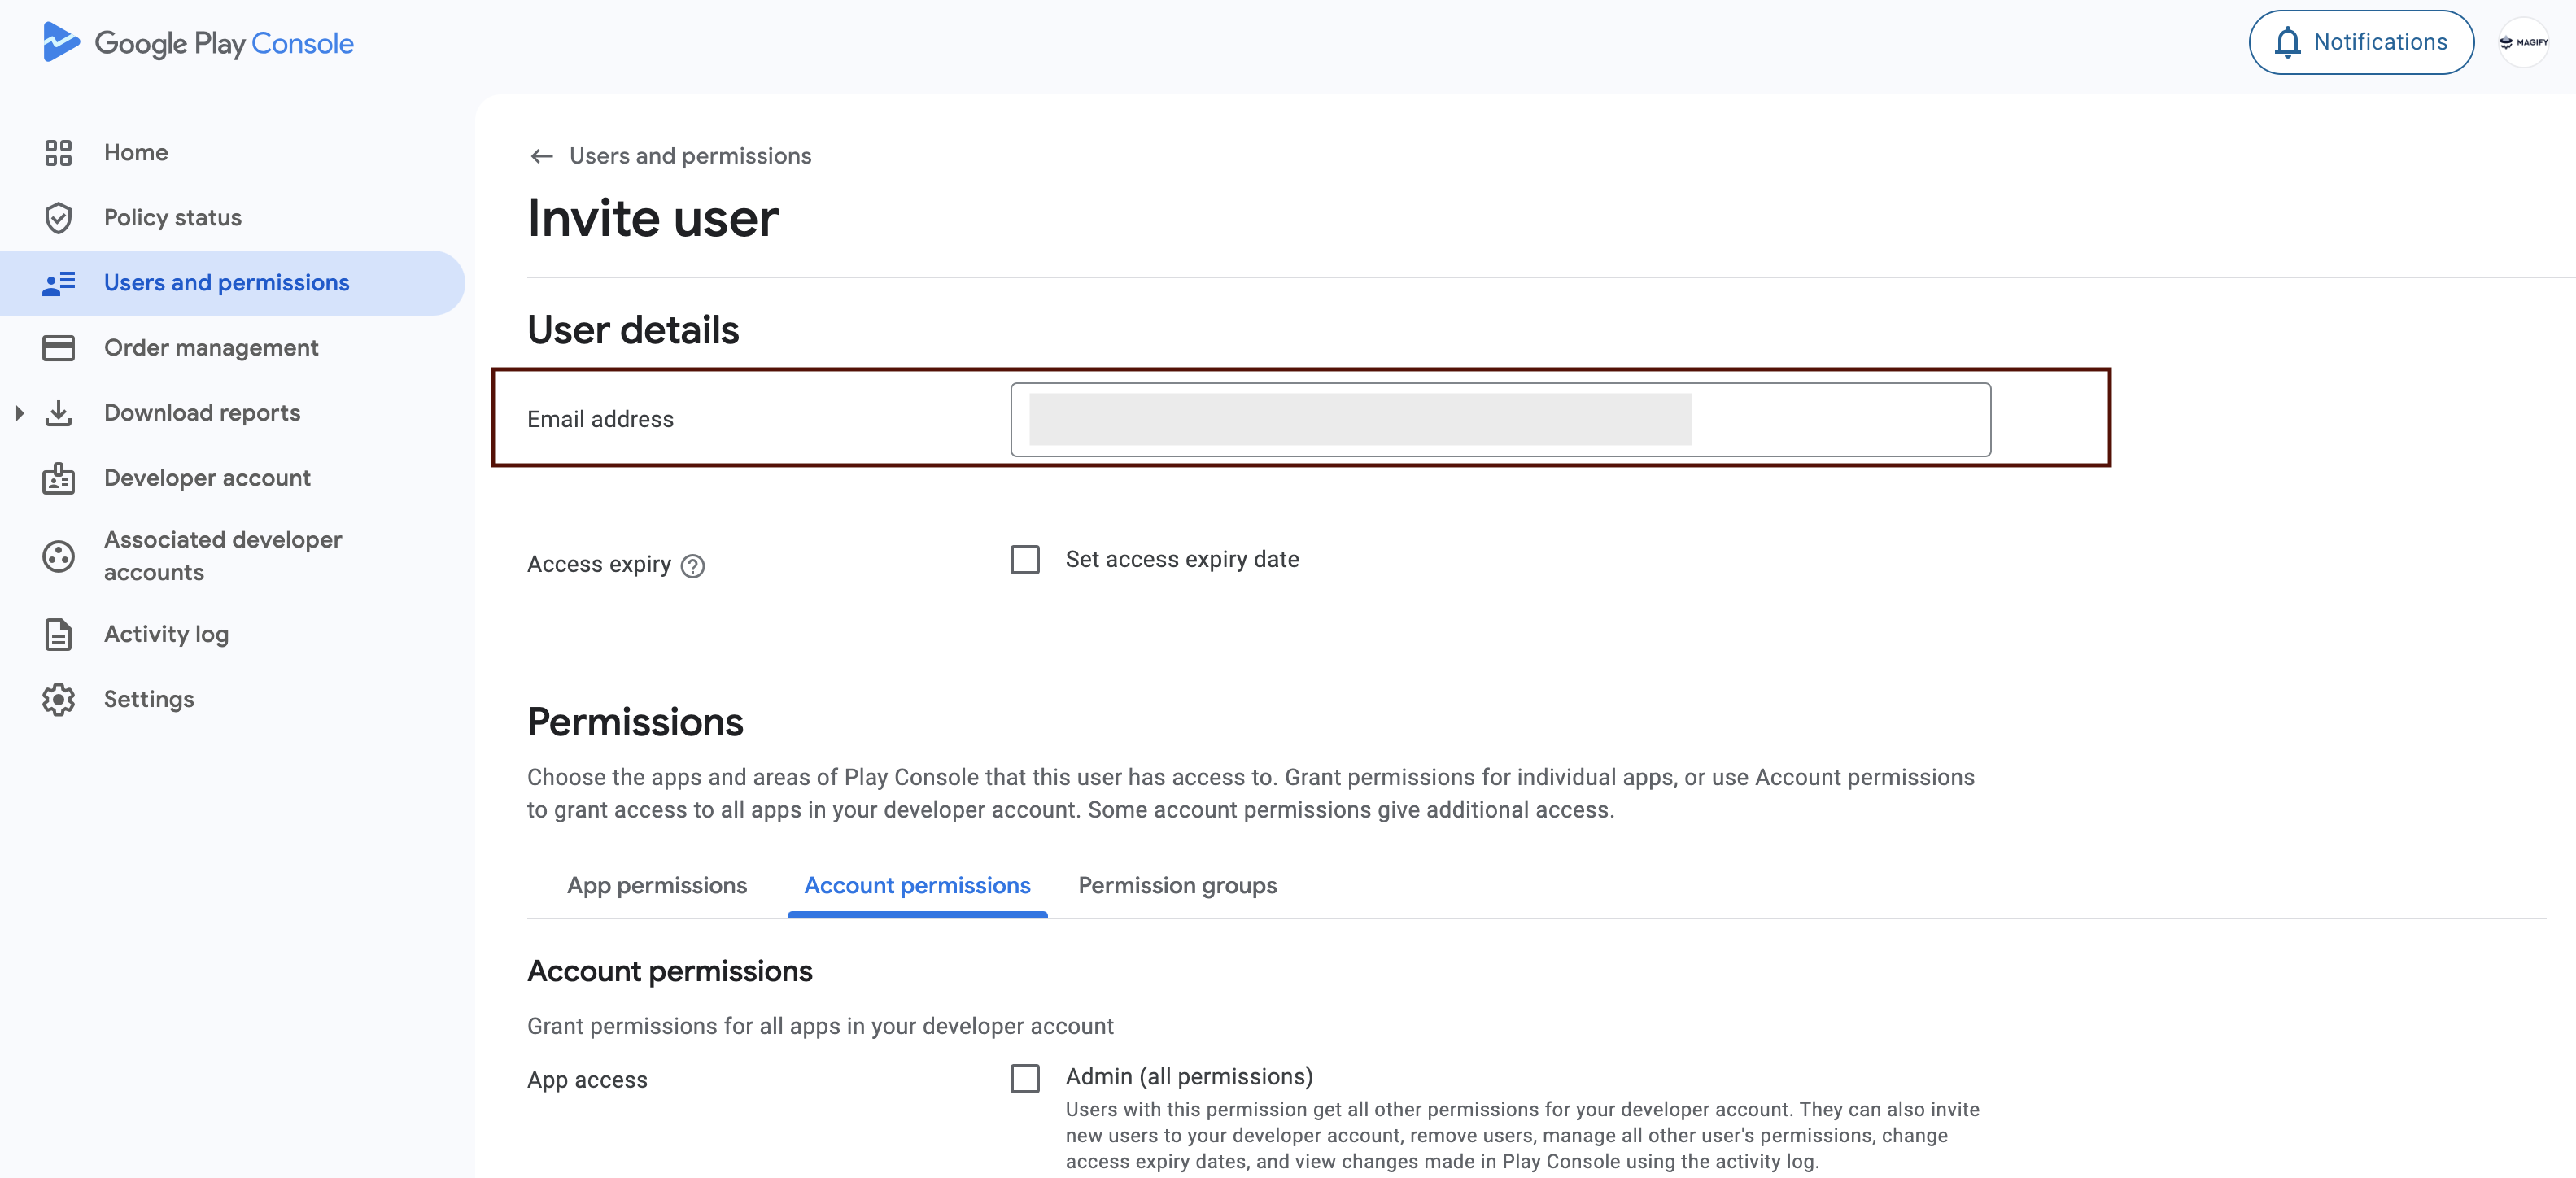
- Under Permissions, assign the Store Presence role.
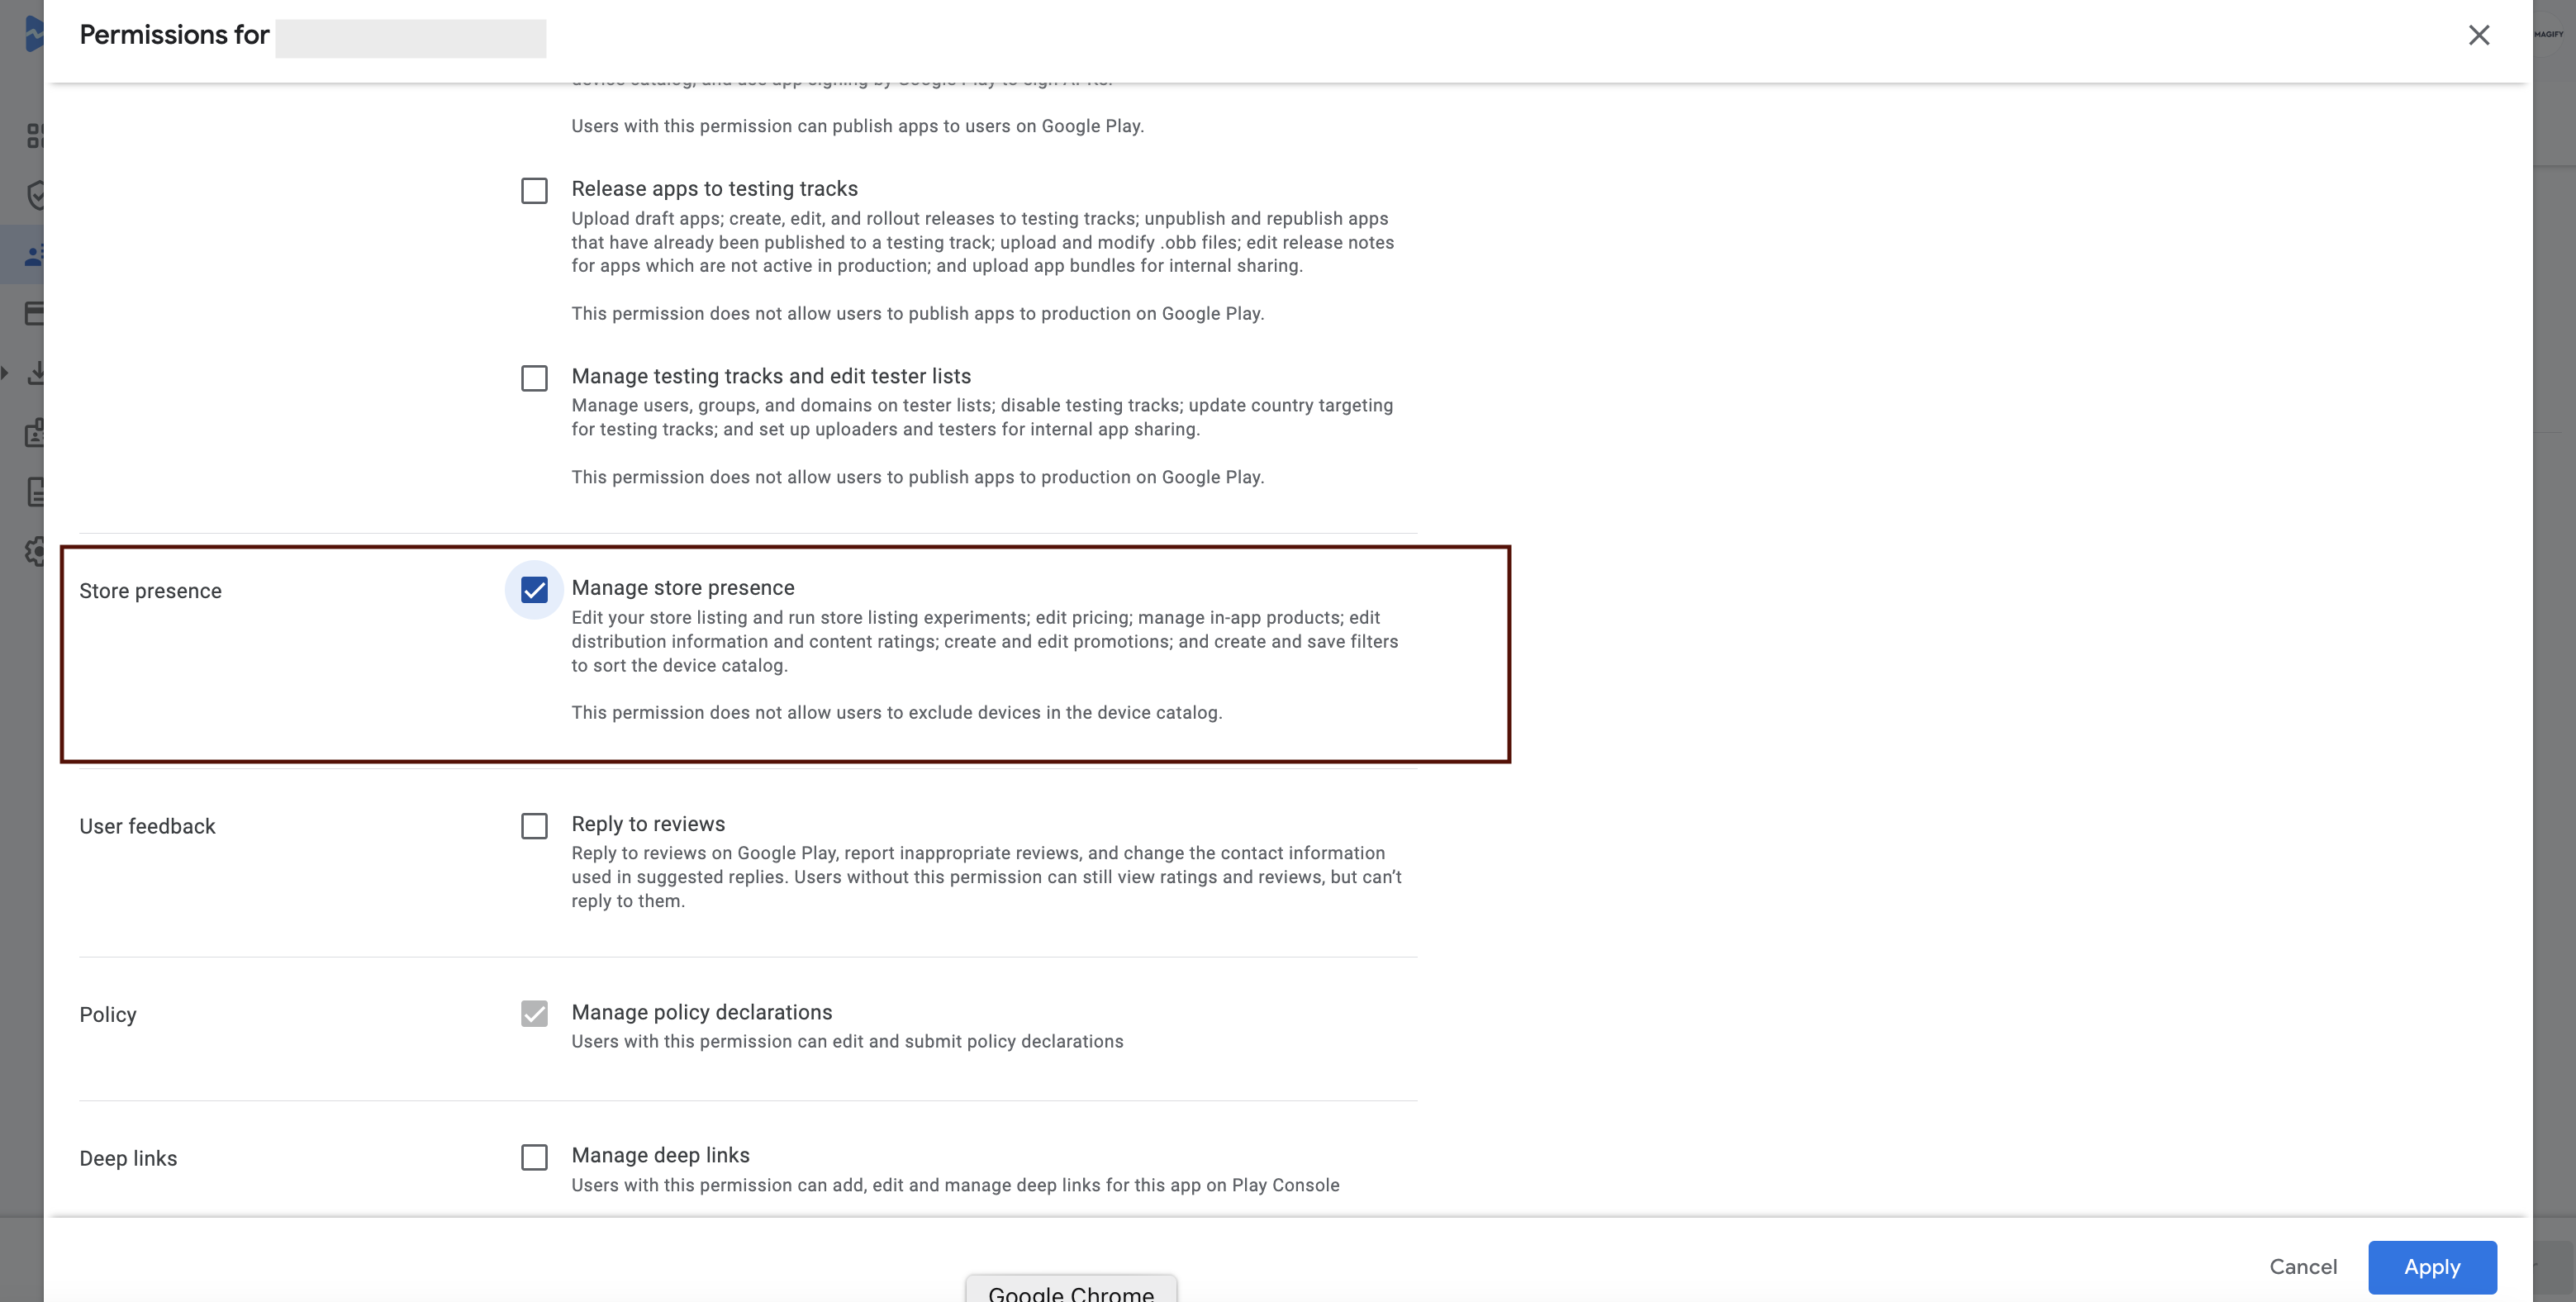
- In the App access section, select specific apps the service account should access, or grant access to all apps.
- Click Invite user to send the invitation and complete the setup.
How Magify Uses the API
Magify uses two official Google Play Developer API methods to import product data:
inappproducts.list— for in-app productsmonetization.subscriptions.list— for subscriptions
The system calls both endpoints every 300 seconds (5 minutes) to retrieve product data. Imported fields include:
productId— unique SKU, used as both key and product namedefaultPrice— price for the US region (always returned in USD)
Next Steps in Magify
Step 1: Define Customs
Path: Magify > Configuration > Remote Config > Native Elements
- In the list of imported products, fill in the Customs field — define what the user receives after purchase (e.g., 500 coins, resource pack)
- Each product must have a default context configured inside the Native Element
The default context is used when:
- The product is purchased via a promo code
- The user purchases from the store page and completes the transaction in-app
- The purchase process is interrupted or incomplete
Step 2: Set Up Product ID Context
Path: Magify > Configuration > Remote Config > Product ID Context > Create New
For each product:
- Select the Product ID — choose the appropriate product from the dropdown list.
- Choose the Type:
In-App Product ID Contextfor consumables and non-consumablesSubscription Product ID Contextfor subscriptions
- Define Customs — visuals, discounts, and reward logic
This configuration controls how the product is displayed to users, integrated into promotions, and interpreted by Magify's campaign logic.
Using Imported Products in Campaigns
Once products and contexts are configured in Remote Config, they’re available throughout the system — including in campaign setup and delivery.
You can now:
- Reference imported products when building offer logic
- Use contexts to control targeting and visuals
- Dynamically apply pricing, visuals, and reward parameters
This setup ensures your campaigns are always connected to accurate and validated product data from Google Play, with full automation and minimal manual effort.
Your integration is complete. Your product catalog is now ready to power scalable monetization and promotional campaigns across Magify.